hexo + next主题 自购域名+HTTPS超详细部署方法在CentOS(服务端)+Windows(客户端)
新手建议通篇看完再尝试,因为本渣也是0基础开始的搭建的,一开始连Linux命令行都不懂,经验非常通用
开通阿里云服务器【旧方法】
新方法请看下面第9章【迁移到腾讯云+CentOS Stream 9】
登录阿里云 https://cn.aliyun.com/ 并注册一个账号
购买一个【轻量应用服务器】
选择2C4G的服务器即可,那家有优惠就选那家,不一定是阿里云。系统我选择了CentOS 8.2,剩余都是全默认,没有加任何配置和服务。
PS:其实2C2G就够用,选小一点的,明年续费会便宜一点。
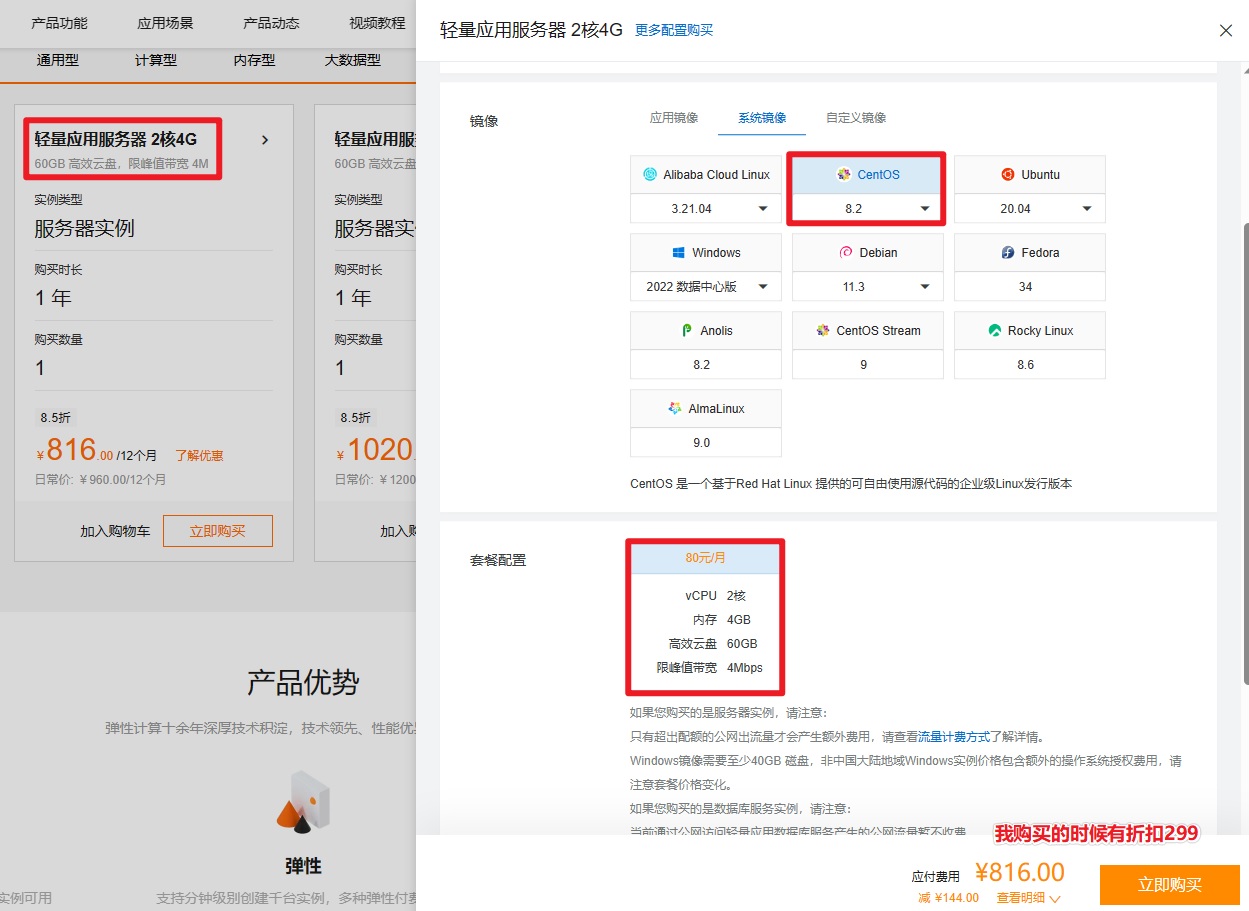
我选择的配置是2核CUP,内存4G,云盘(硬盘)60G,带宽(非流量)4Mbps(不是4MB/s)

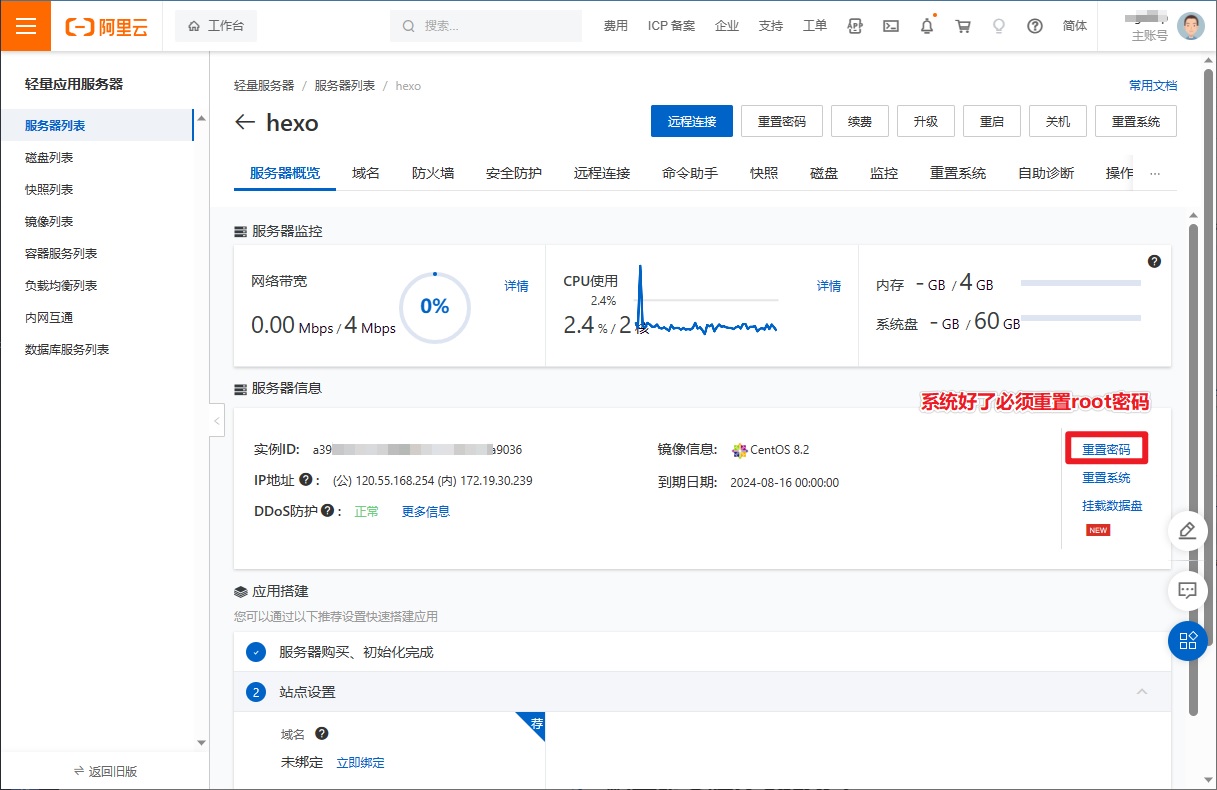
初始化云服务器
购买完成就重置root的密码,阿里云会重启机器。请记住root的密码,后面用ssh登录做运维的时候使用。
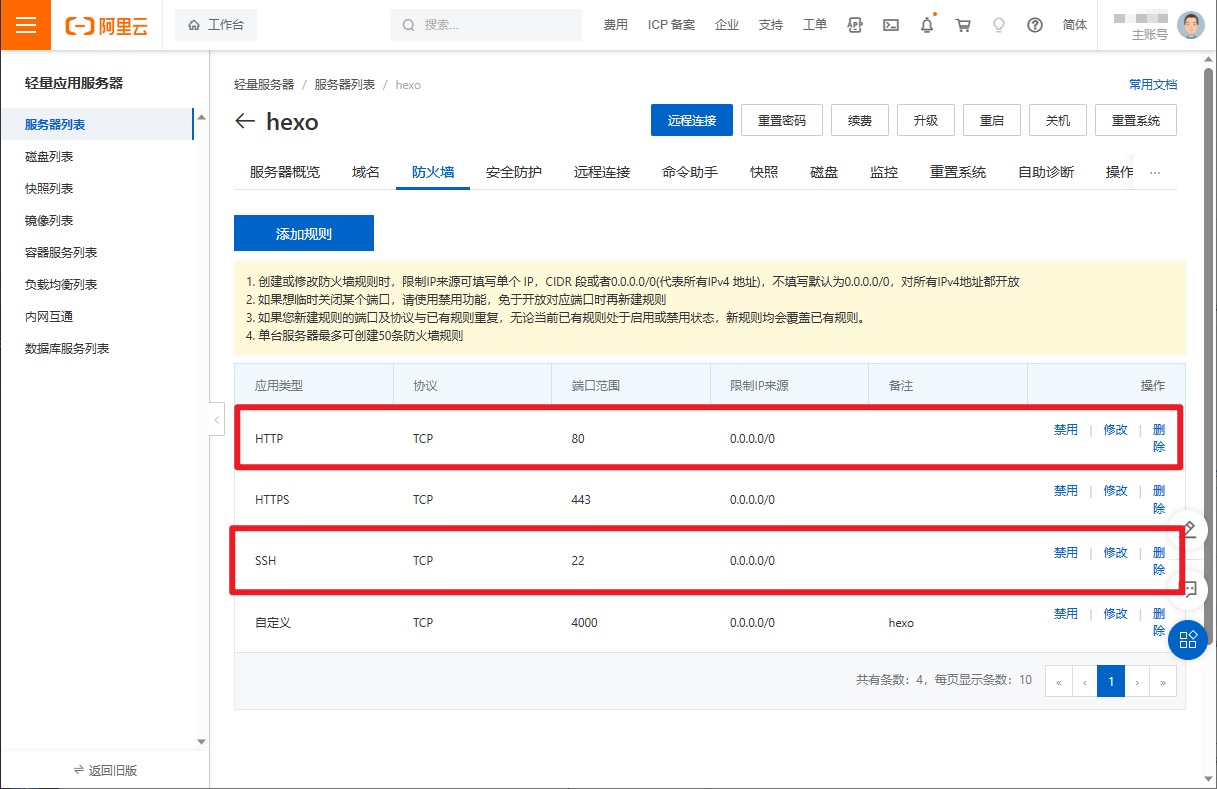
在防火墙必须开启80和22端口。
- 80是访问博客用的;
- 22是远程用xshell和xftp控制电脑的;
- 后续上了证书还需要开443端口。
配置云服务器
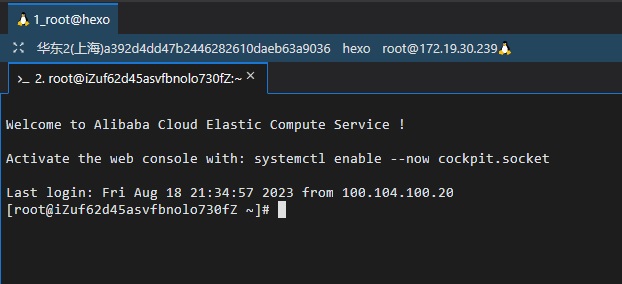
命令行可以连xshell来操作,也可以用阿里云自带的网页形式workbench root
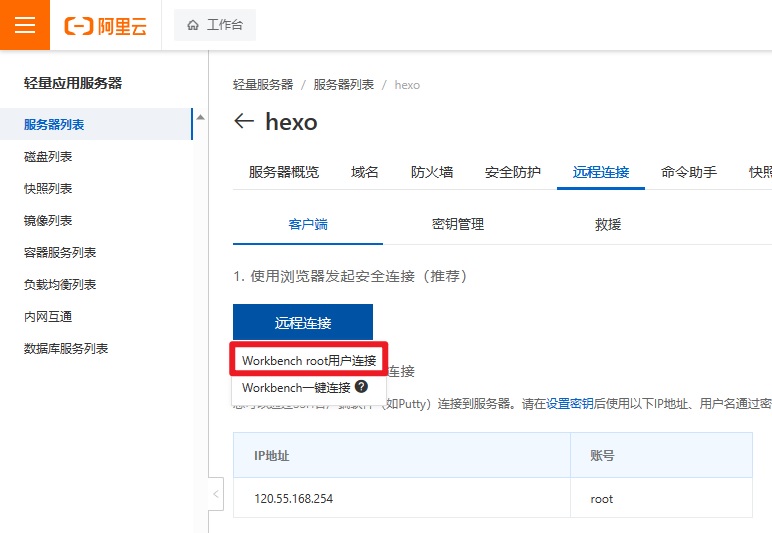
网页形式workbench root连上了
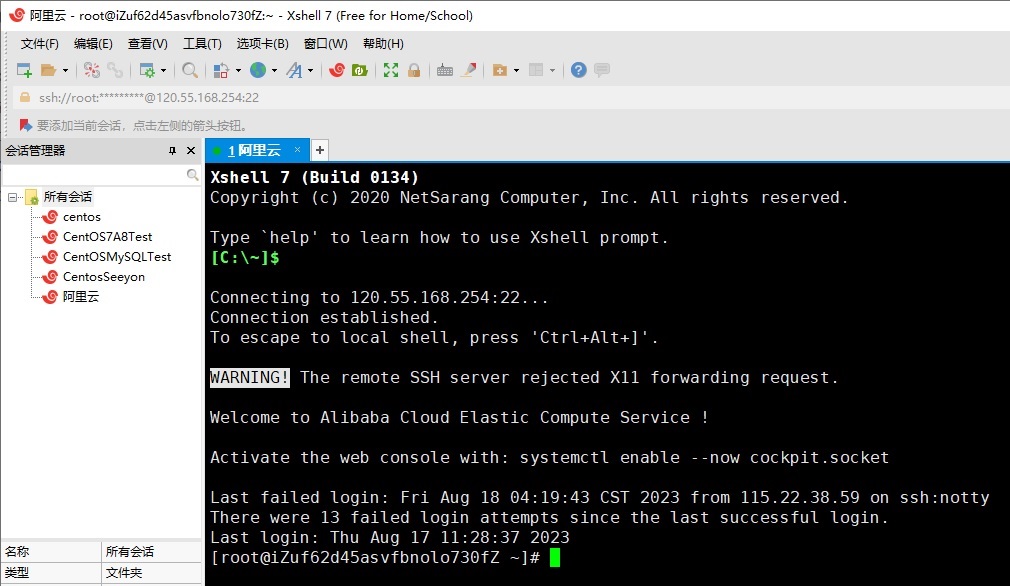
用xshell连上了,个人是可以免费激活xshell的,只需要注册一下
使用命令行对系统做一个简单的检查
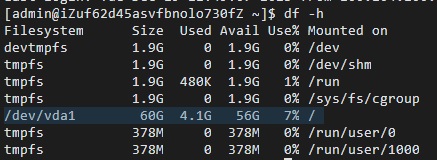
检查一下硬盘df -h
/dev/vda1 是总磁盘的可用量,扣除系统的其他分区还有56G,足够使用了。

CPU内存状态检查:top
%Cpu(s) - id 是CPU的空闲时间
MiB Mem - free 是内存未被占用量

安装依赖gcc gcc-c++
确保用root用户操作
1 | #安装gcc gcc-c++ |
安装依赖PCRE库
确保用root用户操作
1 | #安装PCRE库 |
PS:pcre一般下载最新版即可,不一定是这里的8.37
1 | tar -xvf pcre-8.37.tar.gz #解压这个包 |
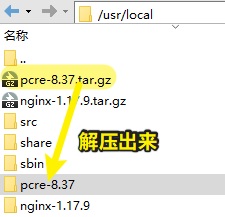
1 | cd pcre-8.37 #包被解压到pcre-8.37这个文件夹里面了,所以在cd进去 |
1 | make && make install --进行编译并安装 |

看到有版本号返回就证明安装PCRE库成功了
安装其他依赖
确保用root用户操作
1 | #安装 openssl 、zlib 、 gcc 依赖 |
安装Nginx(Nginx相关的内容超难,要多看几遍)
确保用root用户操作
1 | #安装nginx |
PS:一般下载最新版的Nginx即可,不一定是这里的1.17.9版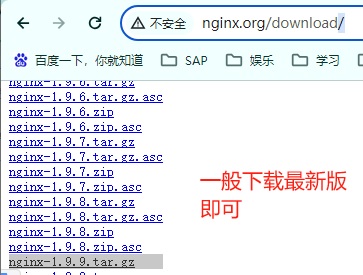
1 | tar -xvf nginx-1.17.9.tar.gz #解压包到本命令执行的目录 |
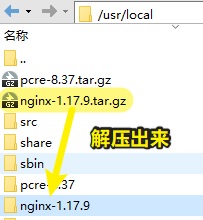
1 | cd nginx-1.17.9 #解压出来的在nginx-1.17.9目录下,cd进去 |
1 | make && make install #进行编译并安装 |

创建hexo网站文件的存放目录
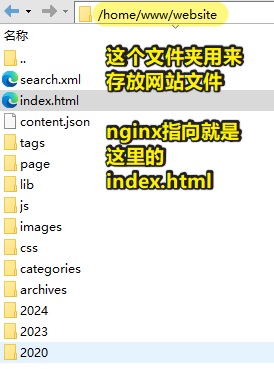
新建**/home/www/website**文件夹,这是放置静态页面index.htm主页的地方,让nginx代理到这里找到index.htm文件就能浏览网站了。
确保用root用户操作
1 | #确保是在root中操作 |
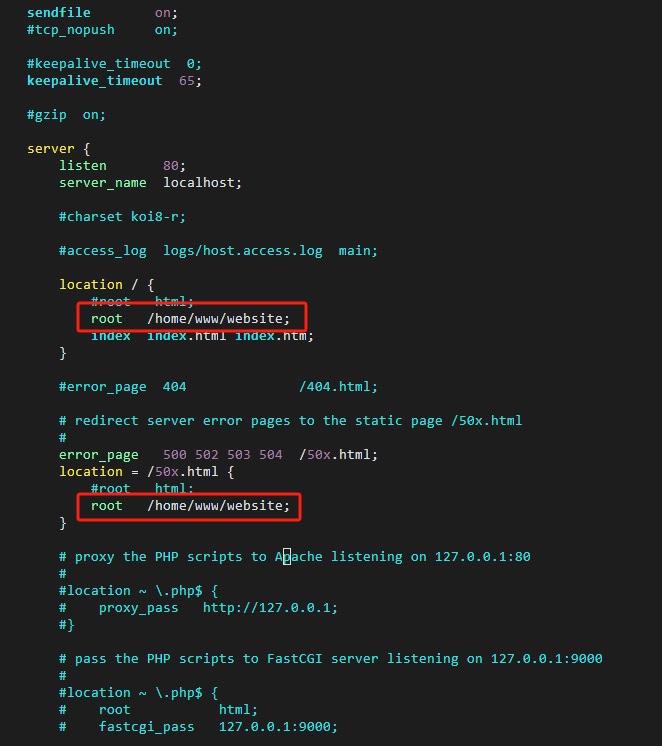
修改nginx.conf
通过vim或vi命令,或xftp来修改/usr/local/nginx/conf目录下的nginx.conf文件中的这两个地方,换成
root /home/www/website
当然,如果你的hexo静态网站文件,是在另外一个目录,改成对目录即可。 这就是Nginx代理指向的文件目录。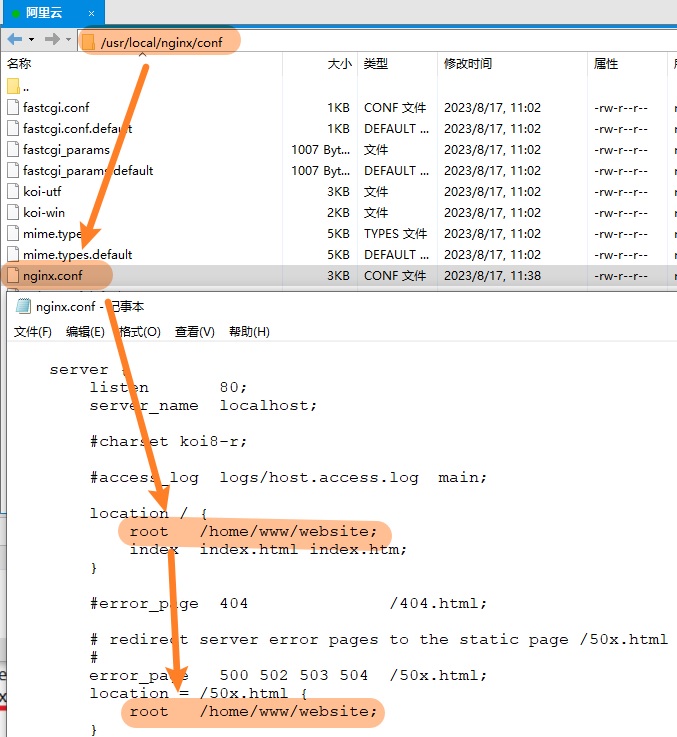
确保用root用户操作
1 | nginx -s reload #修改完conf文件,用这个命令可以让其生效 |

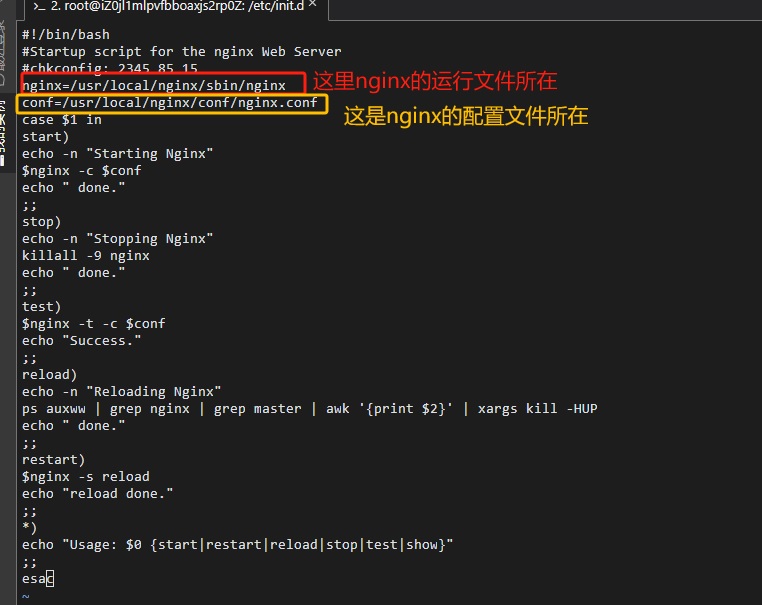
配置nginx脚本
在/etc/init.d/路径下添加脚本文件,名称为nginx,内容如下。人员用vim或vi添加。
确保用root用户操作
把下面这段话粘贴到nginx里面。
1 |
|
1 | chmod +x nginx #继续在在/etc/init.d/路径下,给这个文件赋权 |
1 | #这个功能是用来停止启动nginx的,重启完服务器后记得启动一下 |
在/home/www/website中还没有index.html文件之前,返回404错误,就是Nginx正确配置的一种表现。因为Nginx没有找到文件,返回了标准的错误。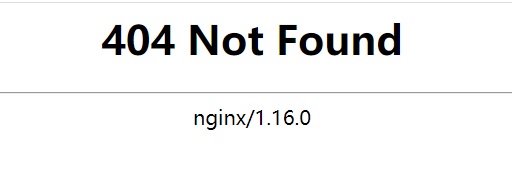
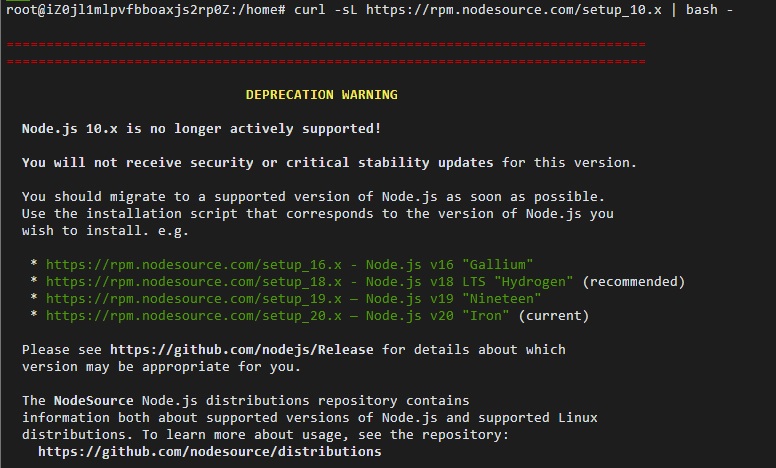
安装nodejs(服务端)
确保用root用户操作
1 | cd /home #建议先回到home目录,不是必须 |
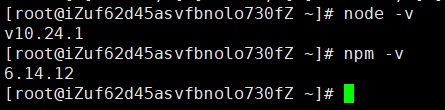
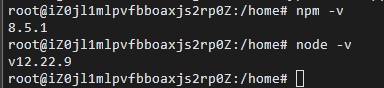
查看node和npm的版本,有返回值证明安装nodejs成功了
1 | node -v |
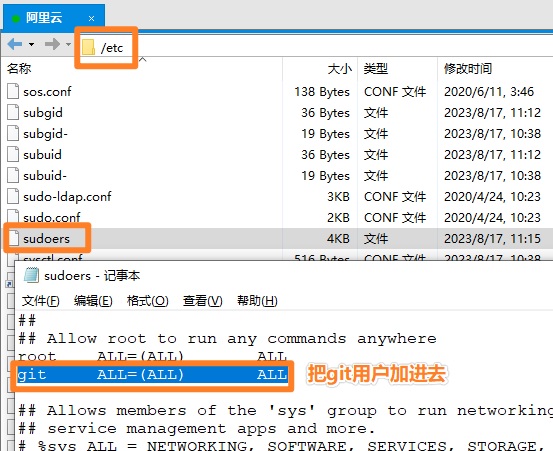
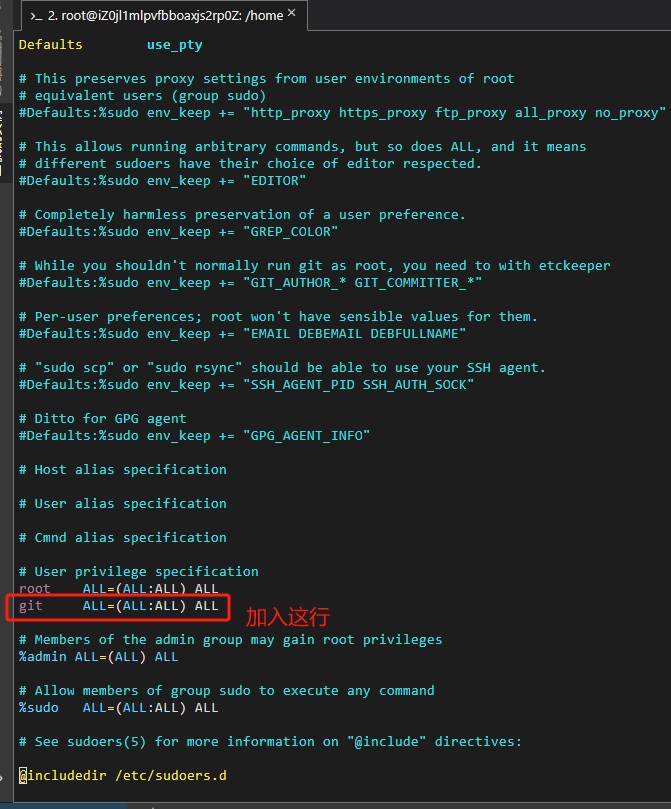
安装git
确保用root用户操作
1 | yum update -y #先更新列表,确保安装的git是最新版本 |

1 | chmod 740 /etc/sudoers #给/etc/sudoers赋权 |
配置秘钥,让Windows免密登录云服务器
确保用root用户操作
1 | adduser git #新建一个叫git的linux账号 |
确保用git用户操作
这小节操作复杂,要多看几次再操作
1 | su git #切换到git用户 |
把windows的登录用户中的C:\Users{用户名}.ssh 下面的 id_rsa.pub的内容复制出来,放在/home/git/.ssh目录中的authorized_keys文件中,当然用xftp放也行。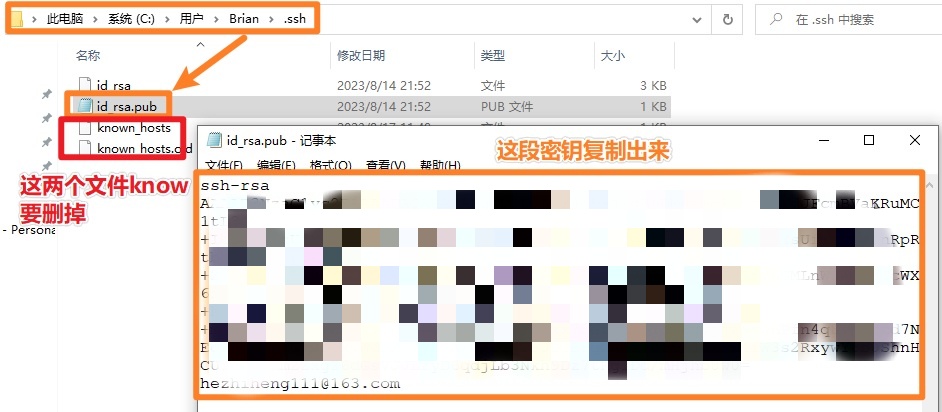
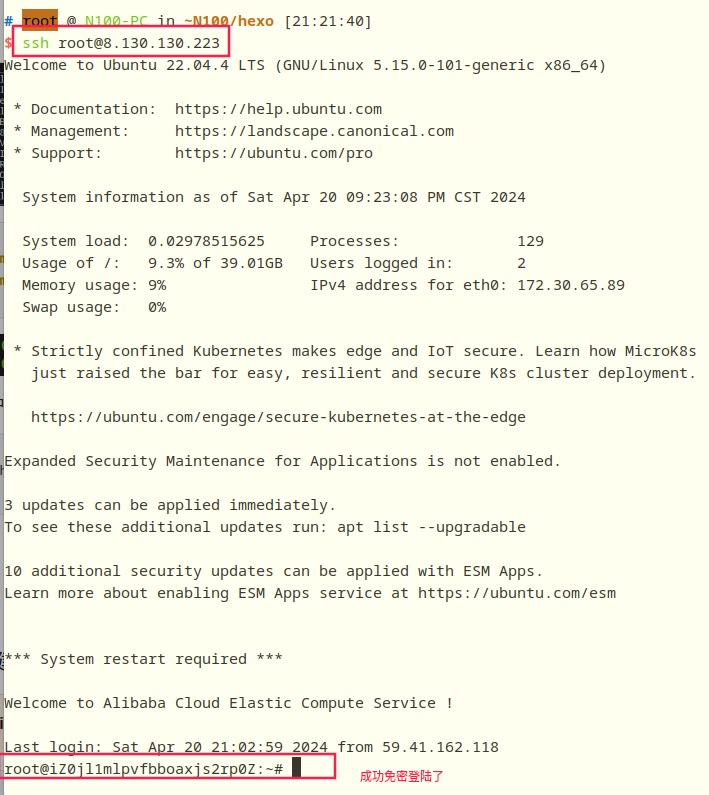
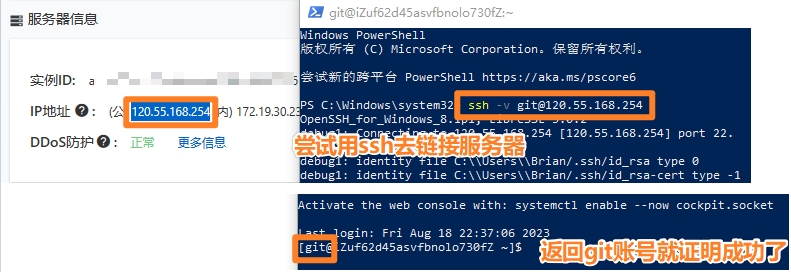
配置好后,在windows的powershell用ssh -v {linux用户名}@{linux公网IP} 命令来尝试脸上服务器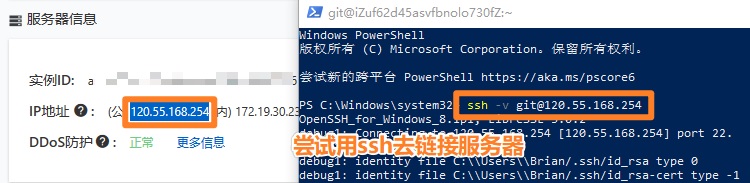
返回git账号就证明成功了
这小节要达到的目的是,用git用户来免密登录服务器。用ssh命令来测试是否成功。后面网站文件上传到服务器,就需要免密登录上传。
创建git空仓库
确保用git用户操作
1 | cd ~ #回到git的home/git目录中 |

把这句话git --work-tree=/home/www/website --git-dir=/home/git/blog.git checkout -f写入post-receive文件
/home/www/website 这是放博客静态网站文件的地方
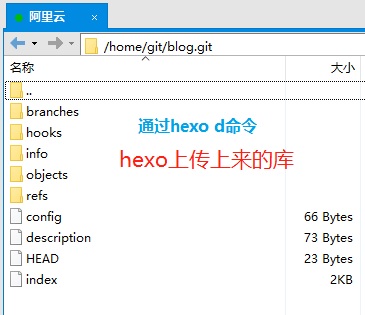
/home/git/blog.git 这是放hexo库的地方
配置Windows客户端
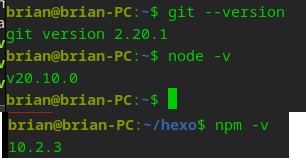
安装nodejs和git
在windows下载安装nodejs,去官网下载安装包安装就好。
https://nodejs.org/en/download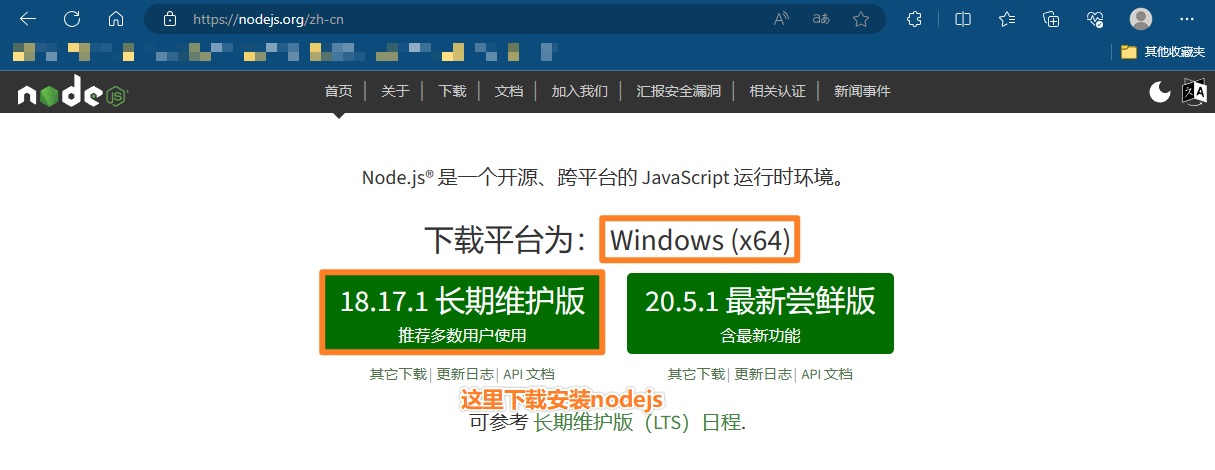
在windows下载安装git,去官网下载安装包安装就好。
https://git-scm.com/download/win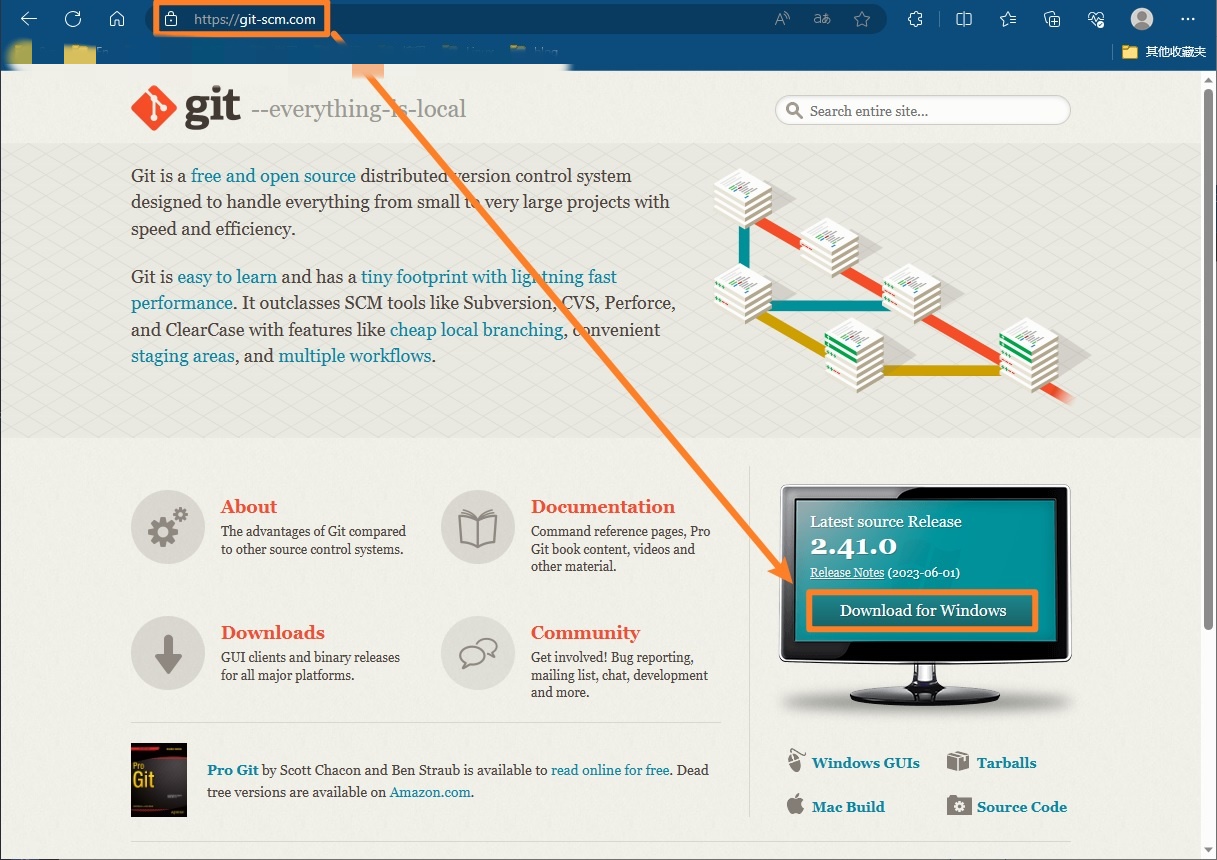
在power shell中查看版本是否安装成功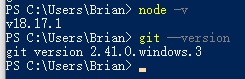
初始化hexo
创建一个目录来初始化我们的hexo
如C盘下的blog目录下创建一个hexo目录,以后所有hexo命令都要在这个目录下执行才会有效。
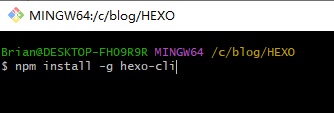
接下来所有命令都可以在hexo部署文件夹用鼠标右键打开open git bash here来运行
1 | npm install -g hexo-cli #在hexo的目录打开命令行工具执行全局安装 |
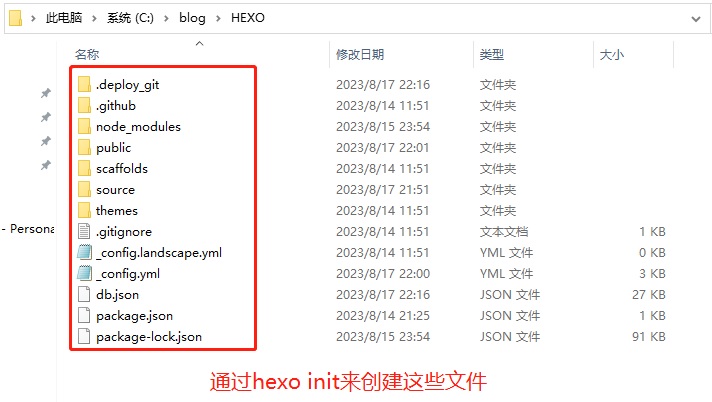
1 | hexo init #要在你想出初始化的目录中打开 右键open git bash here来运行 |
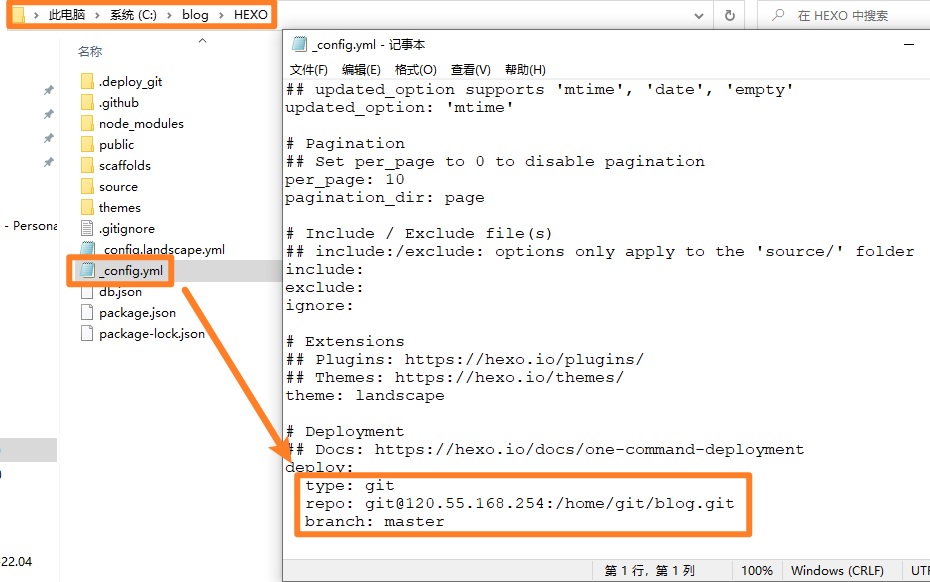
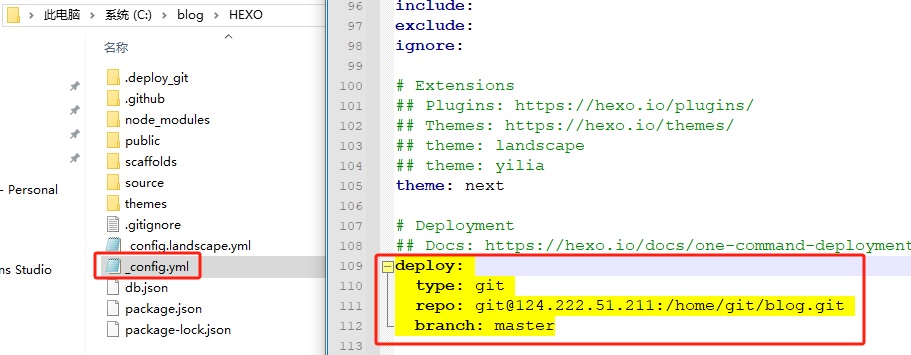
配置_config.yml文件
在_config.yml文件的最后配置如下内容
1 | deploy: |
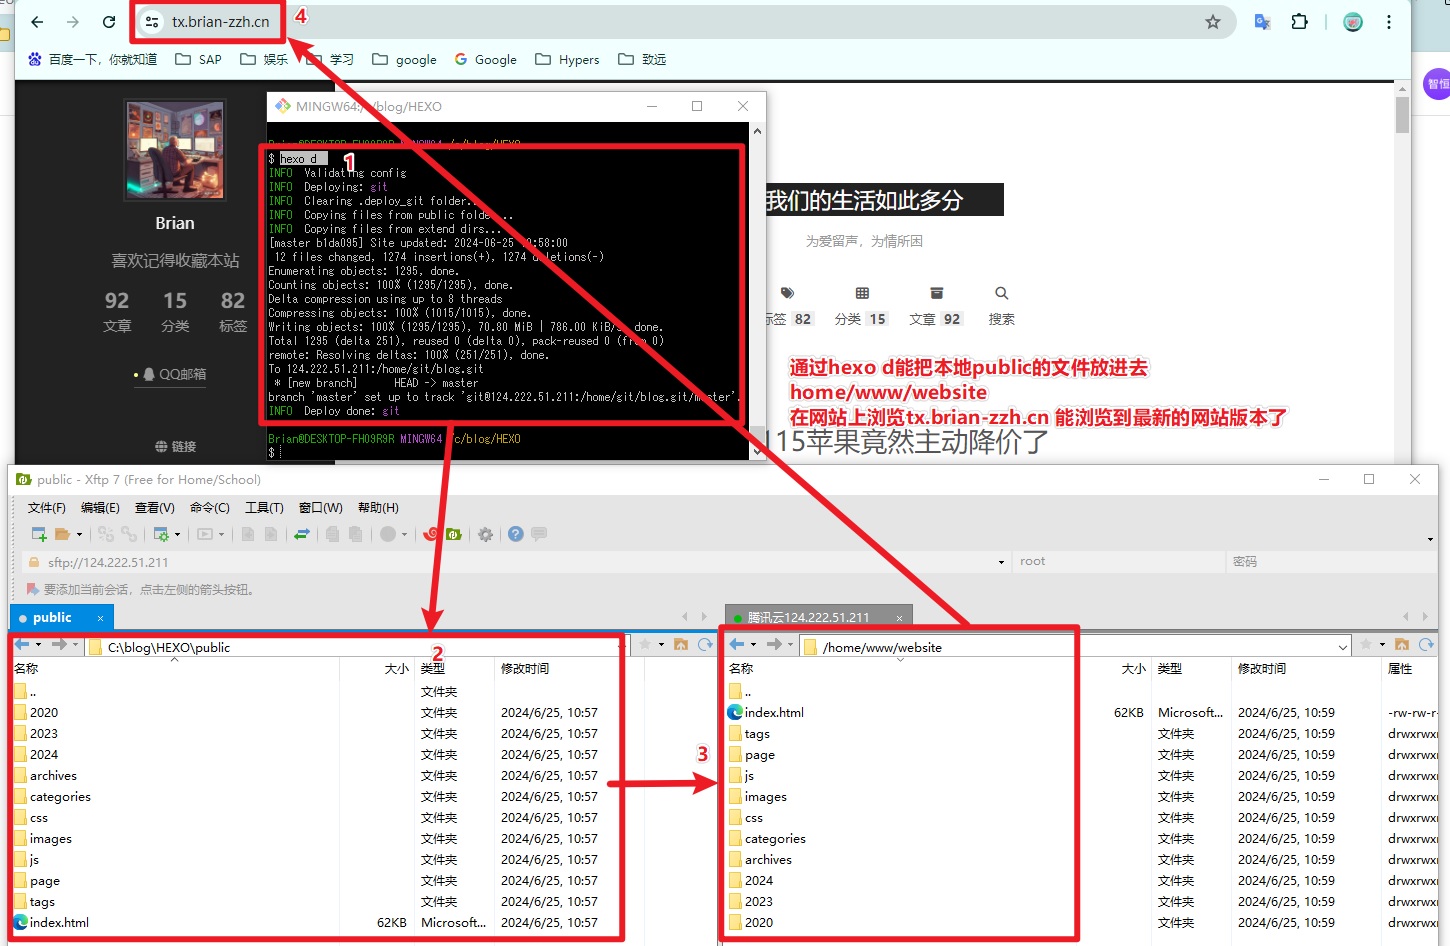
发布浏览博客
最后是hexo命令的四板斧
1 | hexo s #可以通过http://localhost:4000/本地浏览效果 |
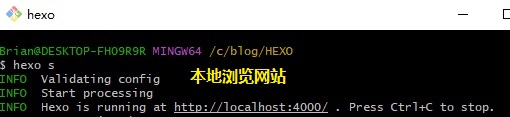
通过hexo s命令,可以通过浏览器在http://localhost:4000/中访问到本地博客文件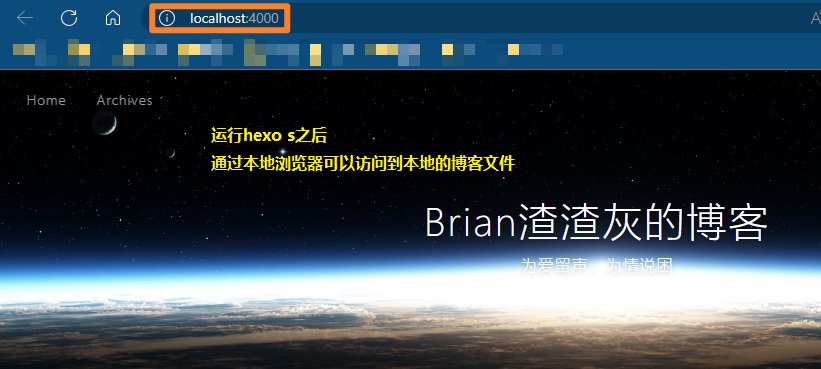
通过hexo d能把博客文件上传到云服务器中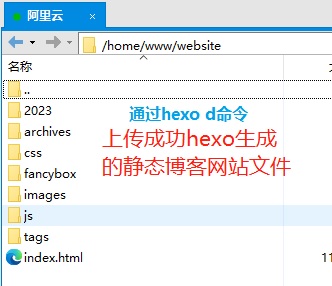
通过公网IP,能访问到博客。下一步就是要申请域名,用域名来访问我们的博客了。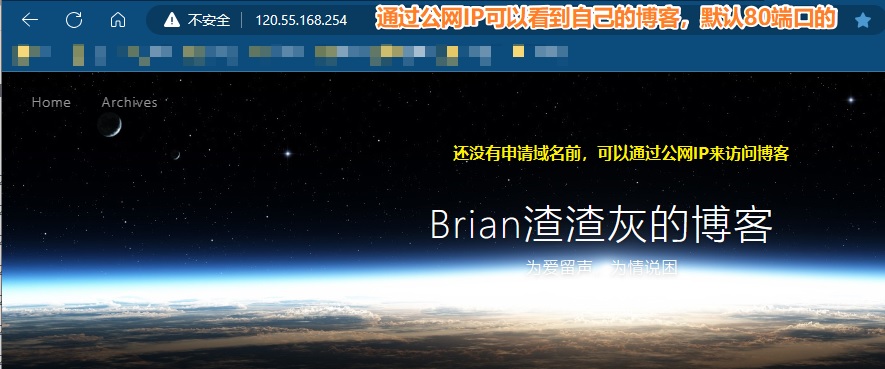
PS: 最近在Fedora上安装Hexo无法使用简单命令了,下图仅供参考。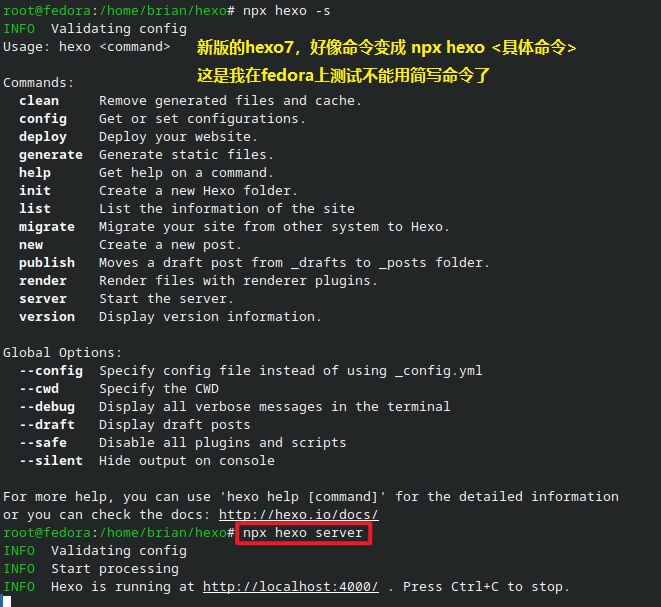
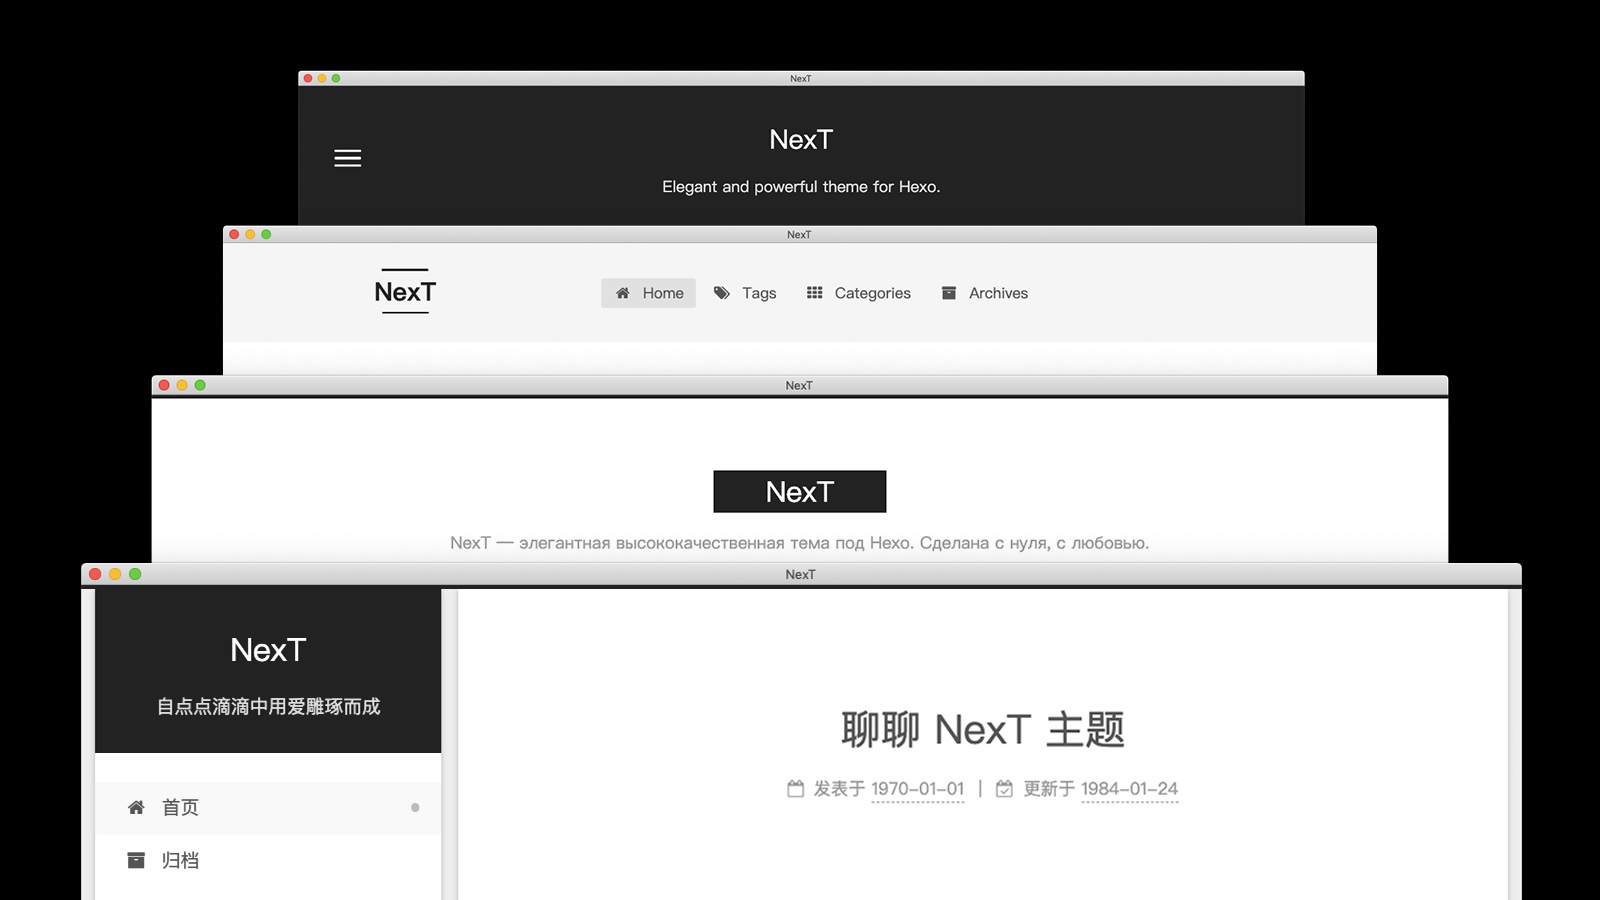
使用next主题美化(7.8.0版)
这里的美化都是基于7.8.0版的,8.x版基本都一样,但是会有一点不一样。
安装next主题
https://theme-next.iissnan.com/getting-started.html这个网址有安装方法及使用方法
方法一:(网络原因一般不会成功)
在/home/brian/hexo里面执行git clone https://github.com/iissnan/hexo-theme-next themes/next
方法二:(成功率较高)
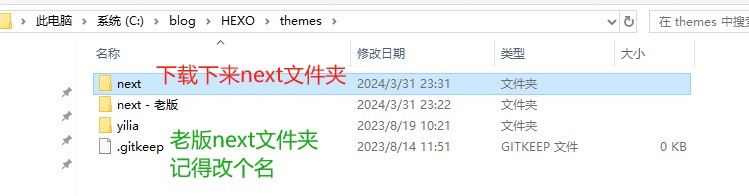
下载源码,解压到hexo/themes里面,并改名为next
https://github.com/theme-next/hexo-theme-next/releases/tag/v7.8.0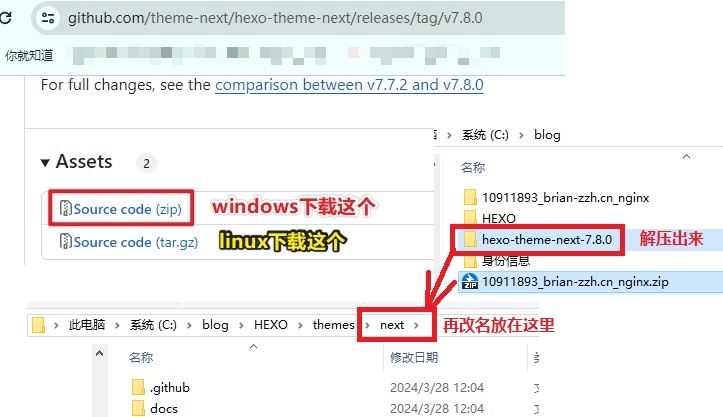
PS:如果无法打开下载地址,尝试本渣的这个方法:如何修改hosts连接上github
然后,改hexo目录下的_config.yml文件,修改前最好备份一下。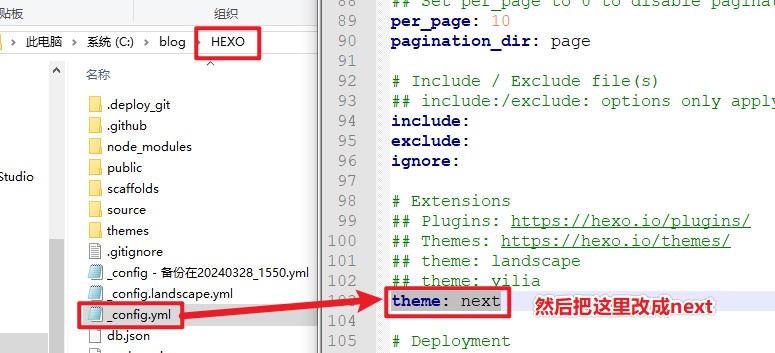
用hexo s尝试一下,就能看到next主题的效果了。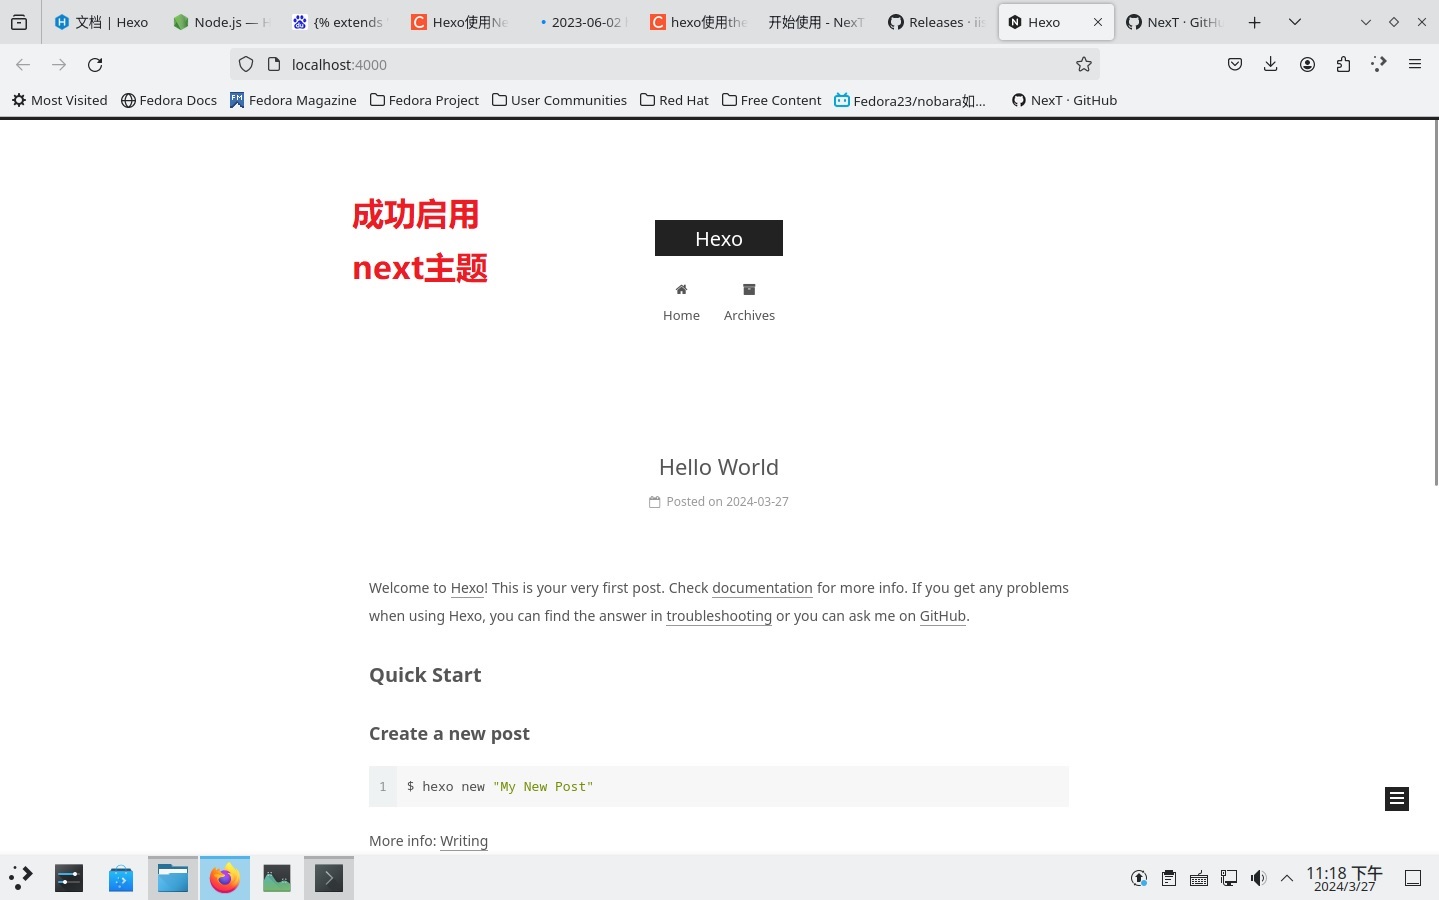
主题模版scheme:
修改HEXO\themes\next下的_config.yml文件
1 | # --------------------------------------------------------------- |
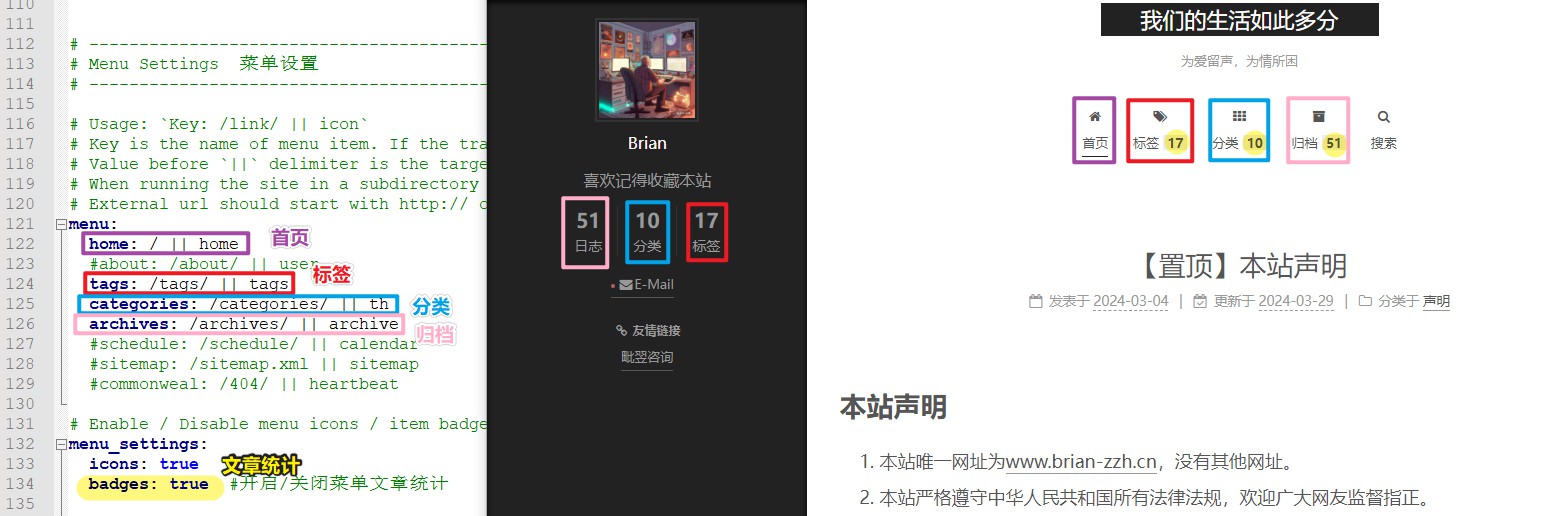
菜单menu:
修改HEXO\themes\next下的_config.yml文件
1 | # --------------------------------------------------------------- |
增加标签页
1 | hexo new page tags |
在新建的C:\blog\HEXO\source\tags目录里面的index.md文件里面加入参数 type: "tags"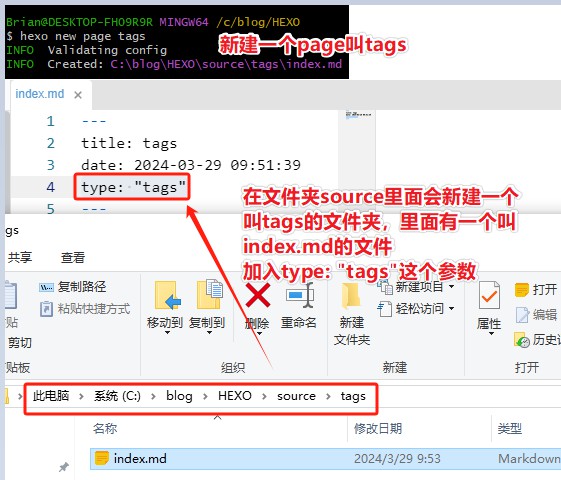
增加分类页
1 | hexo new page categories |
在新建的C:\blog\HEXO\source\categories目录里面的index.md文件里面加入参数 type: "categories"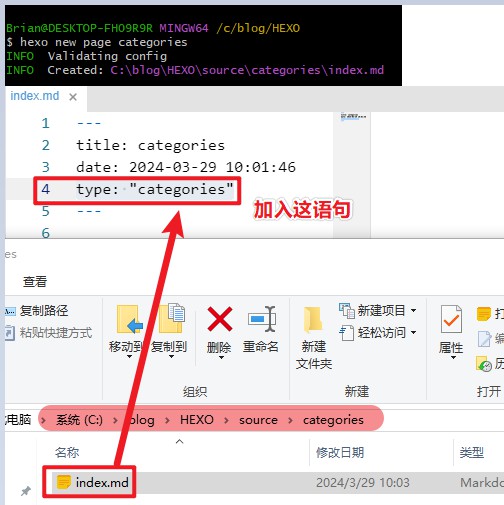
社交(联系)social:
修改HEXO\themes\next下的_config.yml文件
1 | # Social Links |

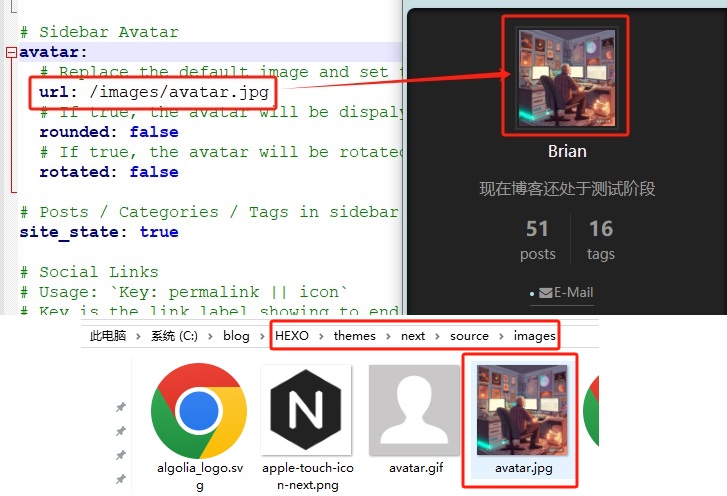
头像avatar:
修改HEXO\themes\next下的_config.yml文件
1 | # Sidebar Avatar |
语言language:
修改HEXO\下的_config.yml文件
1 | language: zh-CN |
语言参数选择的是C:\blog\HEXO\themes\next\languages里面的文件名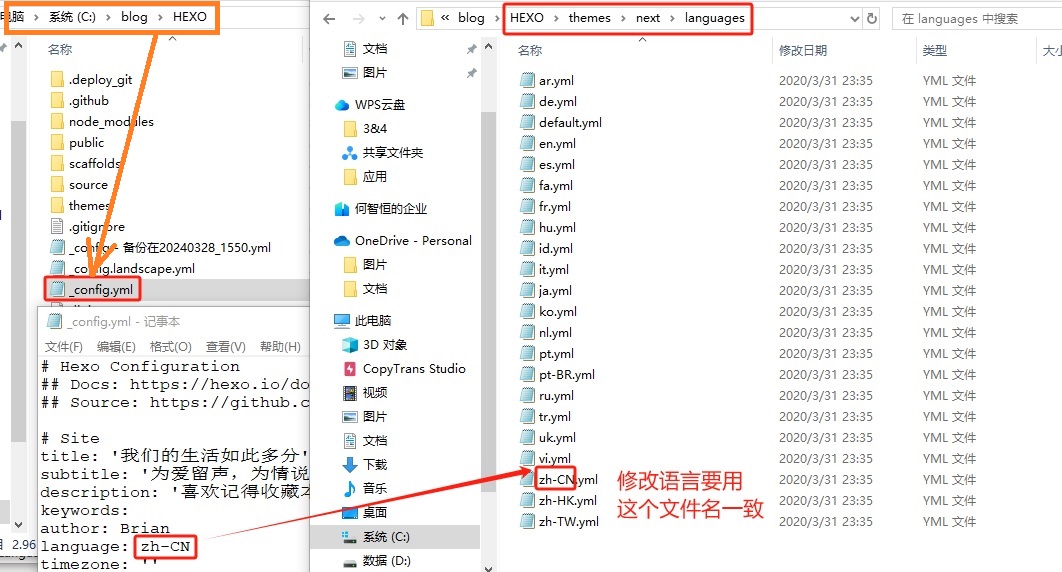
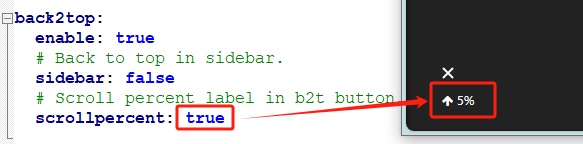
回到顶部back2top:
修改HEXO\themes\next下的_config.yml文件
1 | back2top: |
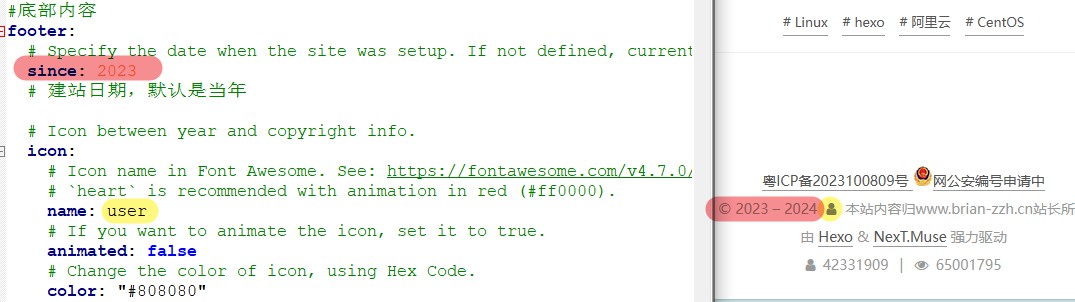
侵权声明copyright:
修改HEXO\themes\next下的_config.yml文件
1 | # If not defined, `author` from Hexo `_config.yml` will be used. |

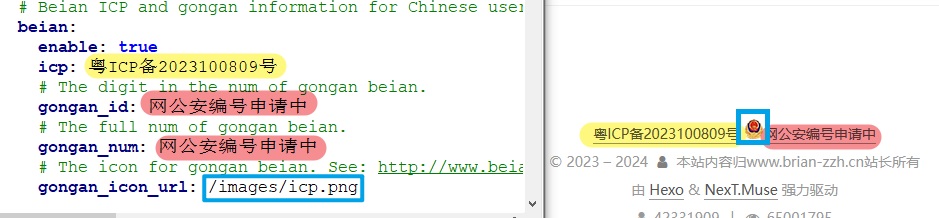
ICP备案编号 beian:
修改HEXO\themes\next下的_config.yml文件
1 | # Beian ICP and gongan information for Chinese users. See: http://www.beian.miit.gov.cn, http://www.beian.gov.cn |
建站时间since:
修改HEXO\themes\next下的_config.yml文件
1 | #底部内容 |
启用搜索功能hexo-generator-searchdb(第三方)
https://theme-next.iissnan.com/third-party-services.html#search-system 参考安装方法
https://github.com/theme-next/hexo-generator-searchdb 参见提供作者
1 | # 在hexo的目录执行这个语句 |

修改HEXO\themes\next下的_config.yml文件
1 | # Local Search 开启本地搜索,需要安装hexo-generator-searchdb插件 |

百度统计baidu_analytics:
https://tongji.baidu.com/ 登录这里去注册一个账号,再注册一个网站然后获得监控ID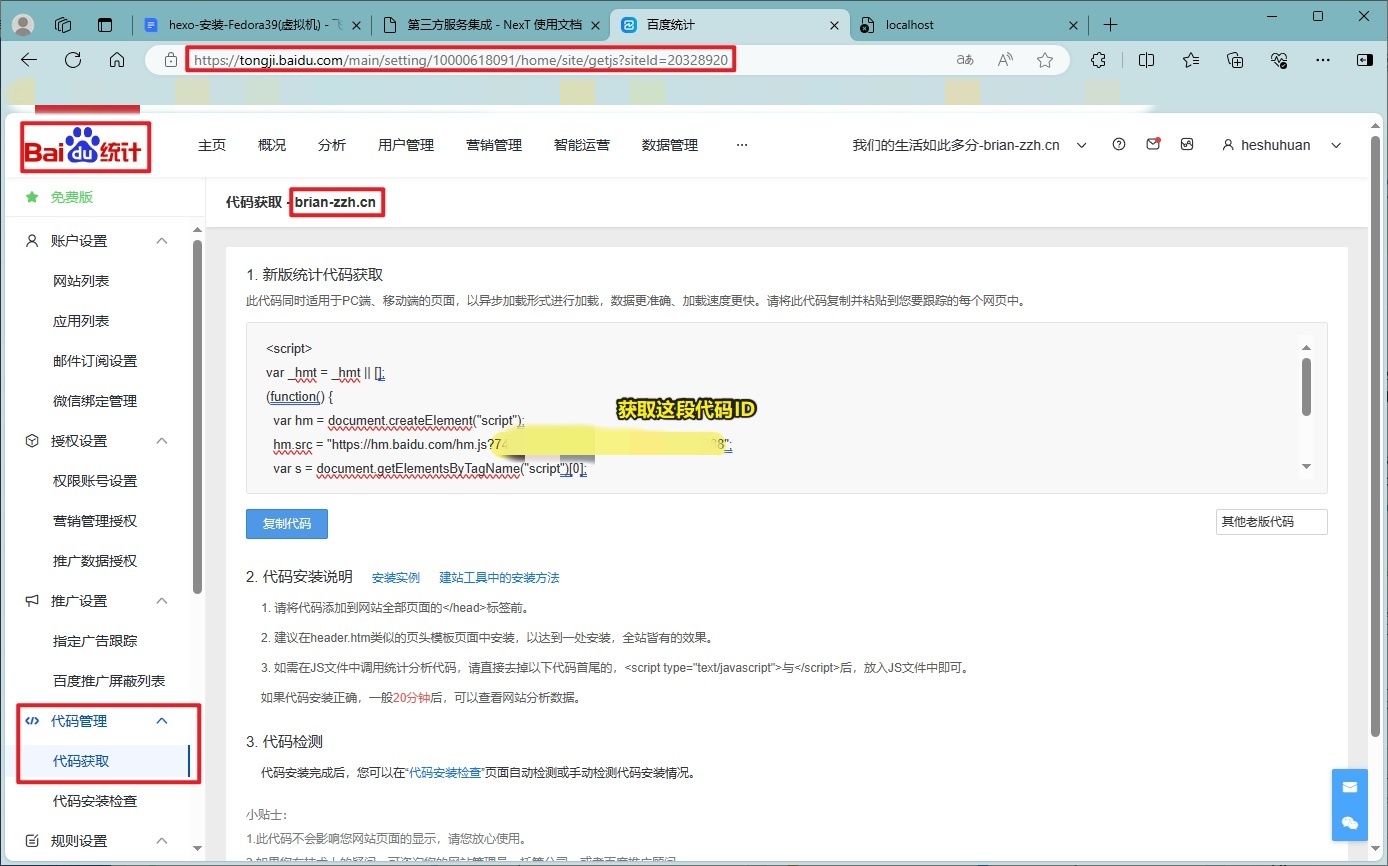
将ID放到这里
修改HEXO\themes\next下的_config.yml文件
1 | # Baidu Analytics 开启百度统计 |
在百度里面就能看到访问数据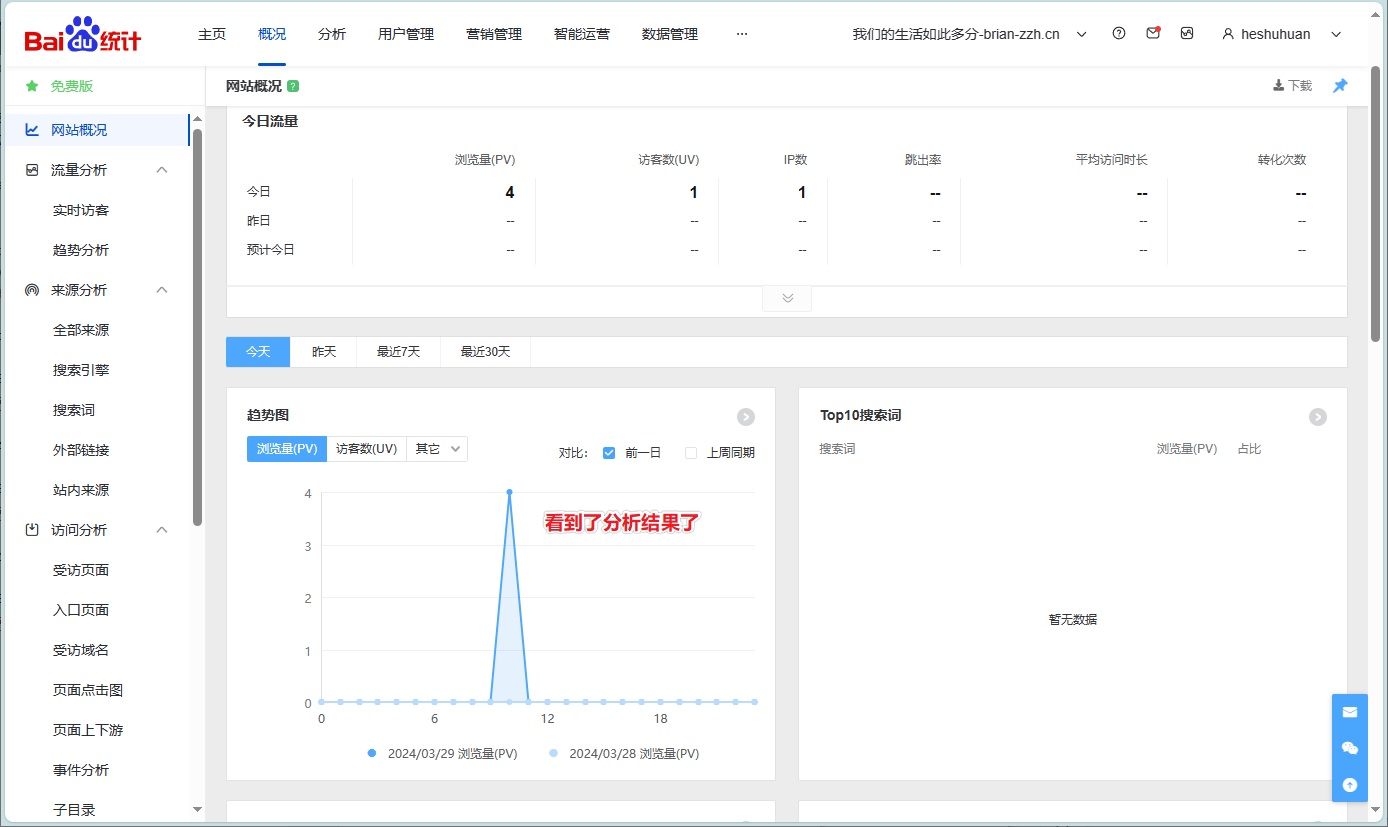
不蒜子统计busuanzi_count:
修改HEXO\themes\next下的_config.yml文件
1 | # Show Views / Visitors of the website / page with busuanzi. |
非常方便的功能,在这个主题中直接集成了
Next主图特有高亮显示方式
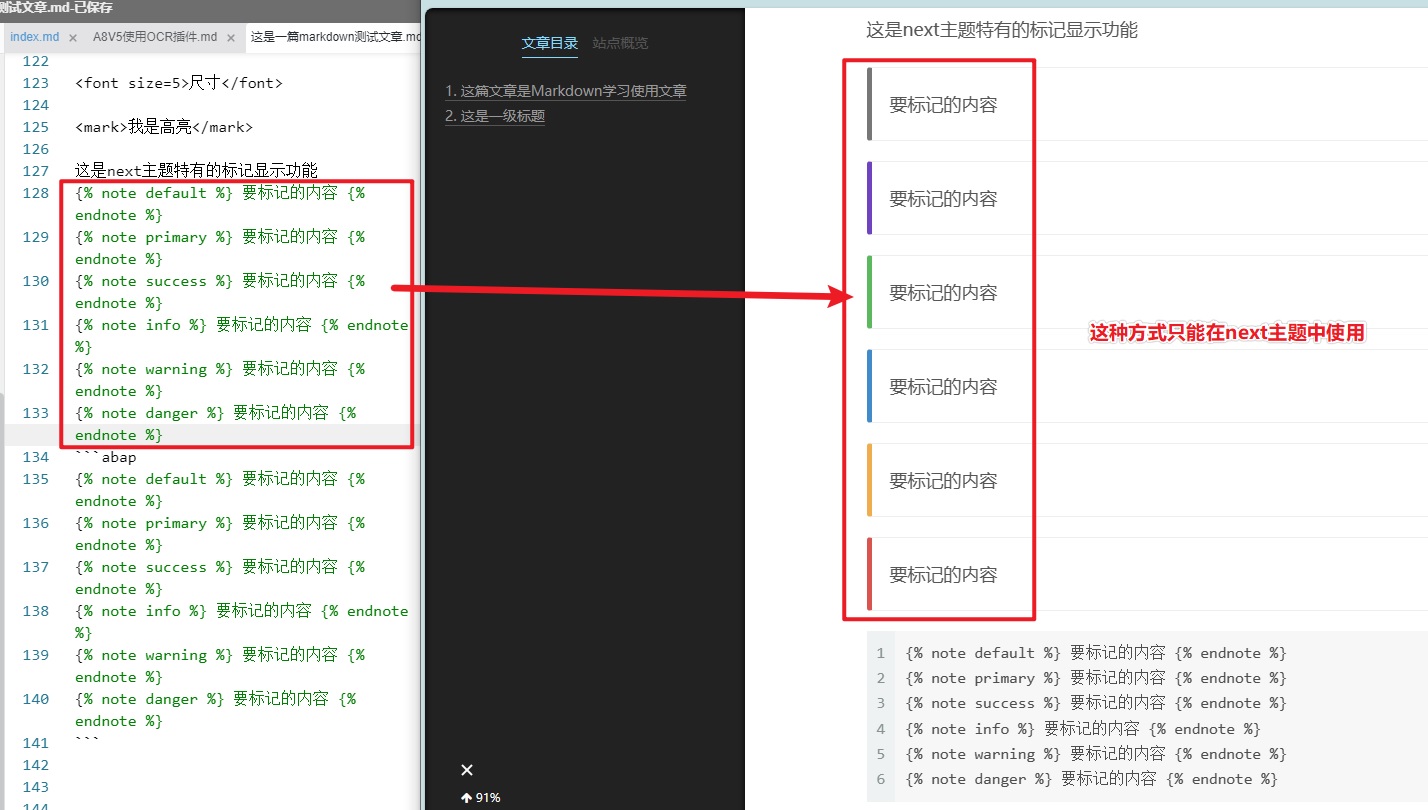
在编写md文件的时候直接用下面的代码
1 | {% note default %} 要标记的内容 {% endnote %} |
评论Valine(Next 7.8.0版)
8.x的支持方式不一样,请看下面next V8的内容,会晚点补充
在https://leancloud.cn 创建一个开发版的应用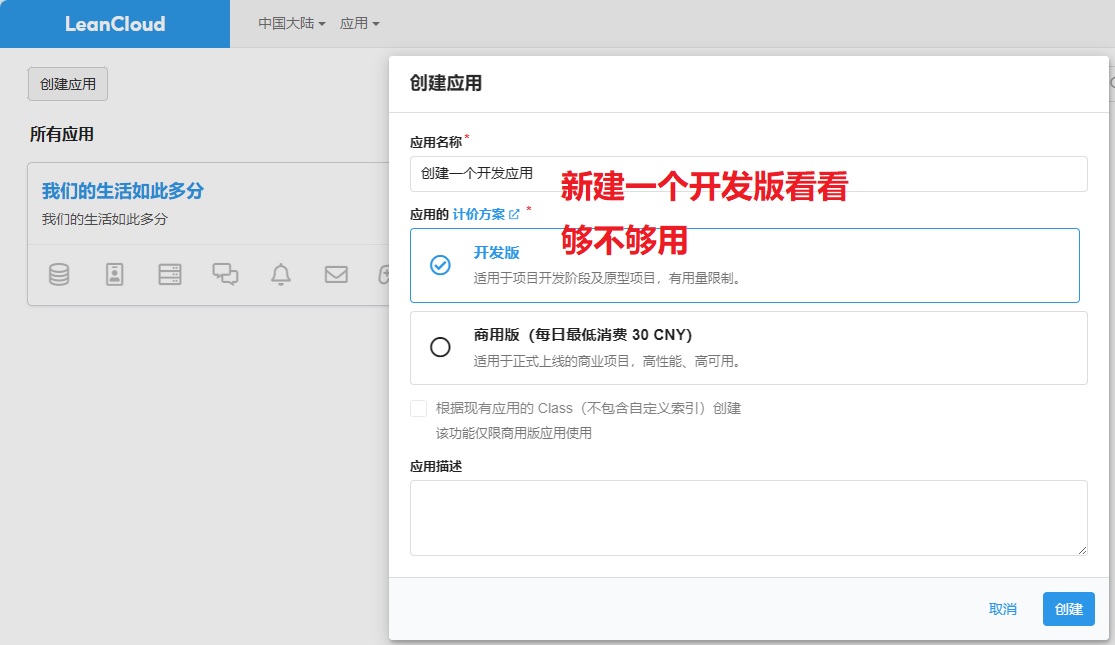
找到AppID和AppKey,填入对应位置。
修改HEXO\themes\next下的_config.yml文件
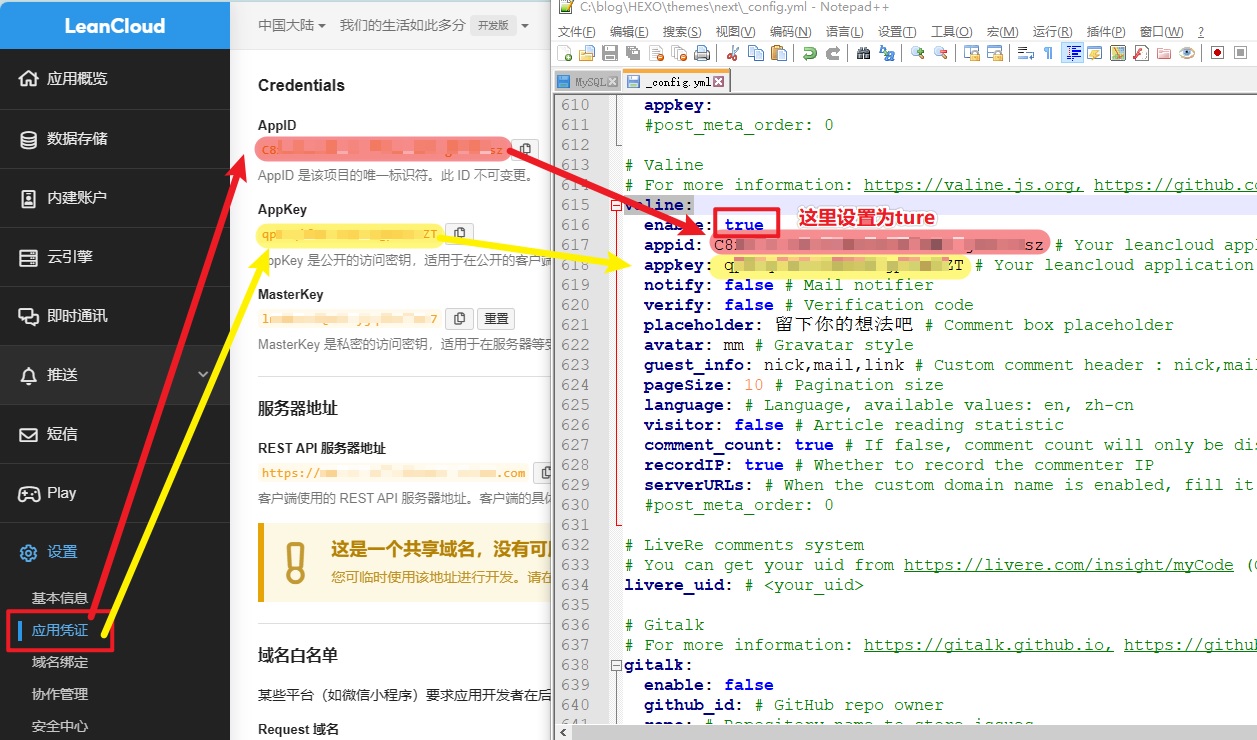
1 | # Valine |
开发版不知道够不够用,尝试一段时间再算吧。不行就研究一下能不能再部署个Twikoo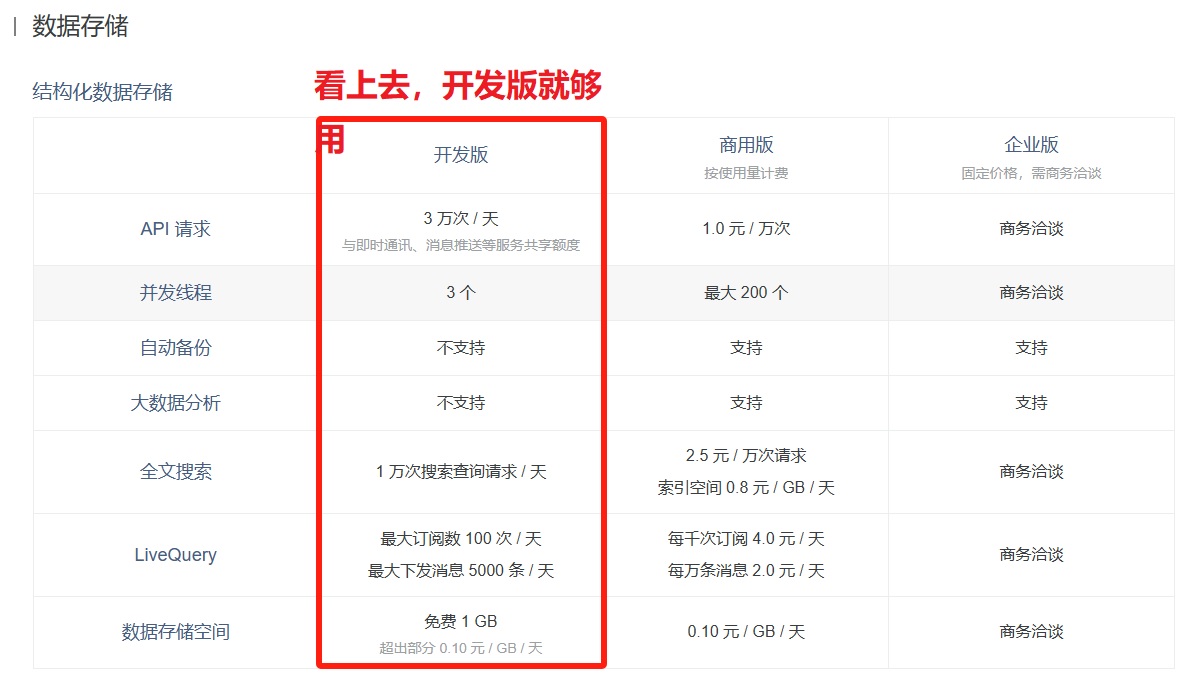
域名配置
域名购买与解析
阿里域名购买地址:https://wanwang.aliyun.com/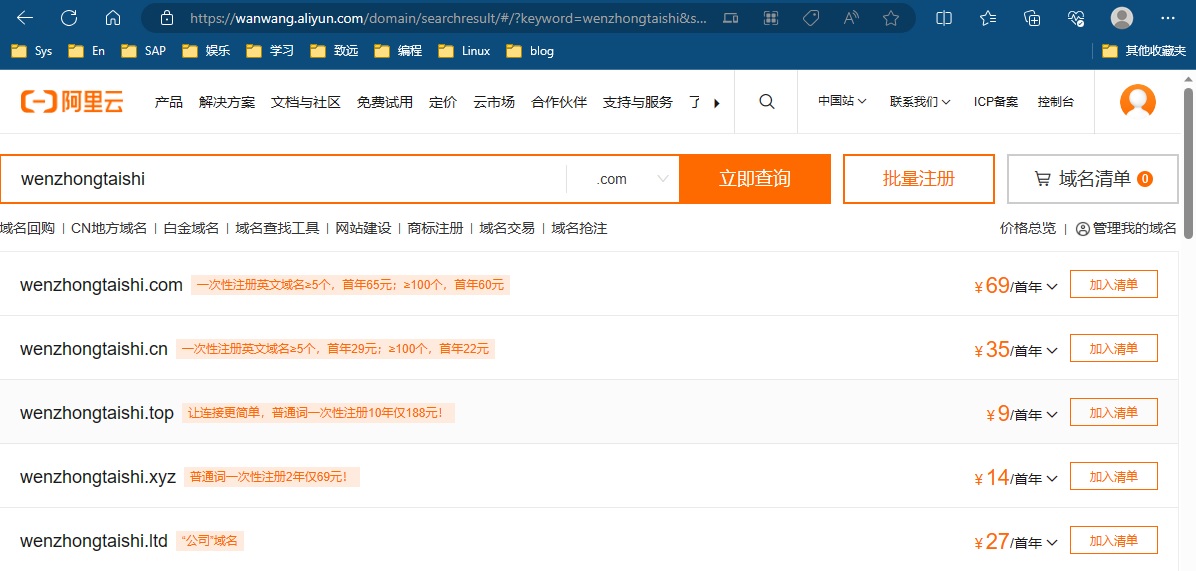
域名解析地址:https://dns.console.aliyun.com/
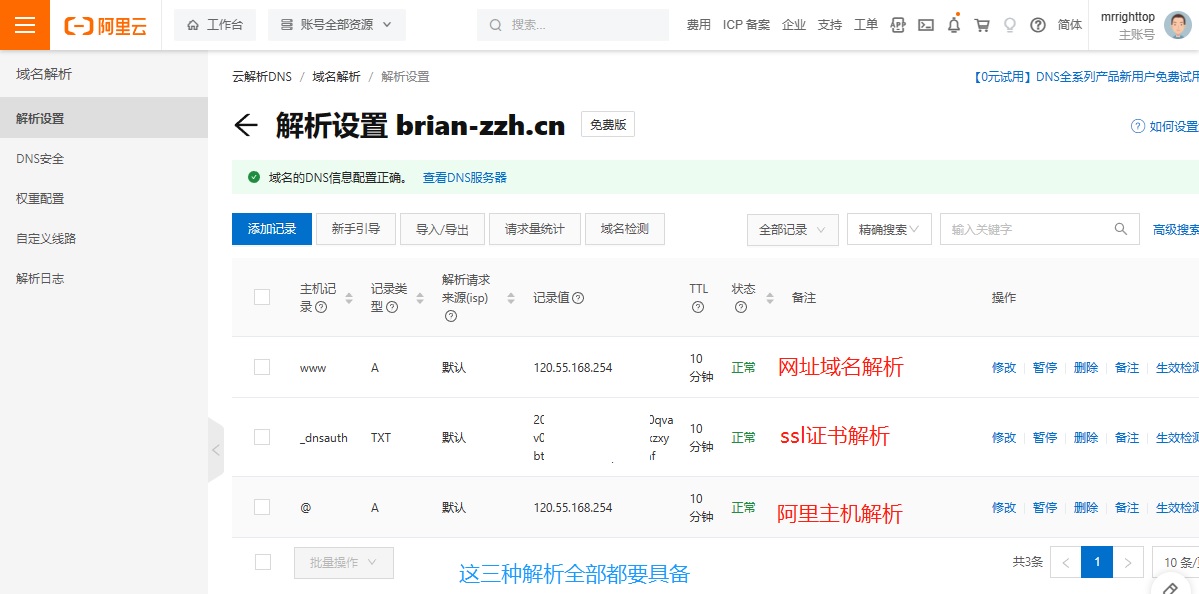
一般在阿里购买的域名是自动配置好的
- A类@:是阿里主机的解析
- A类WWW:是万维网解析
- TXT证书:是ssl证书解析
域名续费地址:https://dc.console.aliyun.com/#/domain-list/all
SSL证书配置
可以在FreeSSL.cn里面买免费的
阿里云里面也有20个免费的,但是二级域名都是占一个,不过有效期好像3个月,建议尽早申请完20个备用。
申请时候的选项跟我一样就好
申请完就下载nginx的,会有两个文件。key和pem文件。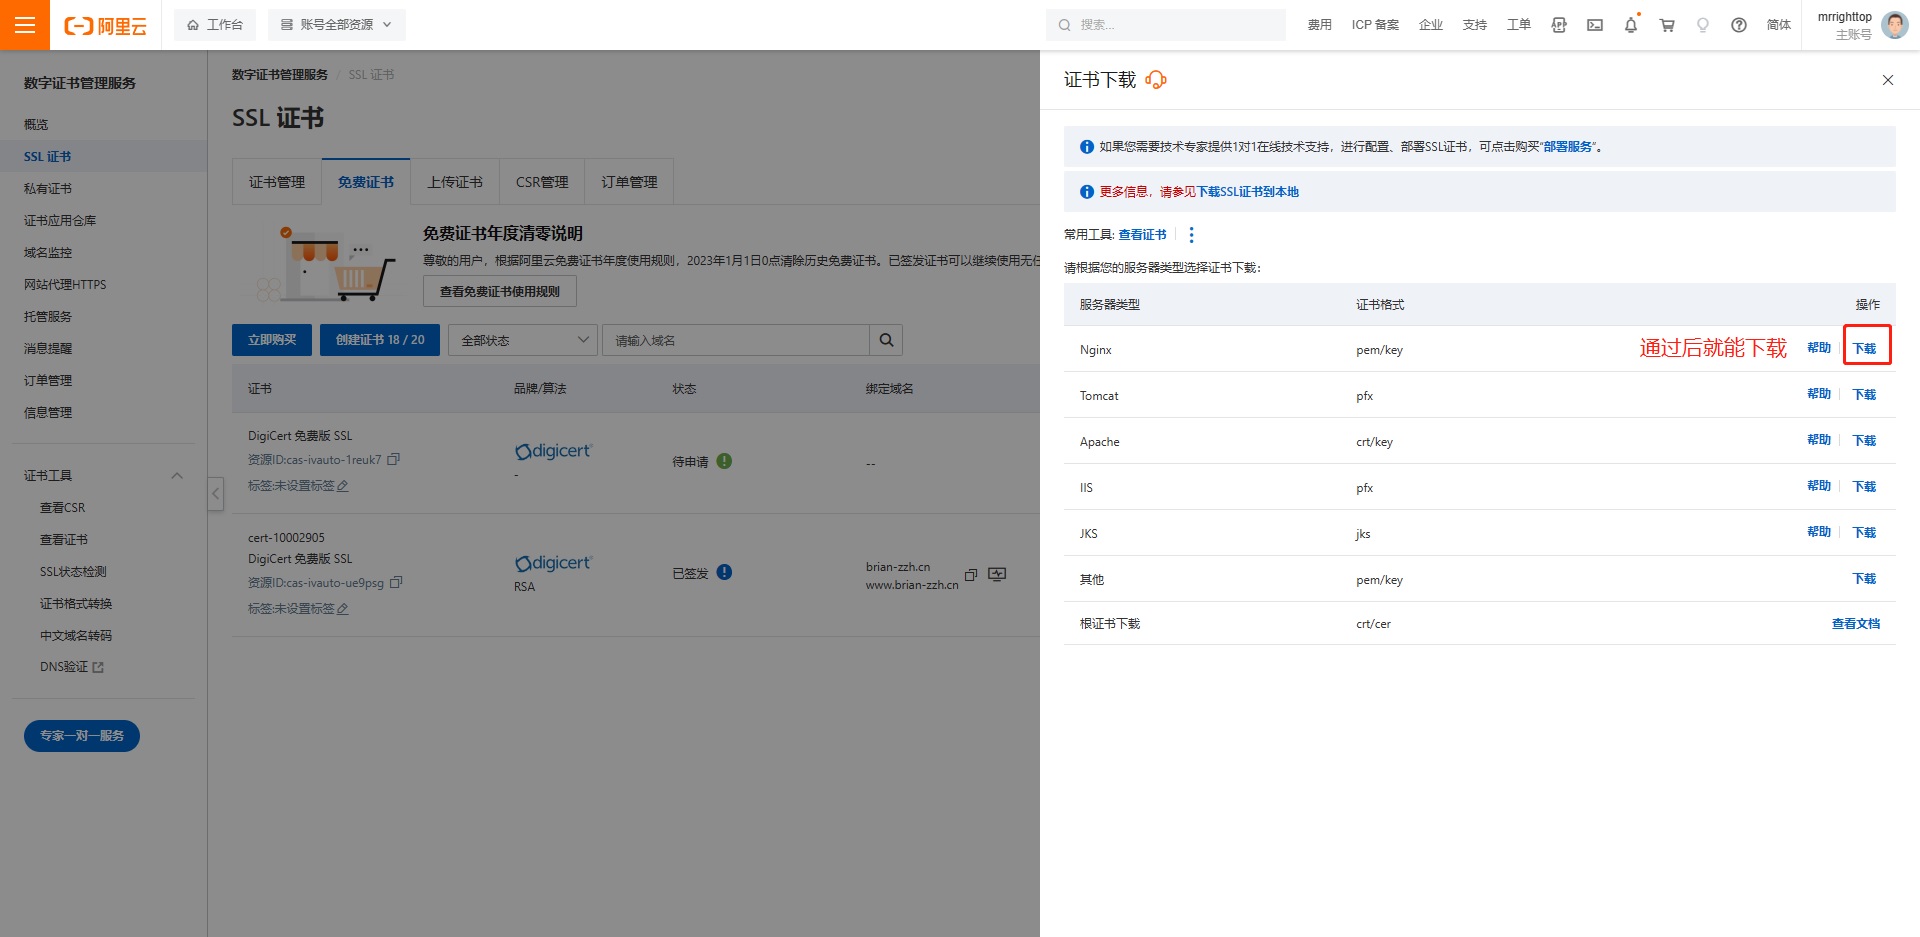
要把这两个文件放在服务器端的etc/ssl里面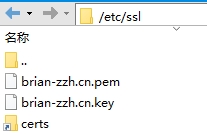
修改Nginx让大家可以默认通过https来访问(这里很难,大家多试试)
修改是否成功标志是能不能用https://www.yoururl.com这样你的域名来成功访问你的系统,但是需要ICP备案成功才能访问,所以配置好了,可以等下面域名ICP备案成功了再试试,没有备案成功之前只能等。
通过vim或vi或xftp命令修改/usr/local/nginx/conf目录下的nginx.conf文件
修改nginx.conf文件如下: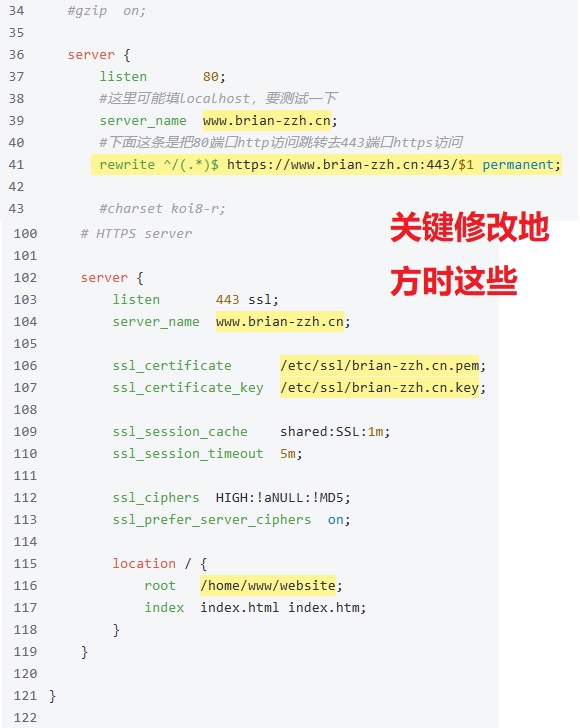
1 |
|
这是我对Nginx配置的理解,大家按照自己的情况配置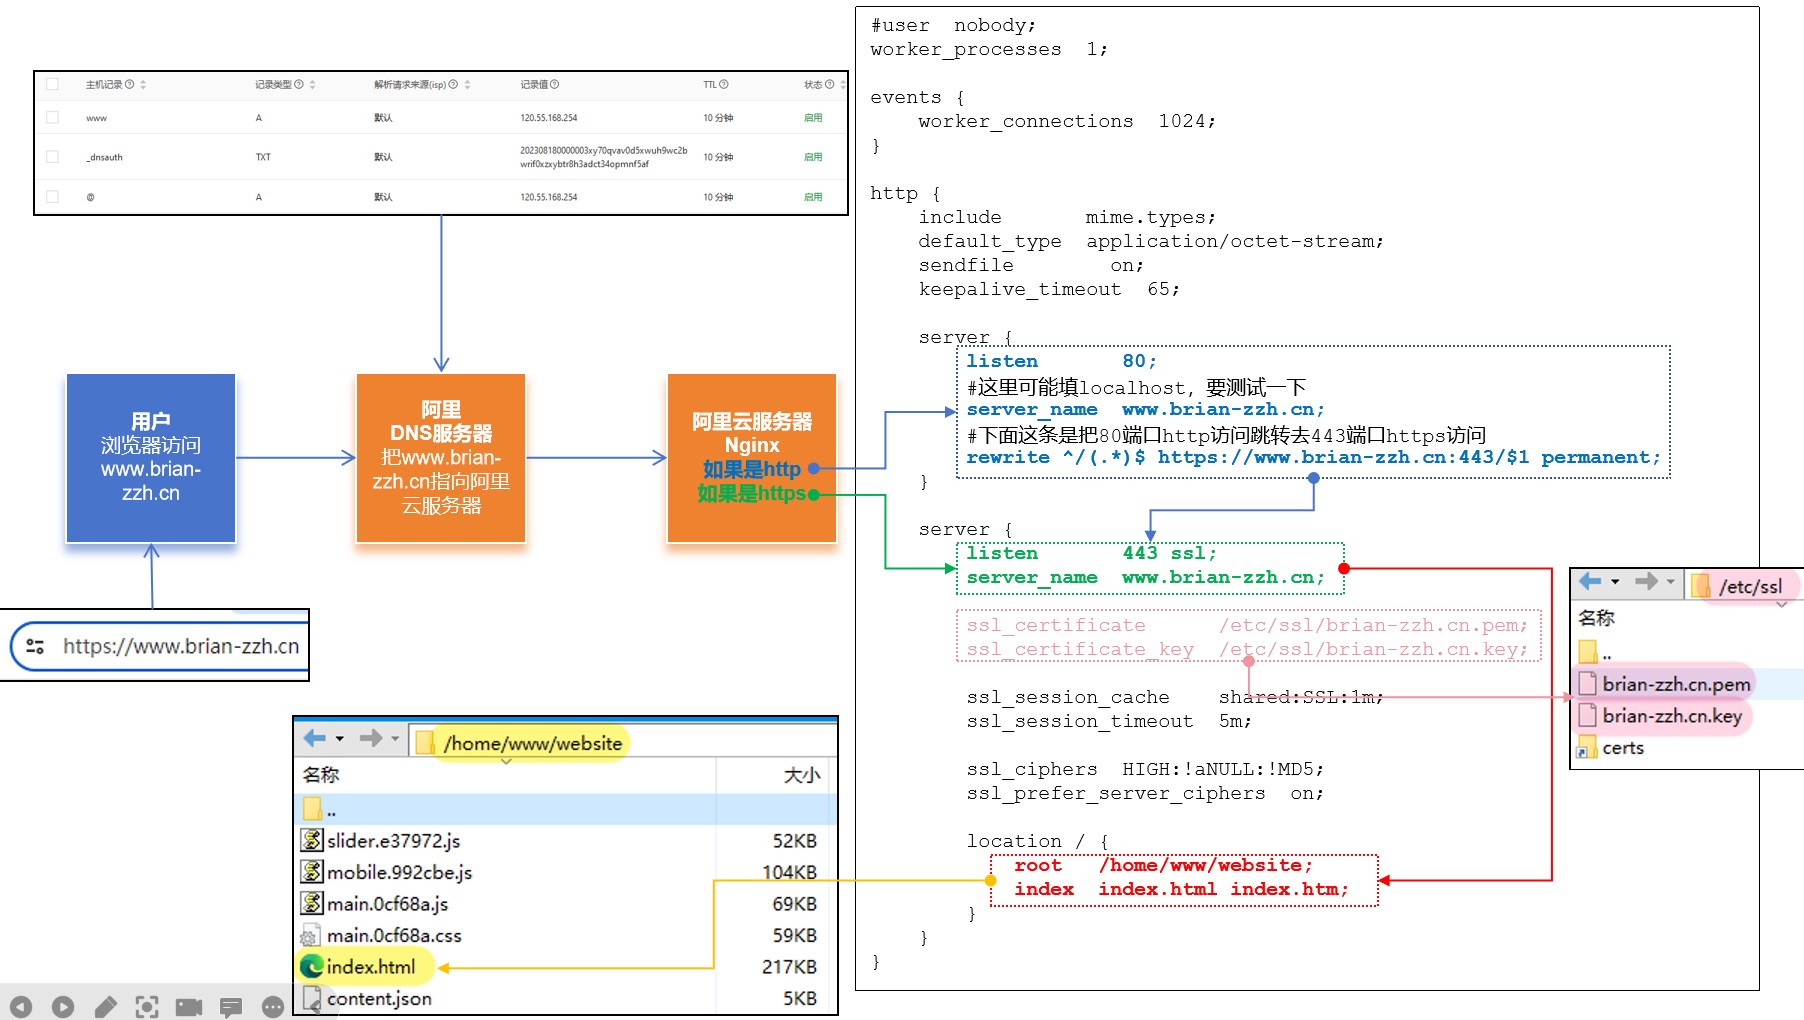
这是要注意的配置地方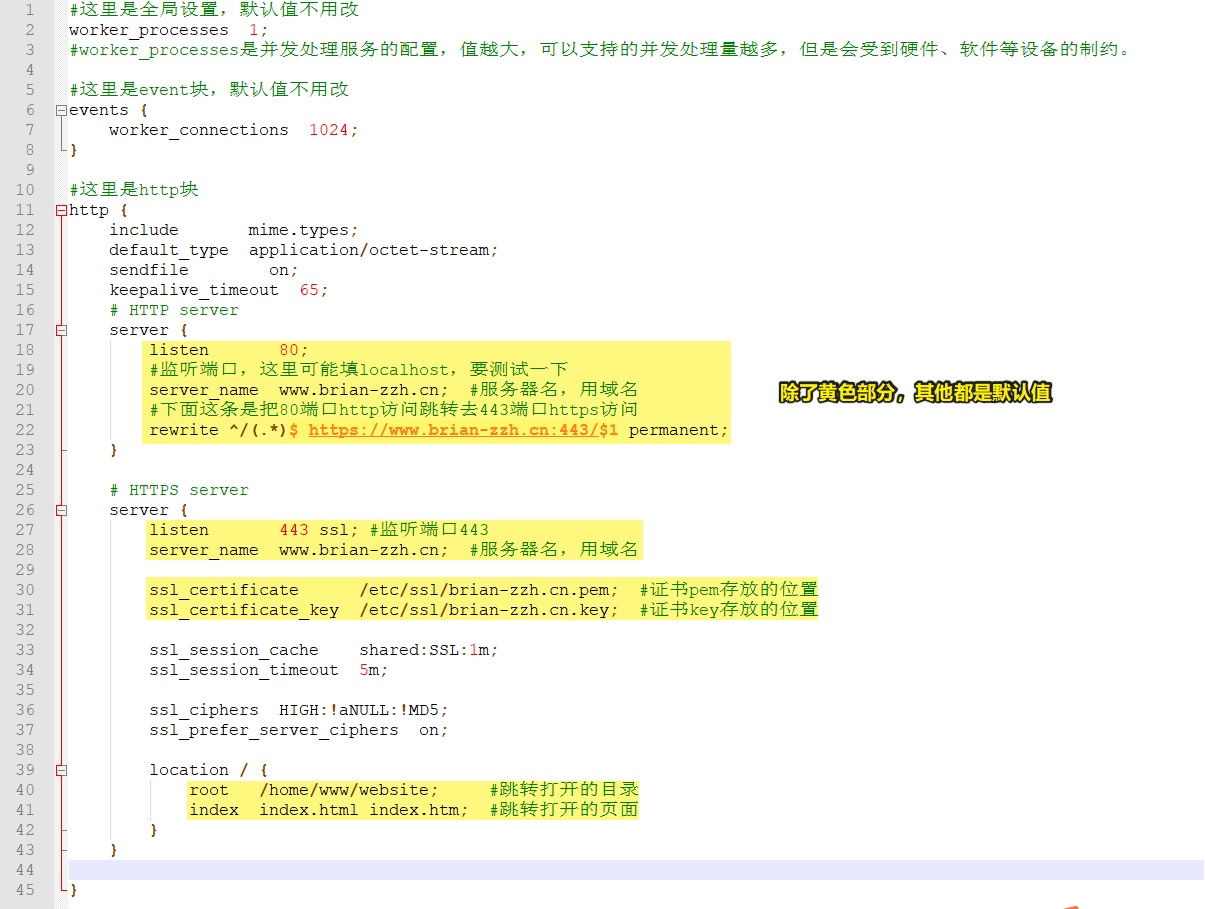
在usr/local/nginx-1.17.9里面执行
1 | #这个语句是配置ssl支持,要在解压出来的nginx文件夹里面执行,如:usr/local/nginx-1.17.9 |
1 | ##看nginx的版本 |
域名ICP备案
域名ICP备案我是直接在阿里上做的,因为阿里会免费帮你初审,比较省事。阿里的流程指引非常清晰,这里就简单贴图给大家看看。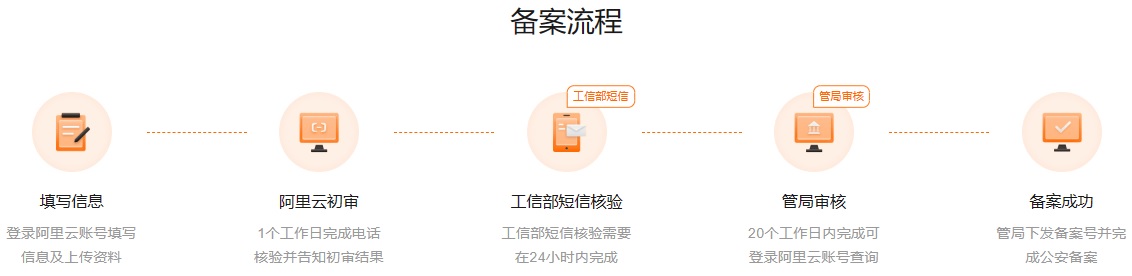
填写信息
首先阿里云的账号是手机、邮箱、实名验证都要OK。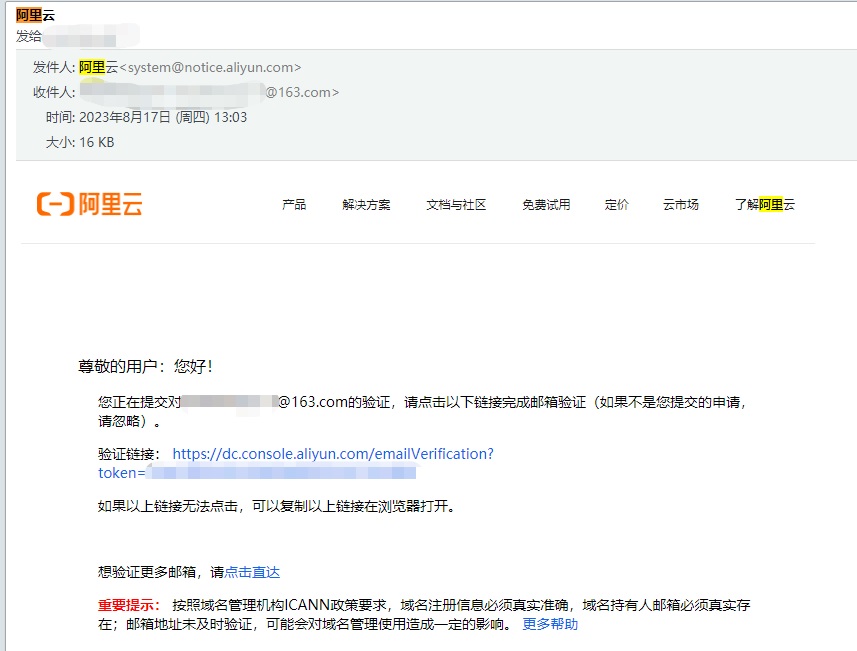
这里要按照阿里的要求填写资料,并且上传身份证和打印一份《互联网信息服务备案承诺书》签字打手指印。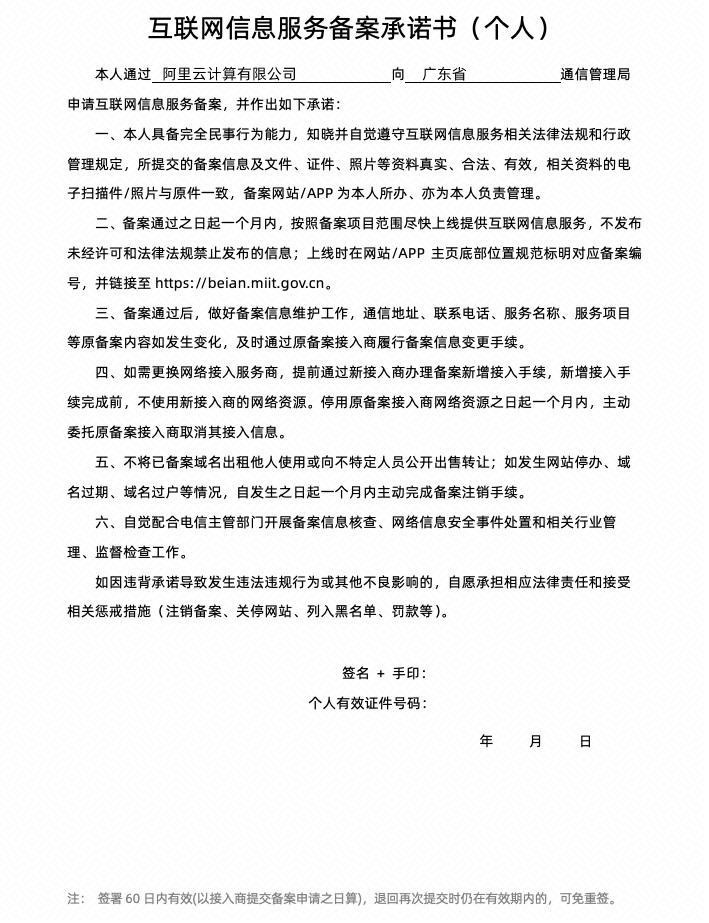
阿里初审
初审大概需要1~2周,特别注意网站名有起名规定,还有网站描述要大于20个字。还需要钉钉视频拿着身份证确认身份。我第一次没有过,因为是起名的问题。大家注意下图及连接,不要乱起名。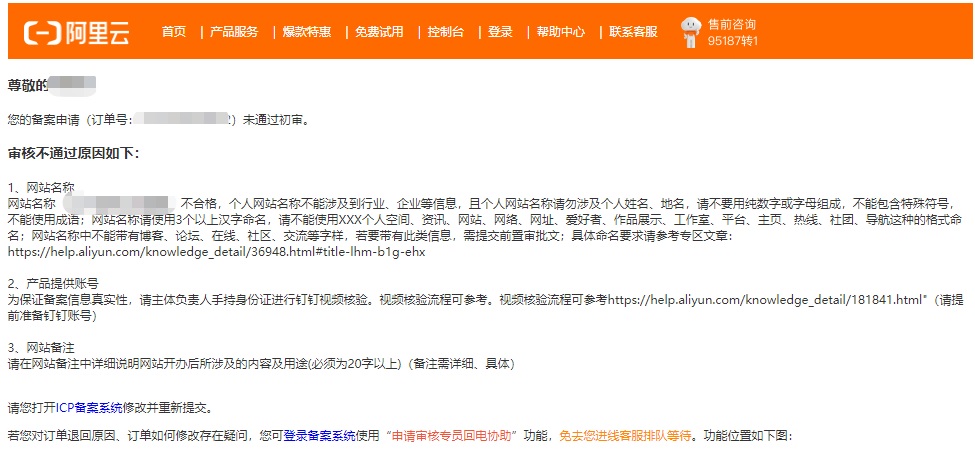
如果有网站名字问题请看要求:https://help.aliyun.com/zh/icp-filing/user-guide/fill-in-the-website-information-2#title-lhm-b1g-ehx
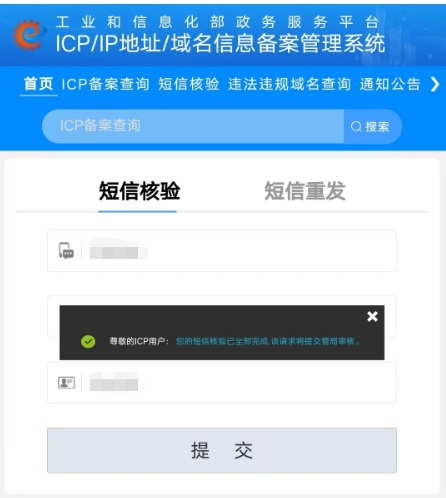
工信部短信验证
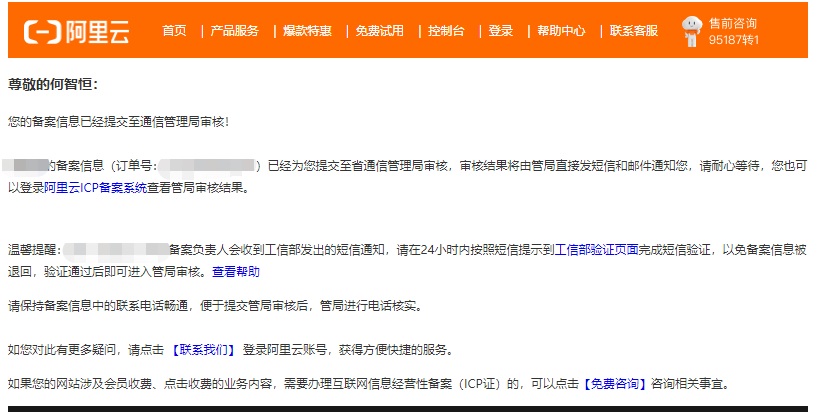
管局审核
这里等就好,我等了1周就好了。不用20多天。
备案成功
备案期间,你的网站会有这样的提醒,是正常的。
备案成功了会有阿里、邮件、短信通知。下图是短信通知。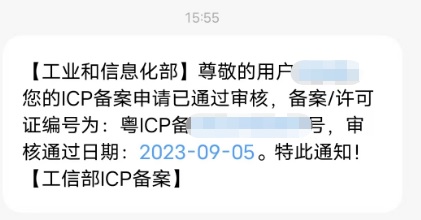
现在终于可以用https来访问我们的网站了。最后一步是去网络安全备案了。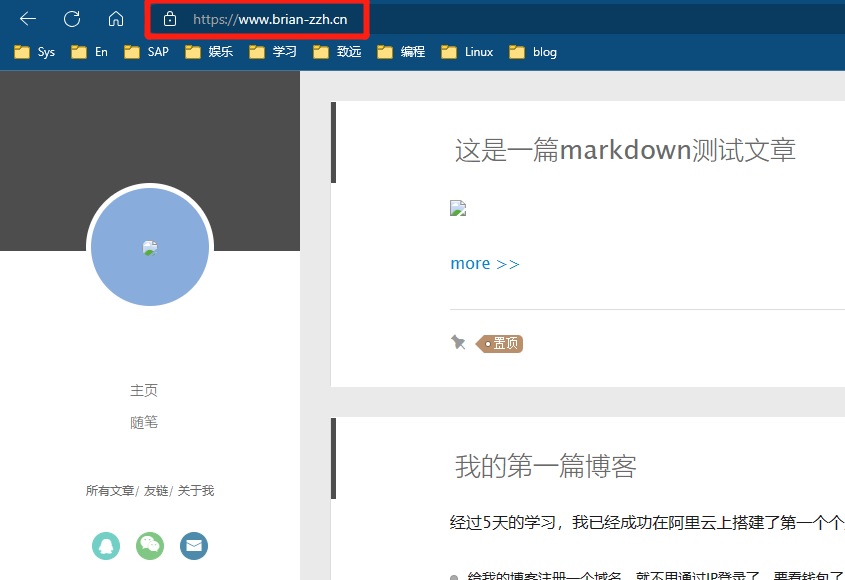
网络安全备案
https://beian.mps.gov.cn/#/ 我用Edge浏览器不能登录,建议用firefox
选择用户登陆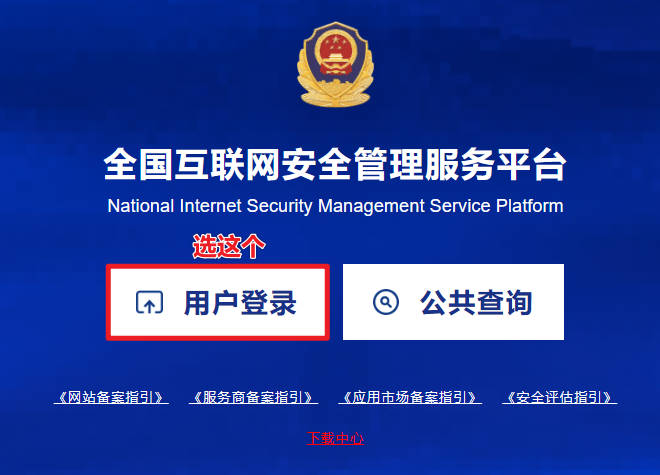
注册的时候要跳转另外一个网站,并下载APP做扫脸认证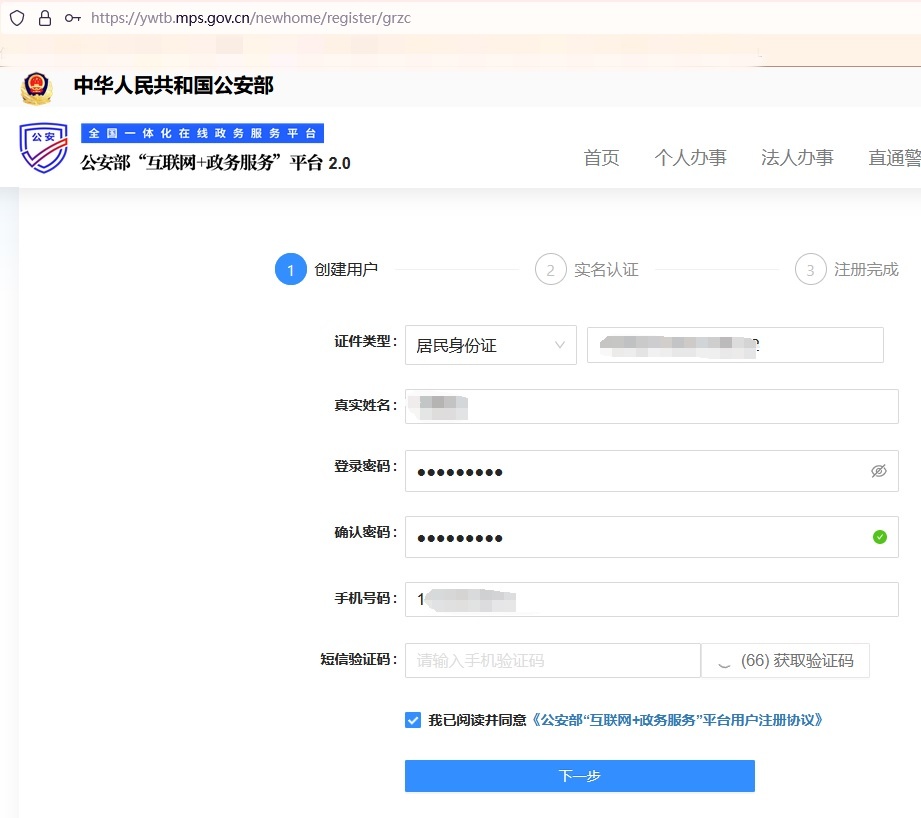
下载APP扫脸认证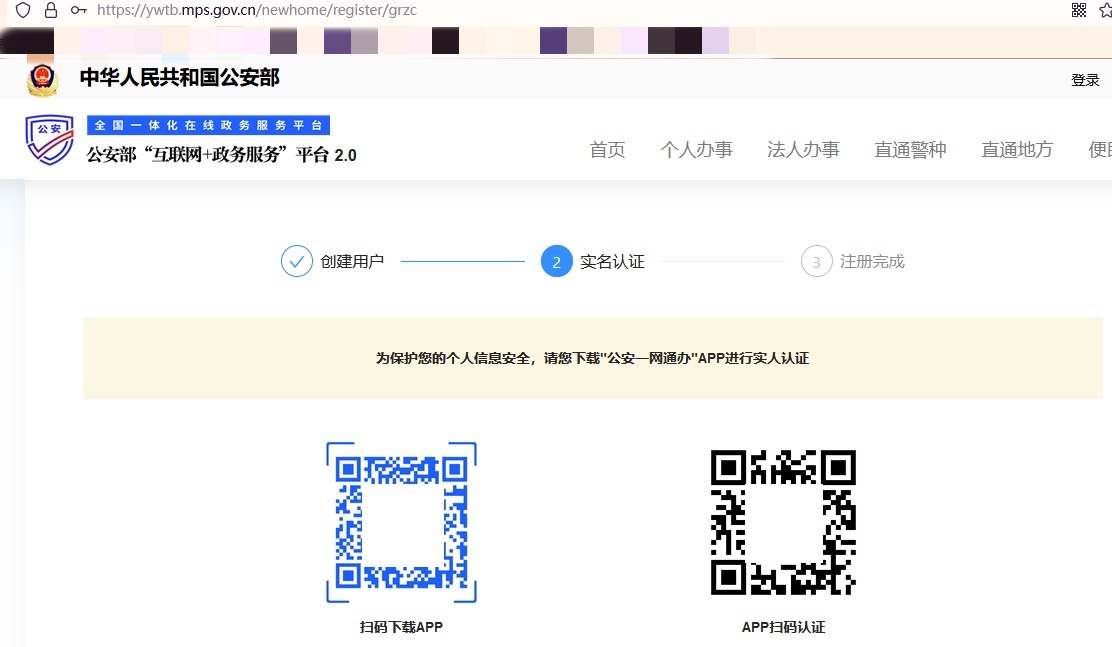
注册完账号就可以回到https://beian.mps.gov.cn 新增一个主体
按照步骤一步一步去填写资料就好,这里会要求域名证书,阿里的域名管理里面可以下载,下载好上传上去就好。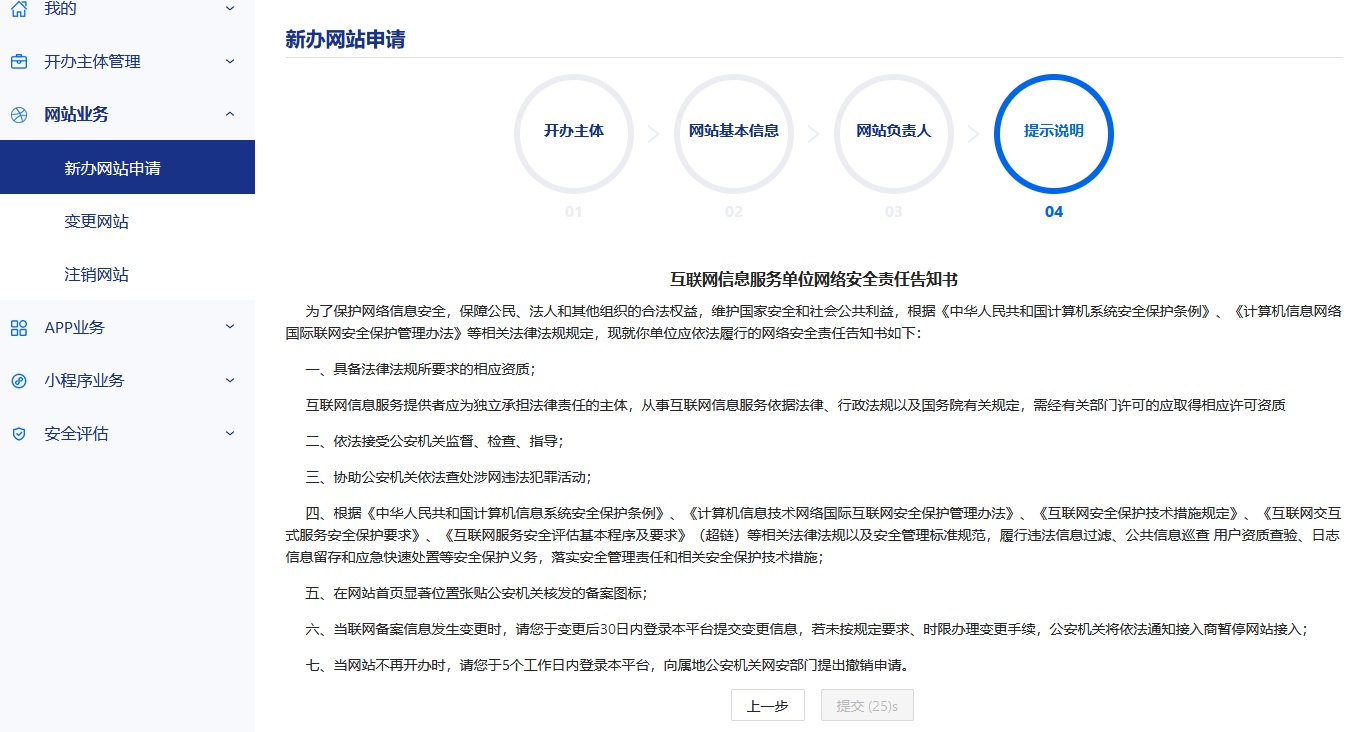
网站可以查到备案进度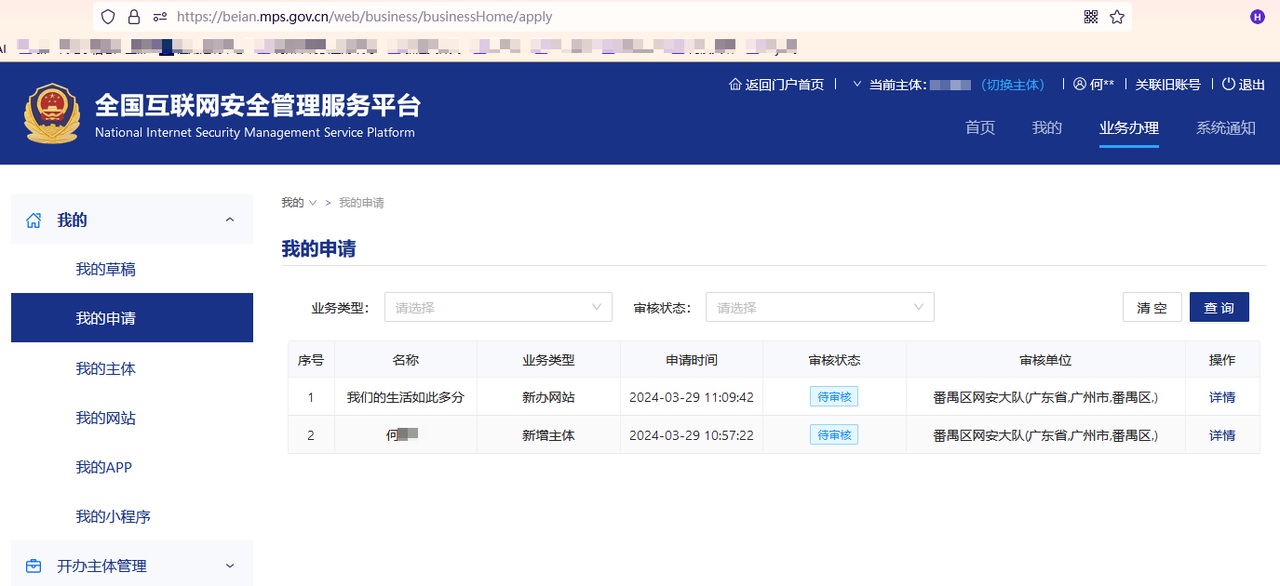
3个工作日(含提交当天),就收到短信说通过了,非常迅速的。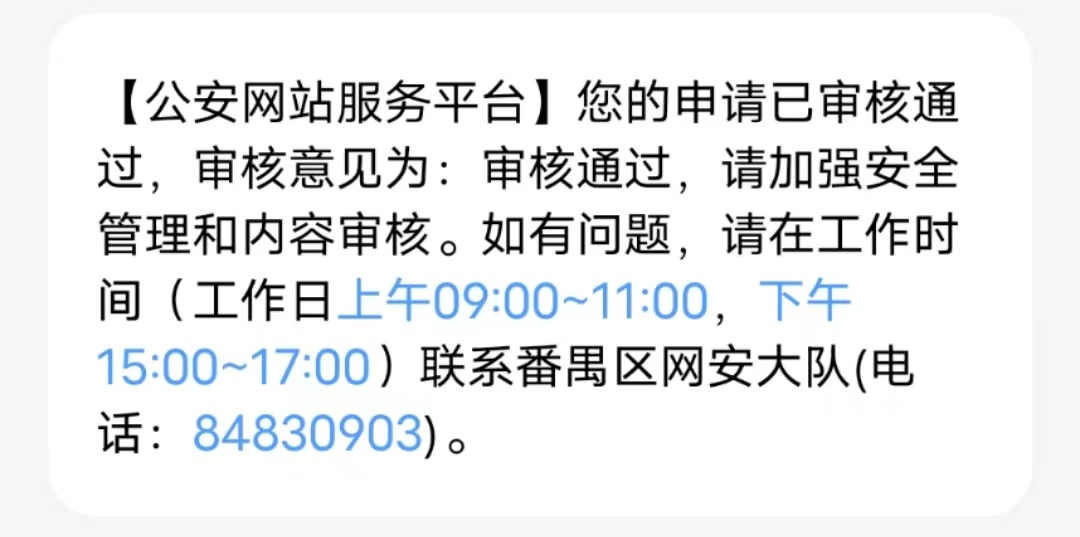
登录回去网站,就能查到备案编码了。现在是合法合规的网站了,赶紧多点写精彩的文章吧。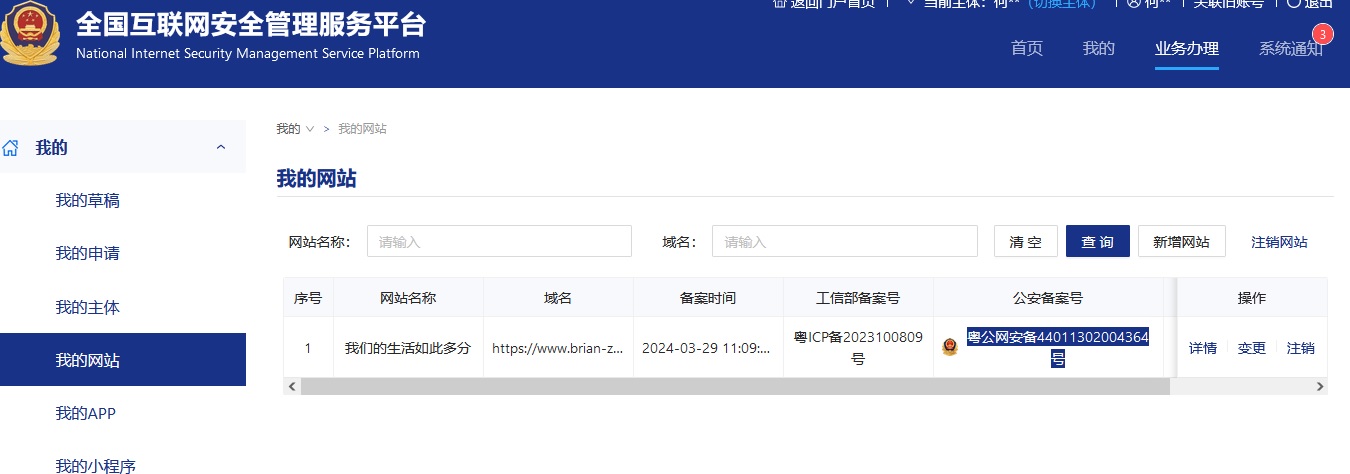
Markdown编写
建议使用工具是Yank Note
怎样编写markdown可以参考我的文章这是一篇markdown测试文章
next主题V8内容更新
(1)V8版next修复了一些bug,如侧边栏目录现在可用了。
(2)更强了一些功能,支持Twikoo,还在研究使用中。
(3)hexo g的速度明显慢很多,如果有几百篇文章以上的博主谨慎使用。
安装next8
https://theme-next.js.org/docs/getting-started/ 官方安装方法
下载安装文件方法1(推荐):
在 https://github.com/next-theme/theme-next-docs 下载源码包,解压出来。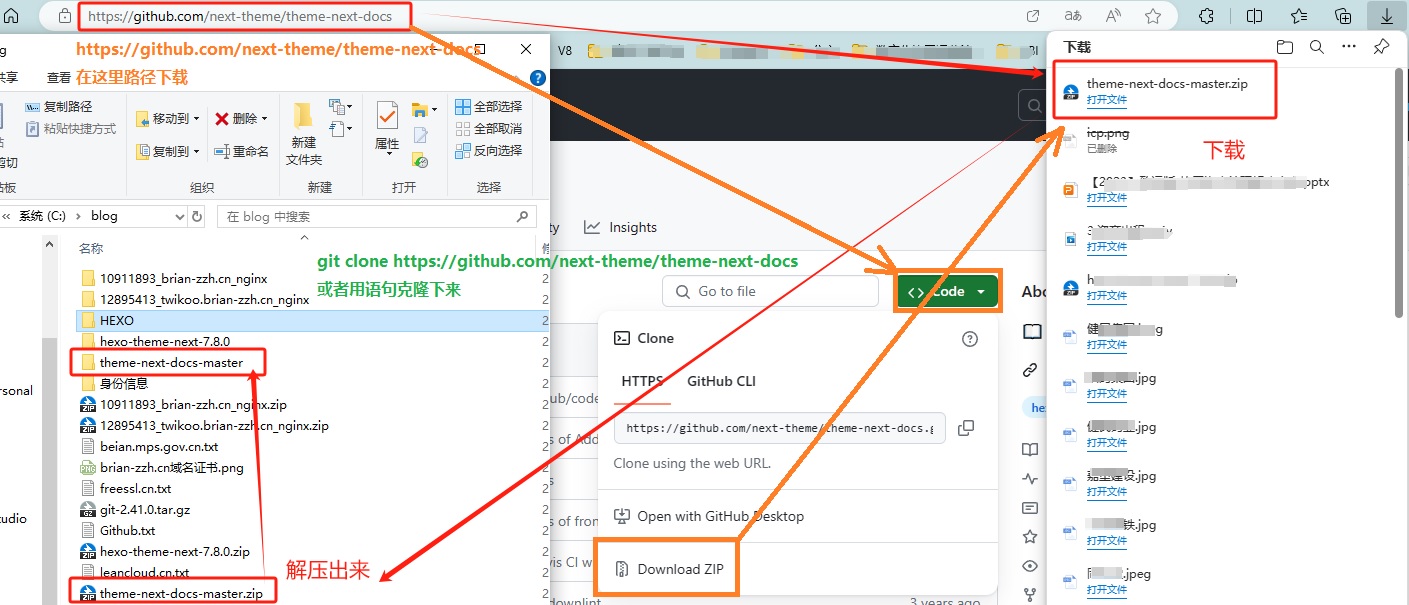
下载安装文件方法2:
1 | git clone https://github.com/next-theme/theme-next-docs |
执行安装next8
1 | cd theme-next-docs # 进入下载下来的文件夹 |
下载配置文件
1 | git clone https://github.com/next-theme/hexo-theme-next themes/next # 在hexo文件夹里面下载这个文件 |
配置启用跟老版next是一样的,见上面的使用next主题美化(7.8.0版)
安装配置Valine(next8)
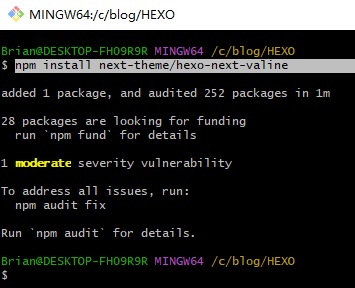
https://github.com/next-theme/hexo-next-valine 作者的链接
1 | # 在hexo的文件夹执行这个语句安装valine |
注册LeanCloud 见上面的评论Valine(Next 7.8.0版)
配置_config.yml,更多配置请看https://valine.js.org/
1 | # Valine |
部署成功: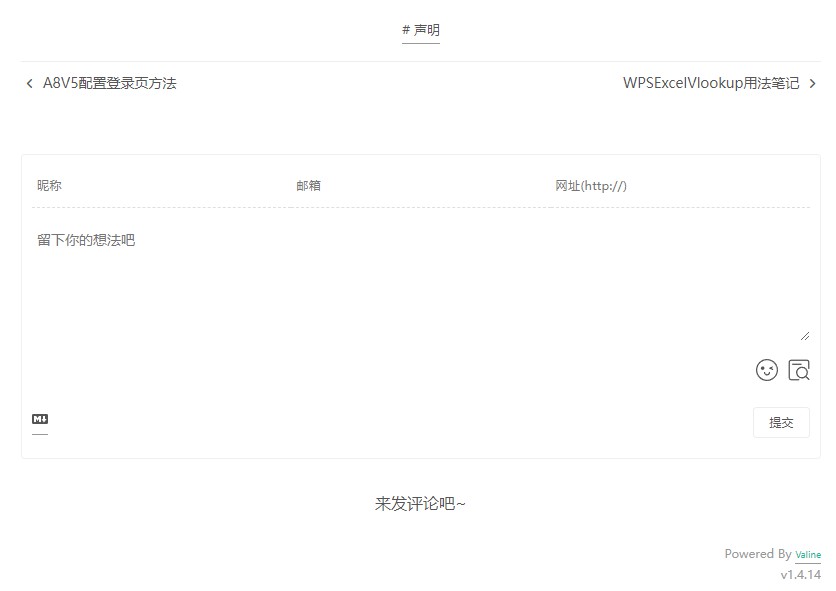
安装hexo-tag-aplayer音乐播放器
官方文档:https://github.com/MoePlayer/hexo-tag-aplayer/blob/master/docs/README-zh_cn.md
在安装部署了hexo的路径运行这个命令
1 | npm install --save hexo-tag-aplayer |
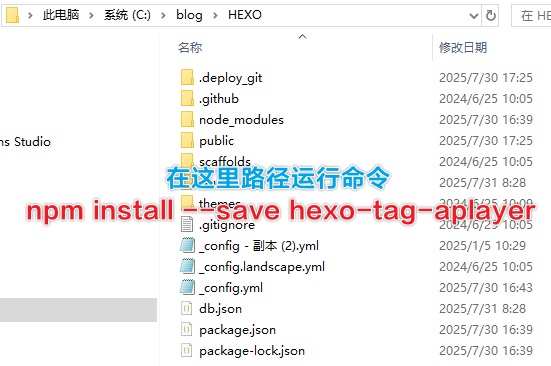
在安装部署了hexo的路径运修改_config.yml文件中的post_asset_folder为true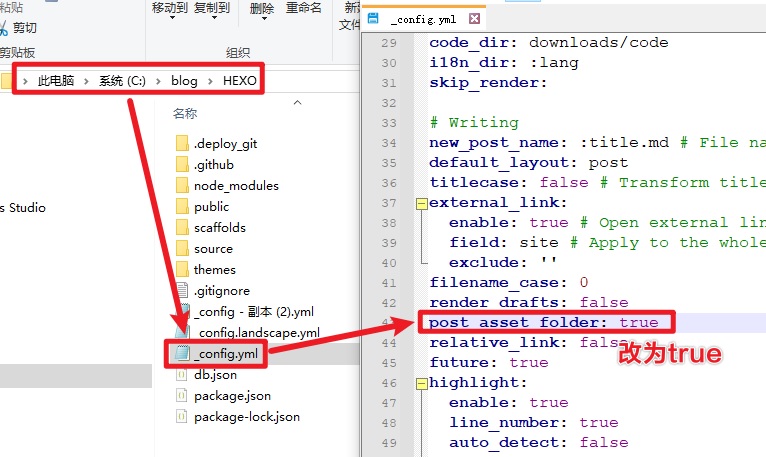
这样的效果是能让执行hexo new post <文章名>这个命令的时候会创建两个文件,一个是文章名.md和文章名的文件夹。
然后你要这个跟文章名一样的文件夹里面放mp3、封面图片、歌词文件。
并在md文件中用以下语句来放入播放器。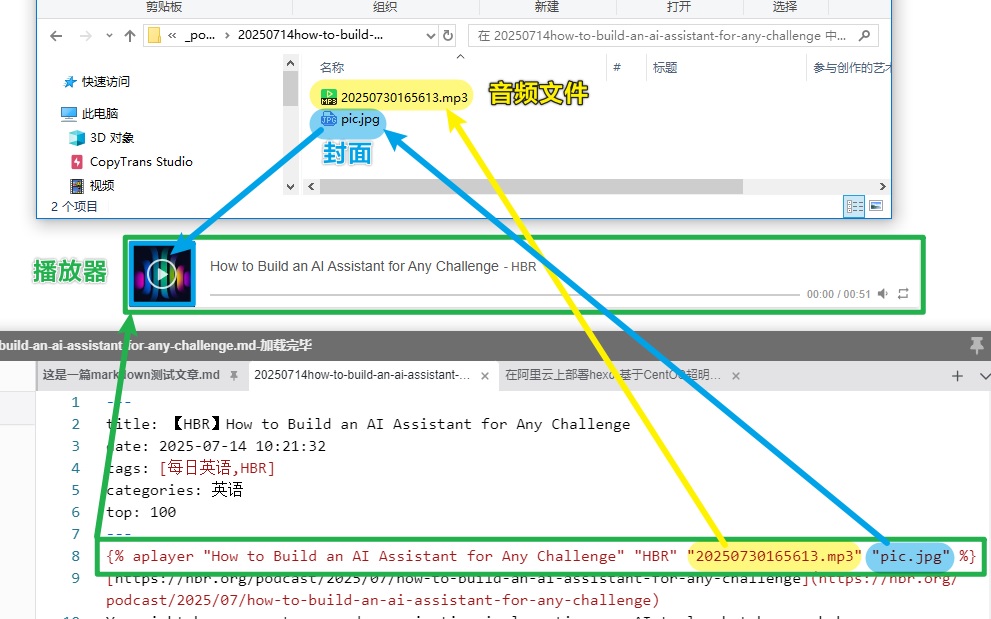
{% aplayer "How to Build an AI Assistant for Any Challenge" "HBR" "20250730165613.mp3" "pic.jpg" %}如本渣的这个例子是:
- 歌名:”How to Build an AI Assistant for Any Challenge”
- 歌手:”HBR”
- 文件:”20250730165613.mp3”,放在了
C:\blog\HEXO\source\_posts\20250714how-to-build-an-ai-assistant-for-any-challenge这个目录中。 - 封面:”pic.jpg”,也是放在了
C:\blog\HEXO\source\_posts\20250714how-to-build-an-ai-assistant-for-any-challenge这个目录中。
详细代码参数:1
{% aplayer title author url [picture_url, narrow, autoplay, width:xxx, lrc:xxx] %}
title: 曲目标题author: 曲目作者url: 音乐文件 URL 地址picture_url: (可选) 音乐对应的图片地址narrow: (可选)播放器袖珍风格autoplay: (可选) 自动播放,移动端浏览器暂时不支持此功能width:xxx: (可选) 播放器宽度 (默认: 100%)lrc:xxx: (可选)歌词文件 URL 地址
资源文件夹和标签的图片
平时我放图片的方法是在文章中用这个命令来显示图片。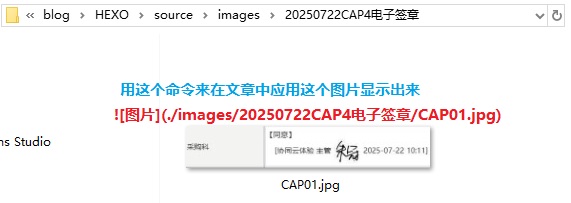
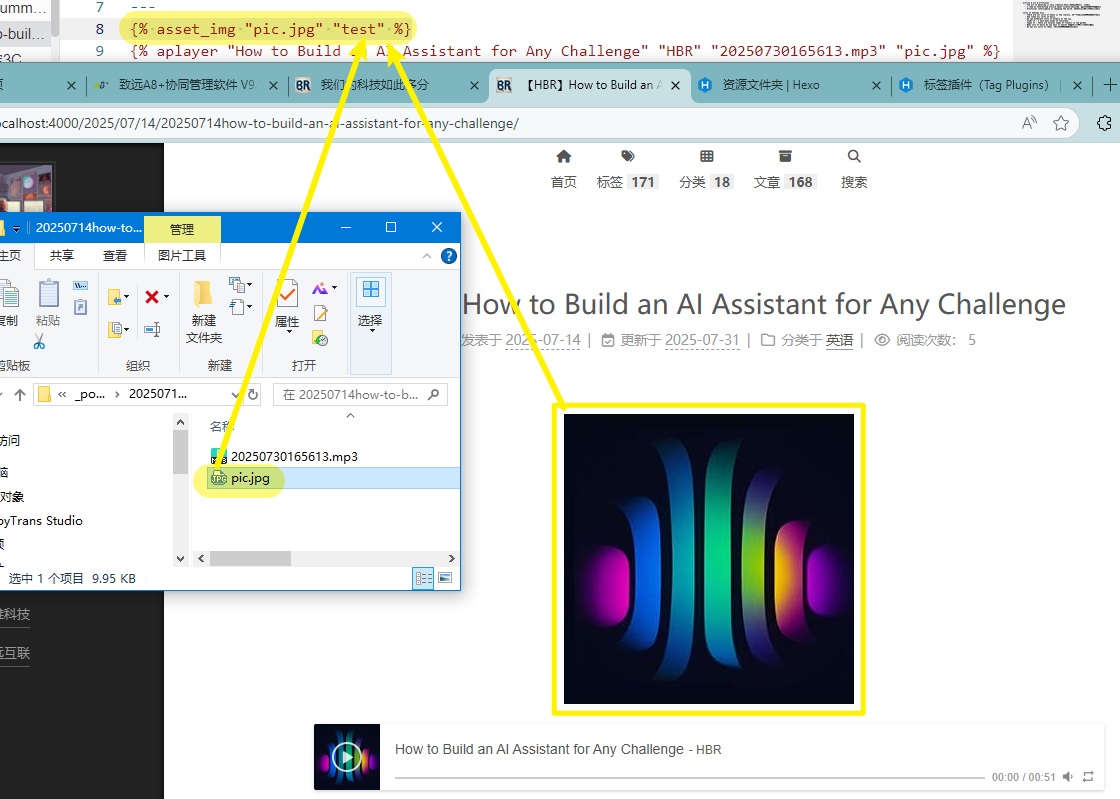
但是如果开启了资源文件夹,即:执行hexo new post <文章名>这个命令的时候会创建两个文件,一个是文章名.md和文章名的文件夹。这个![]()的显示图片方法就不适用了。要改成用标签的方法。
1 | {% asset_img "pic.jpg" "test" %} |
加入看板娘hexo-helper-live2d

(1)在hexo文件夹里面用git Bash运行npm install --save hexo-helper-live2d来安装插件。
(2)在hexo目录新建C:\blog\HEXO\live2d_models\shizukul这个目录,里面新建文件shizuku.model.json。这一步好像没啥用
(3)改hexo文件夹里面的_config.yml在最下面插入这段代码
1 | live2d: |
https://github.com/xiazeyu/live2d-widget-models这里提供了看板娘,选择你喜欢的来安装。
(4)下载你喜欢的看板娘,在hexo文件夹里面用git Bash运行npm install --save live2d-widget-model-shizuku
(5)用hexo s来看看有没有生效。
(参考)基于Unbuntu22.04(服务端)和Deepin20.9(客户端)的部署hexo
最近尝试了一下,用Ubuntu作为服务端,用Deepin作为客户端。因为CentOS停更了,Windows去中国化了,感觉还是需要有备无患。关于Windows去中国化,可以看本渣的这个帖子:微软这人才更新把中文支持变成屎了,这是微软去中国化了吗?
再加上阿里云续费实在太贵了,见本渣此文章:公有云新增便宜,续费贵的陷阱纯吐槽,本博客今年8月要迁移一次了,当成再练手一次吧。
废话不多说了,开始!
白嫖一下阿里云1个月的2C4G服务器来练手
去到开发者社区>云起实验室>实践系列课>阿里云产品入门第一课,完成第一课的学习,就能白嫖一个月2C4G服务器或或者3个月的券。一个项目的学习,一个月基本足够了。就是不知道能不能无限白嫖。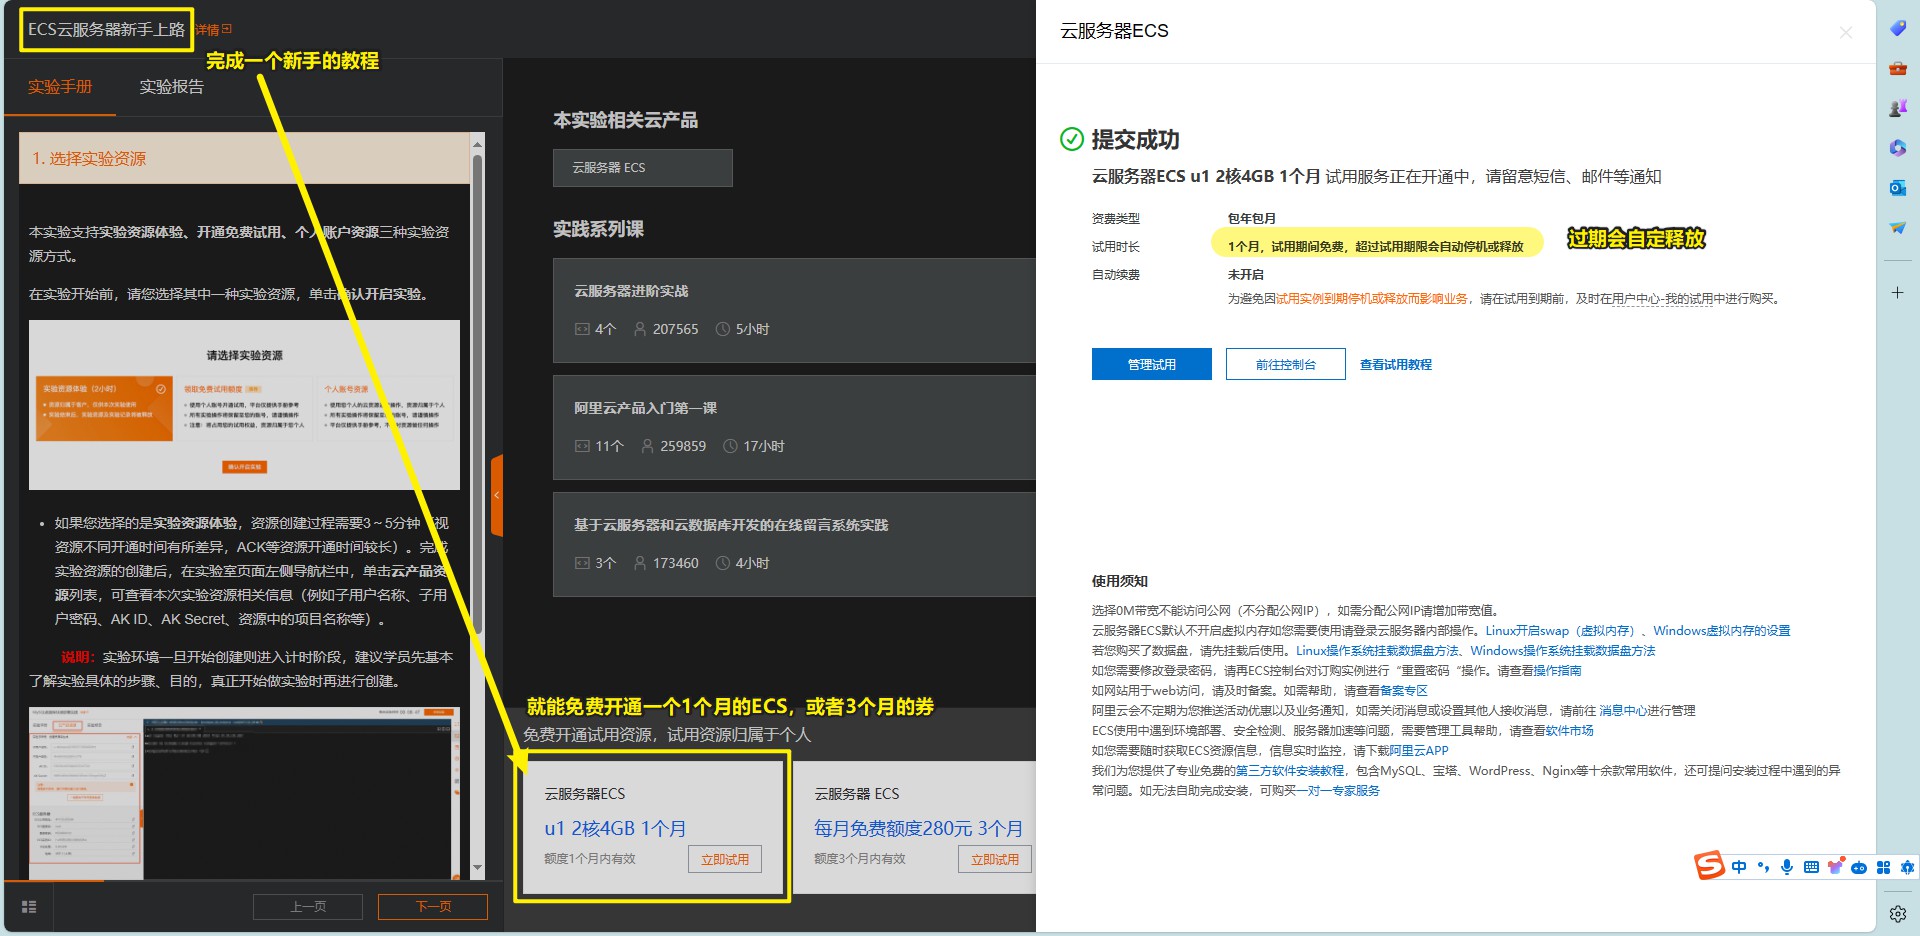
在ecs的控制台就能找到这个云服务器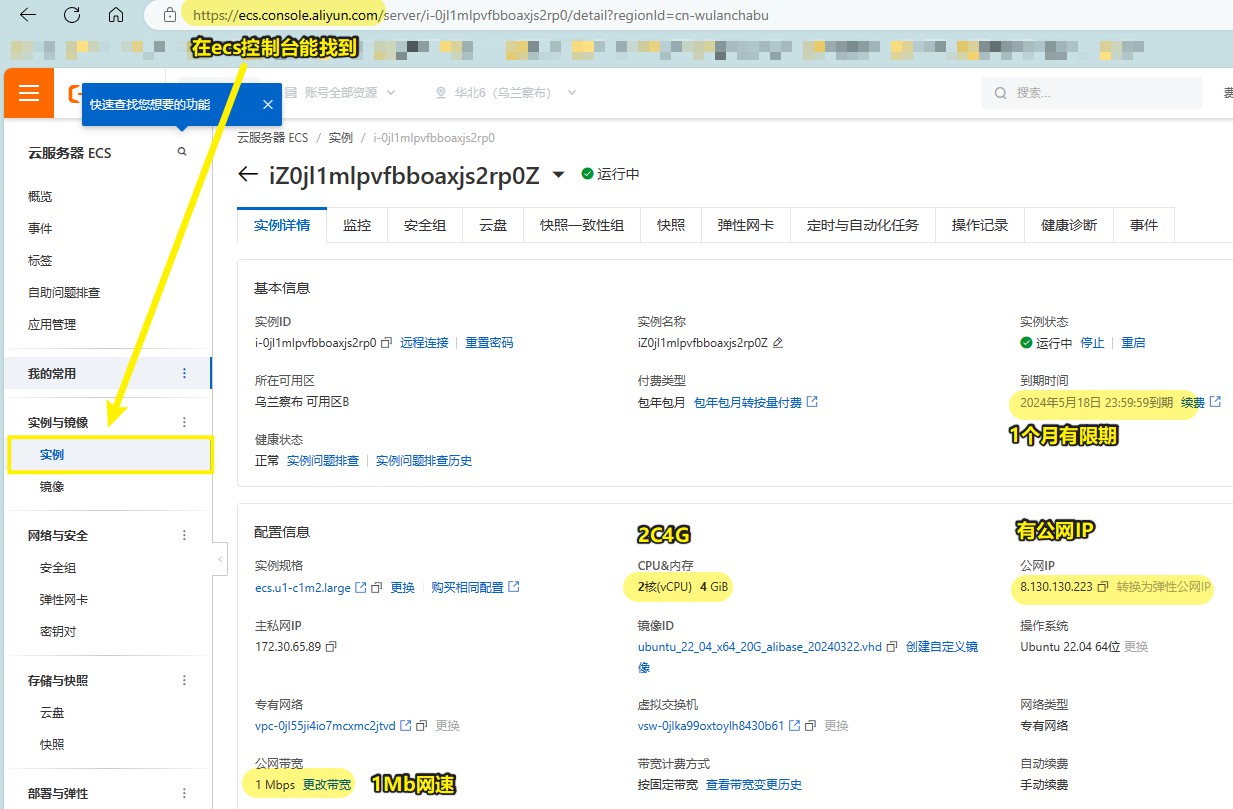
轻松应用起来吧,看似一切都没有问题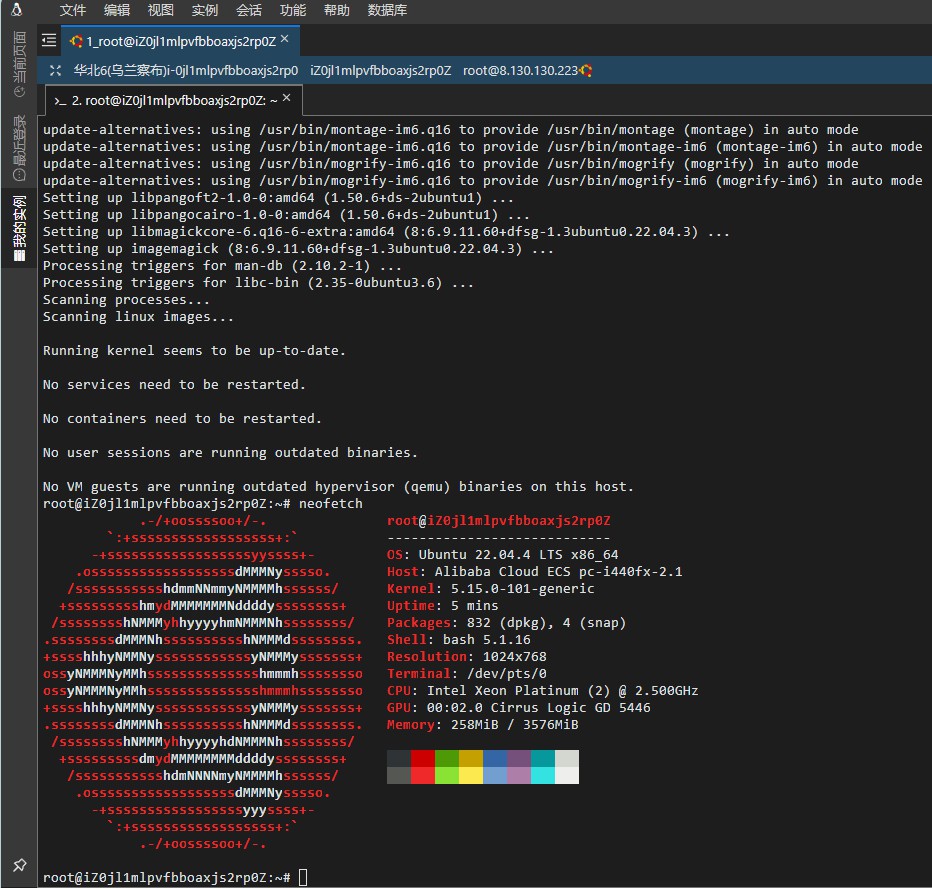
服务端配置(Ubuntu22.04)
所有操作都在root用户中进行
gcc依赖安装
好像已经默认安装了,看看版本gcc --version
1 | root@iZ0jl1mlpvfbboaxjs2rp0Z:/usr/local# gcc --version |

pcre依赖安装
用pcre-config --version查看一下,发现没有安装
1 | root@iZ0jl1mlpvfbboaxjs2rp0Z:/usr/local# pcre-config --version |
Ubuntu建议用这个命令安装pcre
1 | apt install libpcre3-dev #Ubuntu建议用这个命令安装pcre |
再用pcre-config --version查看一下,发现可以返回版本号了。
1 | root@iZ0jl1mlpvfbboaxjs2rp0Z:~# pcre-config --version |

安装Nginx
1 | #安装nginx |

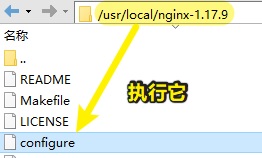
在解压出来的目录下执行./configure
1 | # 确保cd到这个目录: cd /usr/local/nginx-1.25.5 |
1 | #./configure 出来的结果 |
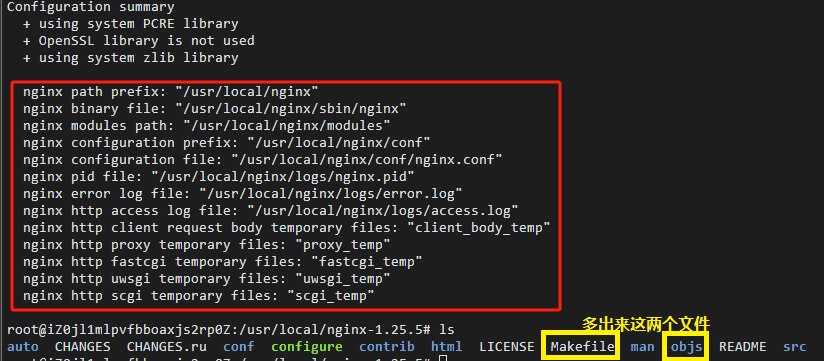
多了Makefile和objs两个文件
继续在/usr/local/nginx-1.25.5目录中执行下面语句
1 | make && make install #进行编译并安装 |
在浏览器上输入服务器的公网IP地址,查看有没有Nginx的返回值,有就证明成功了。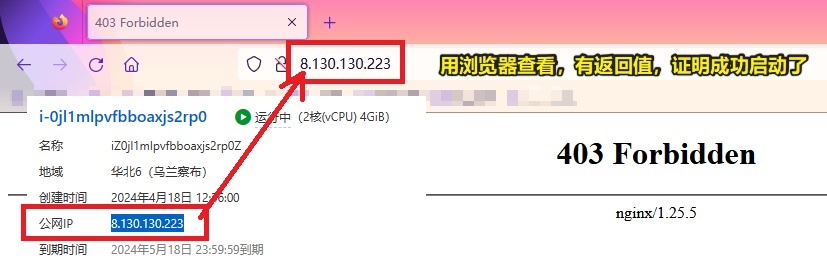
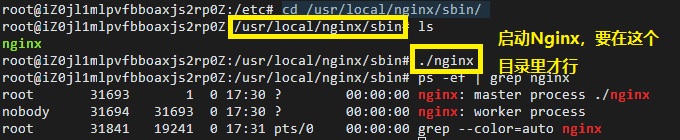
Nginx的启停操作
进入 nginx 目录中: cd /usr/local/nginx/sbin 才能操作
1、查看 nginx 版本号:./nginx -v
2、启动 nginx:./nginx
3、停止nginx:./nginx -s stop
4、重新加载 nginx 重新加载配置文件:./nginx -s reload
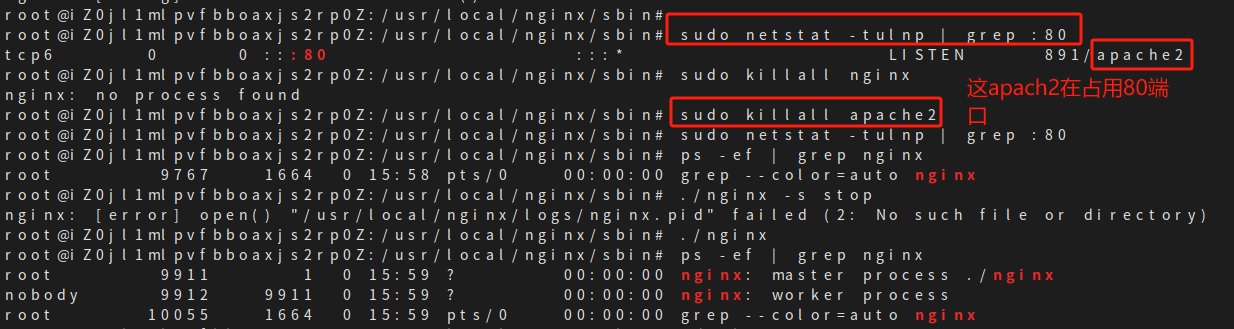
无法重启nginx解决方法:80端口被占用
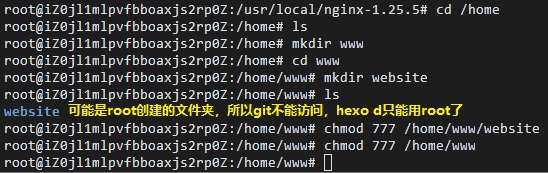
创建hexo网站文件存放的目录
新建/home/www/website文件夹,这是放置静态页面index.htm主页的地方,让nginx代理到这里找到index.htm文件就能浏览网站了。
1 | #确保是在root中操作 |
修改nginx.conf
通过vim或vi或xftp命令修改/usr/local/nginx/conf目录下的nginx.conf文件中的这两个地方,换成
root /home/www/website;
当然,如果你的hexo静态网站文件,是在另外一个目录,改成对目录即可。
1 | cd /usr/local/nginx/conf/ |
1 | cd /usr/local/nginx/sbin/ |

别忘记,在阿里云的安全组里面也要添加80和443的端口开放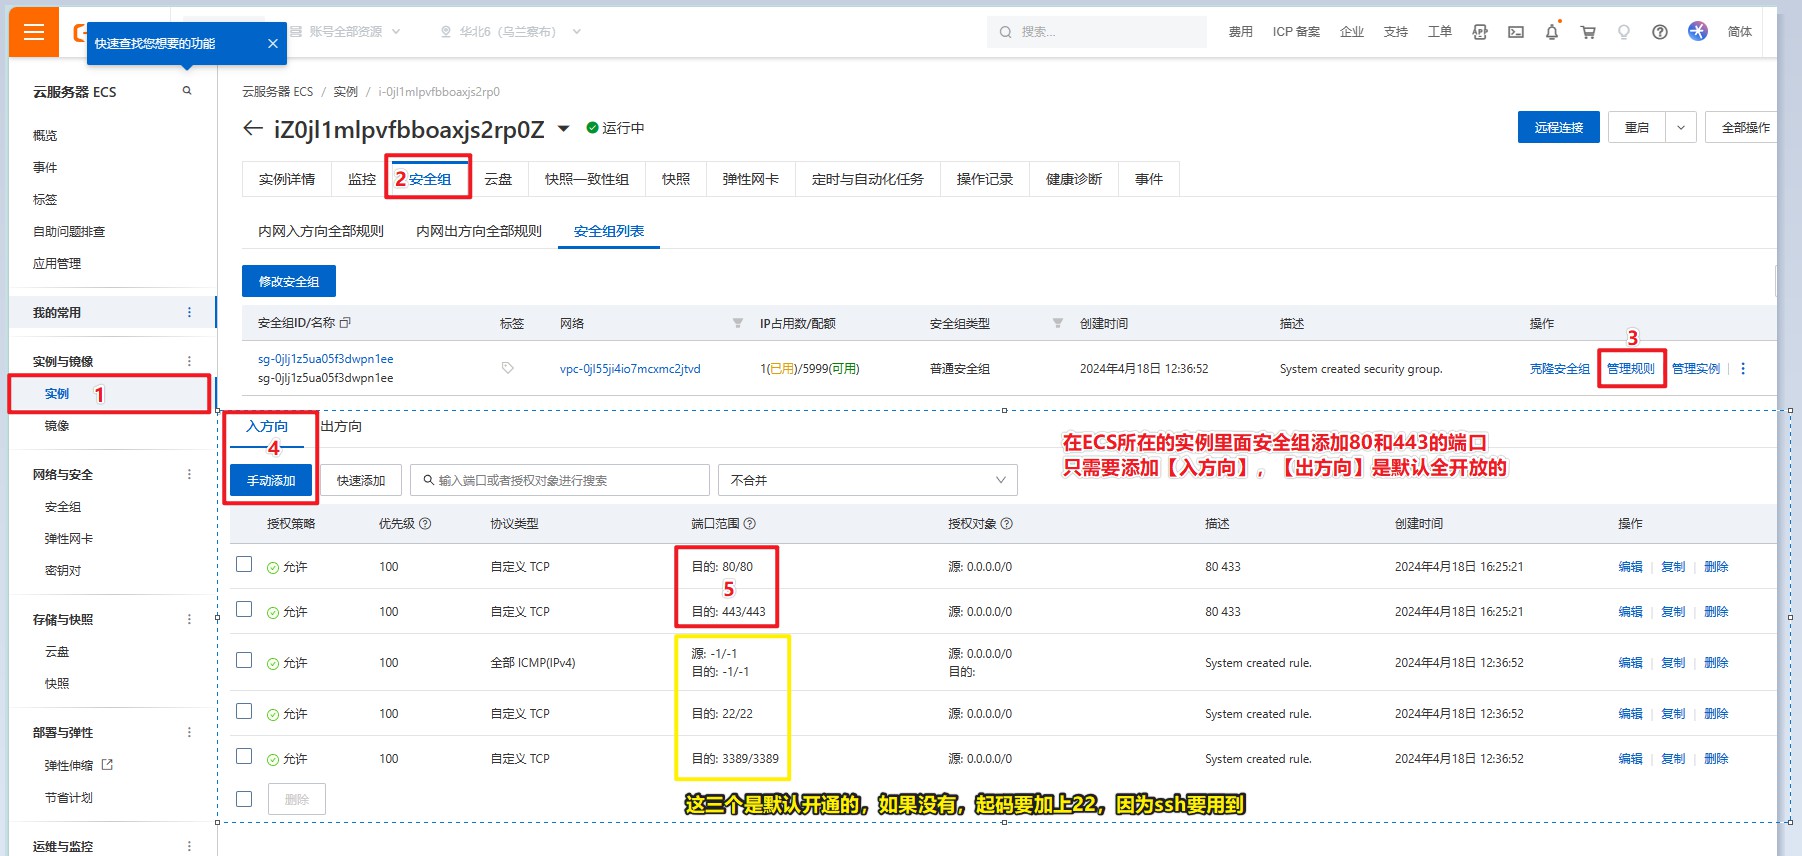
配置nginx脚本
在/etc/init.d/路径下添加脚本文件,名称为nginx,内容如下。用vim或vi添加。
1 |
|
1 | chmod +x nginx --继续在在/etc/init.d/路径下,给这个文件赋权 |
可以使用以下控制指令来使用nginx,而不需要去到/usr/local/nginx/sbin/里面做操作了。
确保在root中操作
1 | service nginx start --启动 |

安装Nodejs和npm
1 | #下载并运行Node.js的安装脚本,以在Linux系统中安装Node.js。 |
1 | node -v # 查看是否安装成功 |
安装git,配置权限
下面用Rsync来实现hexo d,所以git配置好像没啥用,但是还是先配置了再说
1 | sudo apt install git-all #在ubuntu上安装git |

1 | chmod 740 /etc/sudoers #给/etc/sudoers赋权 |
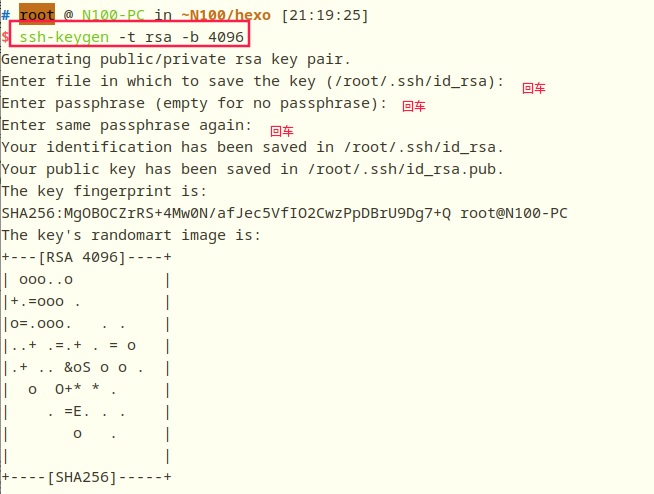
配置shh秘钥登录(免密码登录)
在客户端Deepin系统的root用户下操作
在deepin中生成秘钥,执行语句ssh-keygen -t rsa -b 4096
1 | # root @ N100-PC in ~N100/hexo [21:19:25] |
将生成的公钥复制到服务器上的~/.ssh/authorized_keys文件中:
1 | # 在客户端deepin系统执行这个命令 |
会自动为服务端上的root用户生成authorized_keys文件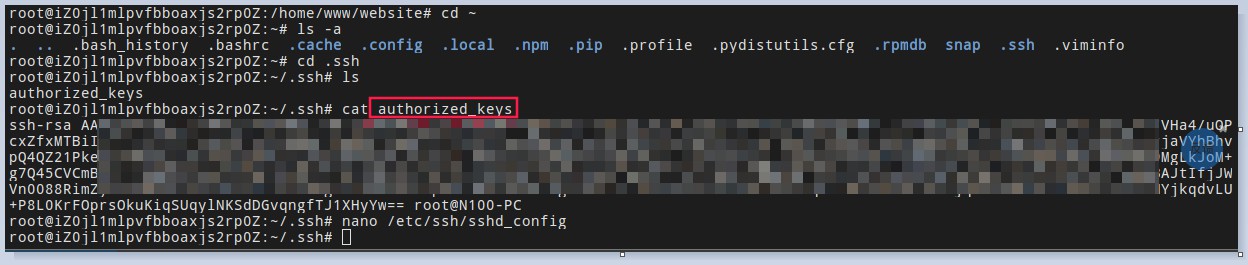
1 | chmod 600 ~/.ssh/authorized_keys #给文件赋权 |

在deepin中使用这个语句尝试是否能免密登录
1 | ssh root@<你云服务器的公网IP> |
创建git空仓库
下面用Rsync来实现hexo d,所以git配置好像没啥用,但是还是先配置了再说
1 | adduser git #新建一个叫git的linux账号 |
把这句话写入post-receive文件
1 | git --work-tree=/home/www/website --git-dir=/home/git/blog.git checkout -f |
- /home/www/website 这是放博客静态网站文件的地方
- /home/git/blog.git 这是放hexo库的地方

客户端配置(Deepin20.9)
建议所有操作都在root用户中进行,不然容易报错,或者命令上加上sudo
安装git
1 | # 安装git 两条语句都行 |
安装nodejs
官方建议安装方法:https://github.com/nodesource/distributions
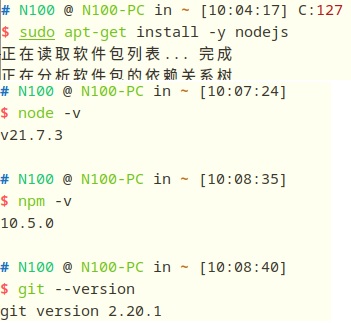
Node.js v21.x:
Using Ubuntu(因为Deepin是基于Ubuntu魔改的发行版,所以用Ubuntu一样的安装方法)
1 | curl -fsSL https://deb.nodesource.com/setup_21.x | sudo -E bash - &&\ |

1 | sudo apt-get install -y nodejs |
安装hexo
要在root用户下才能成功,这样就导致一般用户无法编辑到初始化的文件了
安装好git和nodejs后就可以运行这一句
1 | npm install -g hexo-cli |

非root用户安装Hexo报错解决
如果报错无法执行npm install -g hexo-cli报错,如下图,是权限问题,解决方案,即用非root用户也能安装和使用Hexo: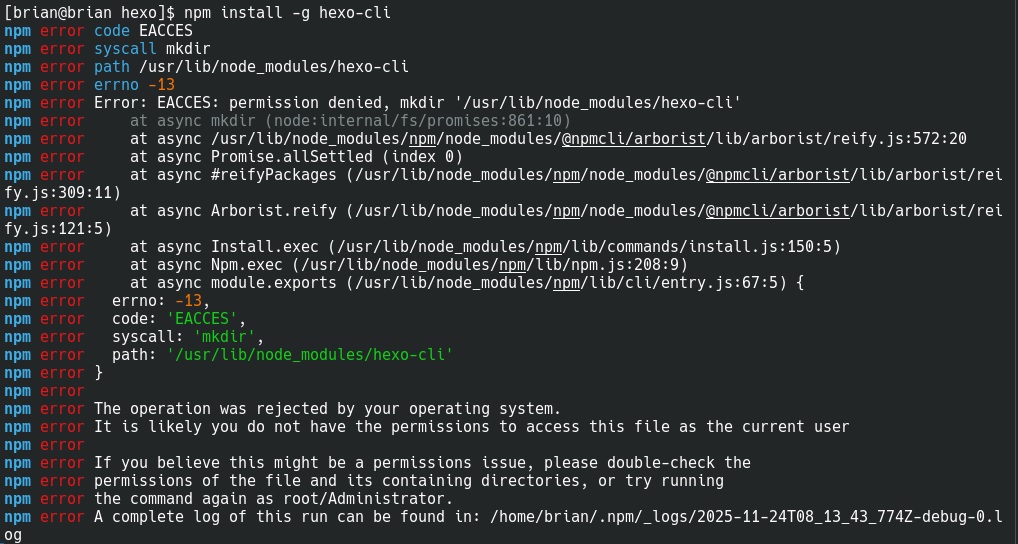
1 | # 为npm创建一个用户级全局目录 |
hexo本地建站
具体操作可查看https://hexo.io/zh-cn/docs/setup
1 | hexo init <目录所在的文件夹路径> #也可以在要建站的目录下直接运行hexo init |
本地建站完毕后,就可以看到这些目录,如用tree命令查看一下
1 | . |
简单的hexo命令使用
要在hexo初始化的文件夹里面使用,如我的目录是/home/N100/hexo/,使用hexo命令前要cd到这个目录
1 | hexo clean # 把/home/N100/hexo/.deploy_git文件夹清空 |
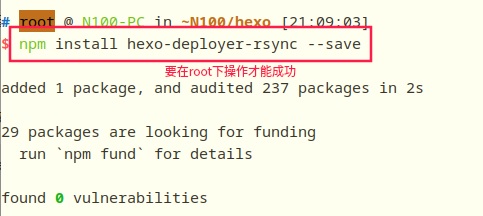
安装Rsync来实现hexo d
要在root用户下才能成功
1 | npm install hexo-deployer-rsync --save |
然后按照下图的方法配置_config.yml,详细见:https://hexo.io/zh-cn/docs/one-command-deployment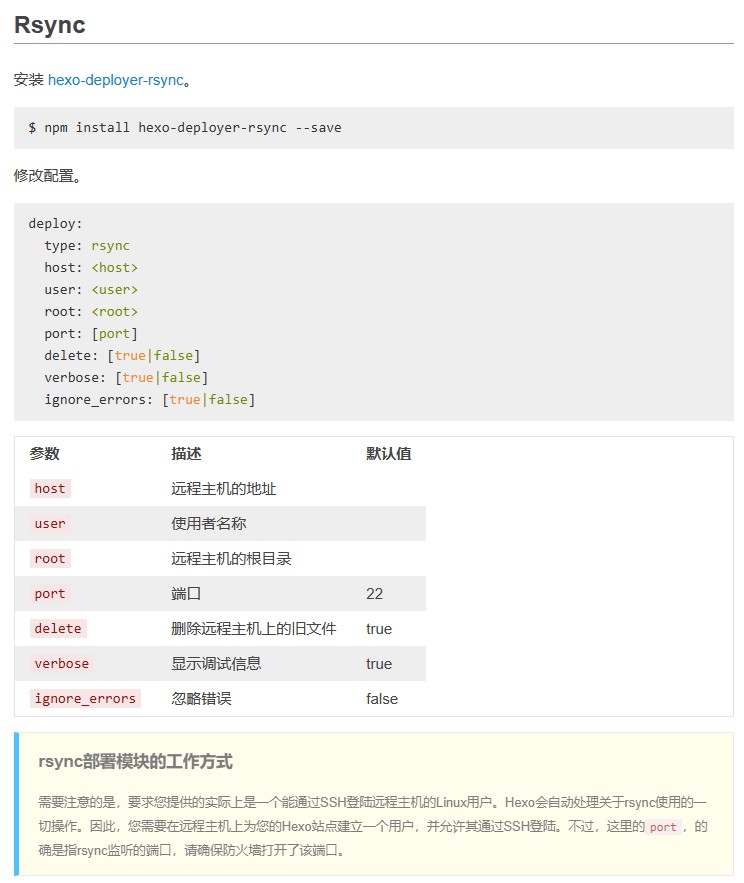
我自己的配置如下: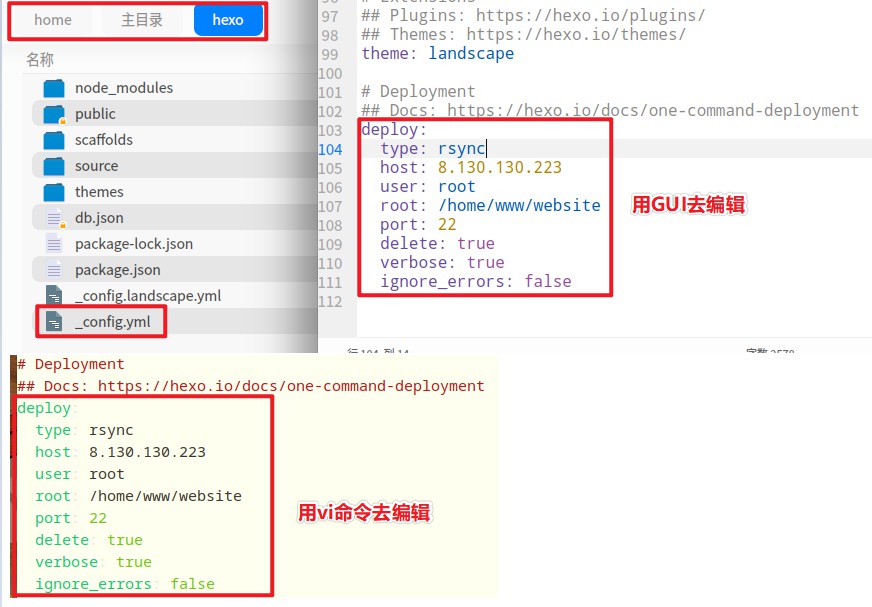
1 | # Deployment |
然后你就可以尝试hexo d命令了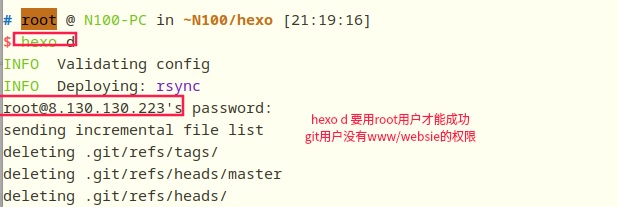
如果你遇到下面这三个问题,可以这样解决:
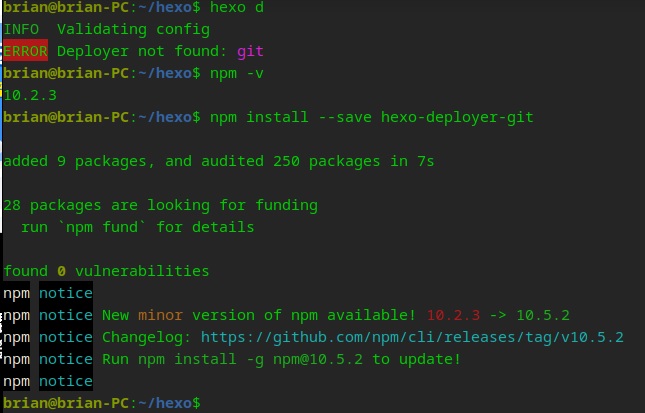
hexo d错误1
1 | # 在/home/N100/hexo/用root用户执行这个语句 |
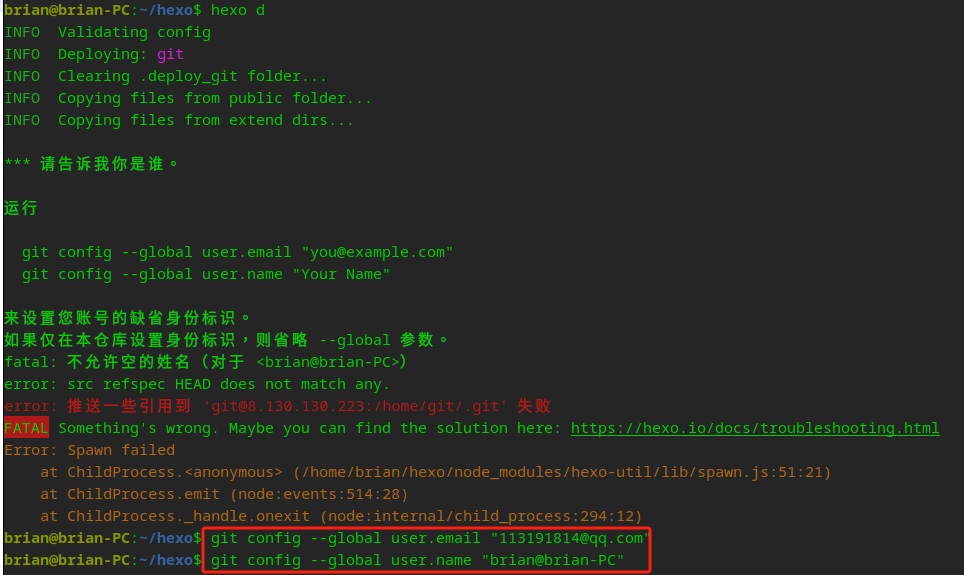
hexo d错误2
这个错误应该是用git的deploy方式才会出现,如果用我建议的Rsync方式,不会出现。
1 | git config --global user.email "113191814@qq.com" |
hexo d错误3
这个错误我是真不知道怎样解决,所以才放弃了用git的deploy方式同步/home/N100/hexo/.deploy_git文件夹,而改成上线建议的Rsync方式。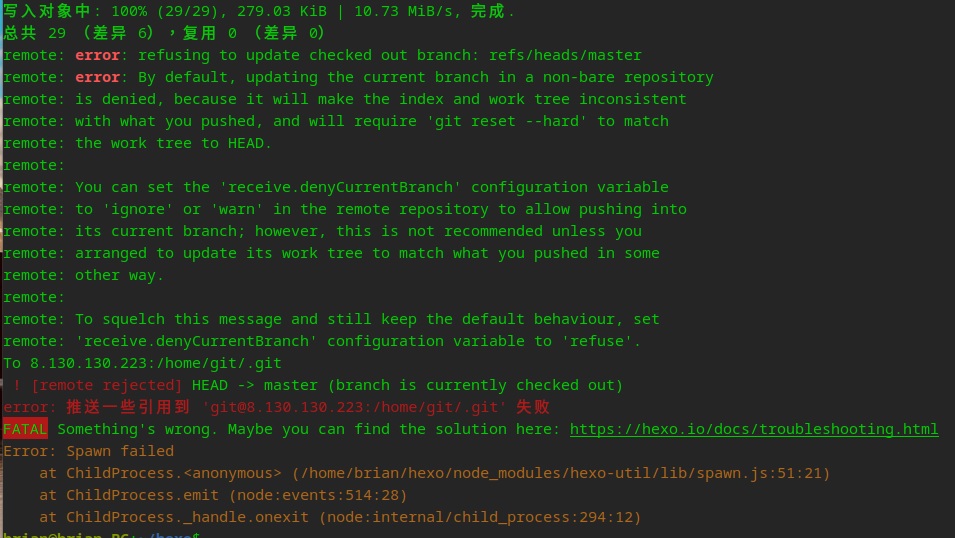
让非root用户可以修改hexo文件
上面,我们的/home/N100/hexo/里面的文件,都是用root用户去创建的。但是我的Deepin默认登录用户是N100,所以要授权给N100用户可以修改/home/N100/hexo/里面的文件。
1 | # 用root用户操作 |
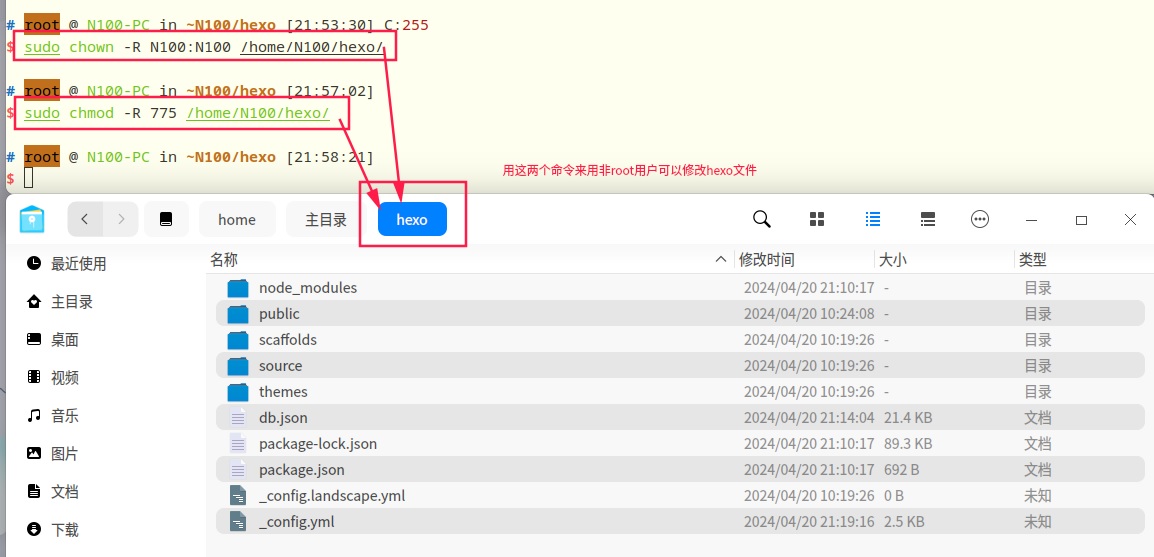
这样我们就能修改里面的md文件了,平时用hexo new命令的时候,用N100这样的普通用户就行。但是要执行hexo d就要切换到root用户,会比较麻烦。
成功用hexo d基于Rsync方式上传网站文件到阿里云服务器了。可以通过浏览器用IP访问了。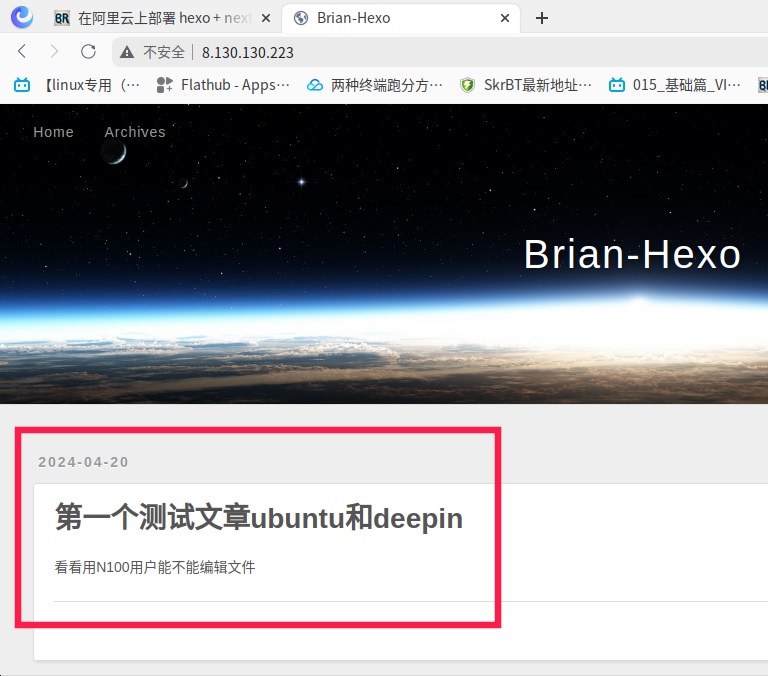
(技巧)Deepin给阿里云传文件SFTP
Deepin是Linux系统,没有xftp,上传文件会比较麻烦。但是Deepin上的FileZilla非常好用,在Deepin商店就能下载。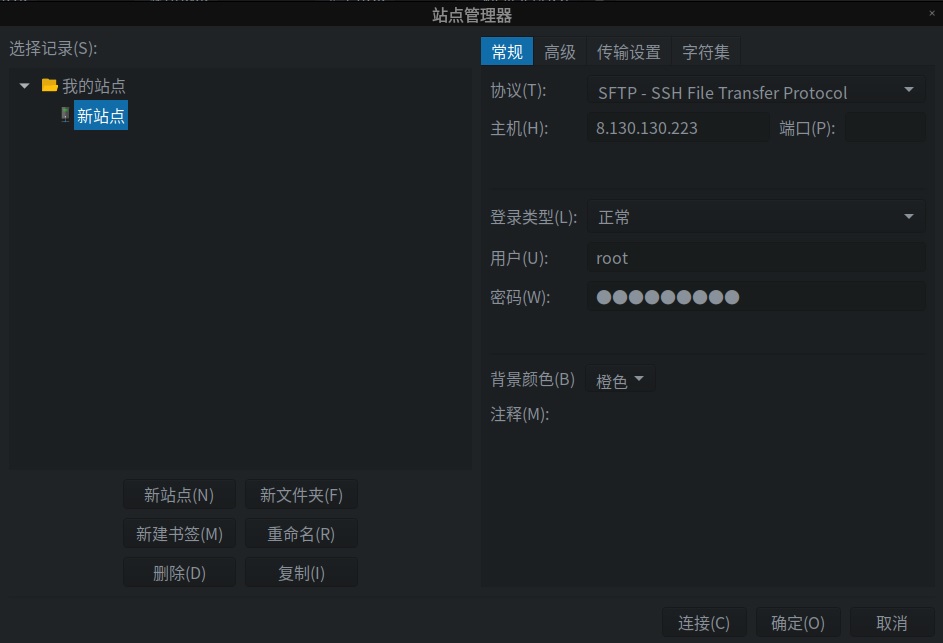
迁移到腾讯云+CentOS Stream 9
购置腾讯云
因为阿里云续费实在太贵了,故而把本博客迁移到了腾讯云。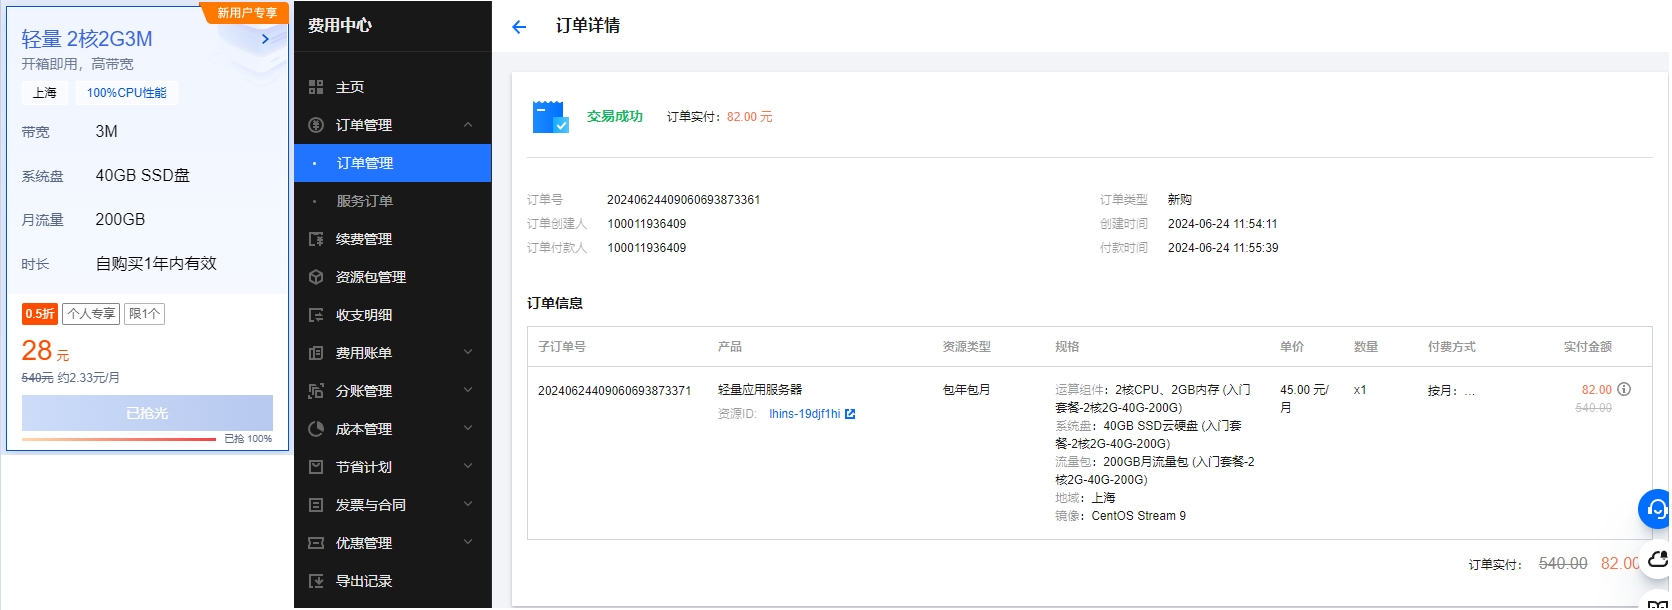
经过简单部署完验证后,这2核2G内存3M宽带(200G流量/月)40G存储的资源够用了。而且腾讯云的运维界面比较直观,登录跳转也比较快。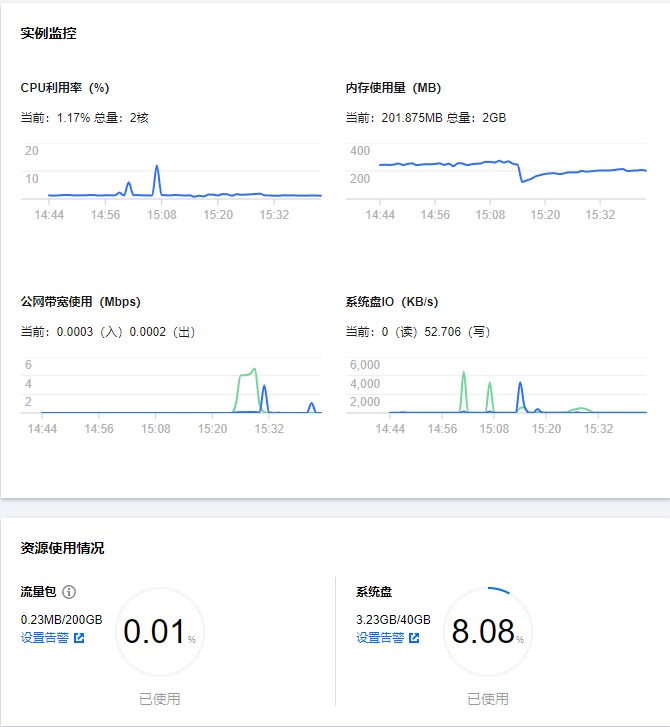
2核2G内存3M宽带(200G流量/月)40G存储暂时看来还是很够用的。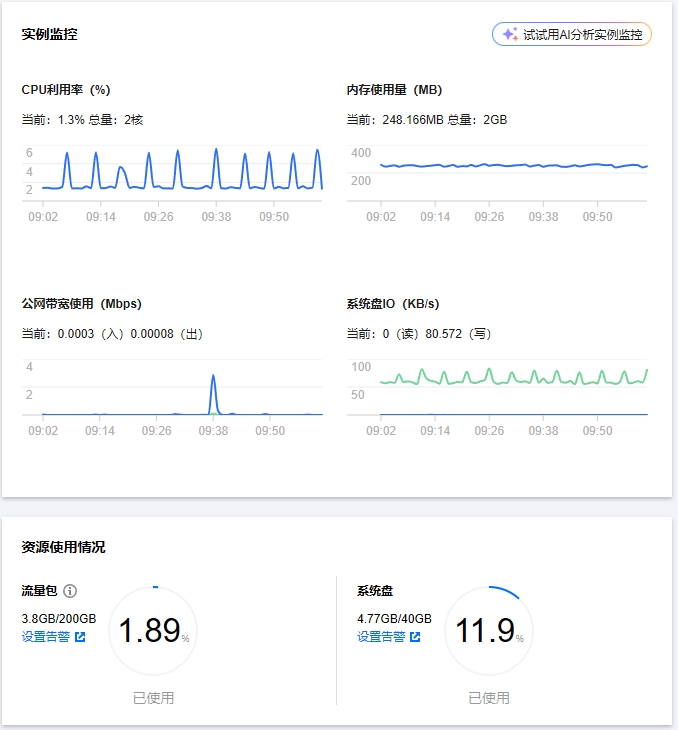
设置防火墙
CentOS Stream 9自带的防火墙默认是没有开启的,这里配置的是腾讯云的防火墙,不是一回事。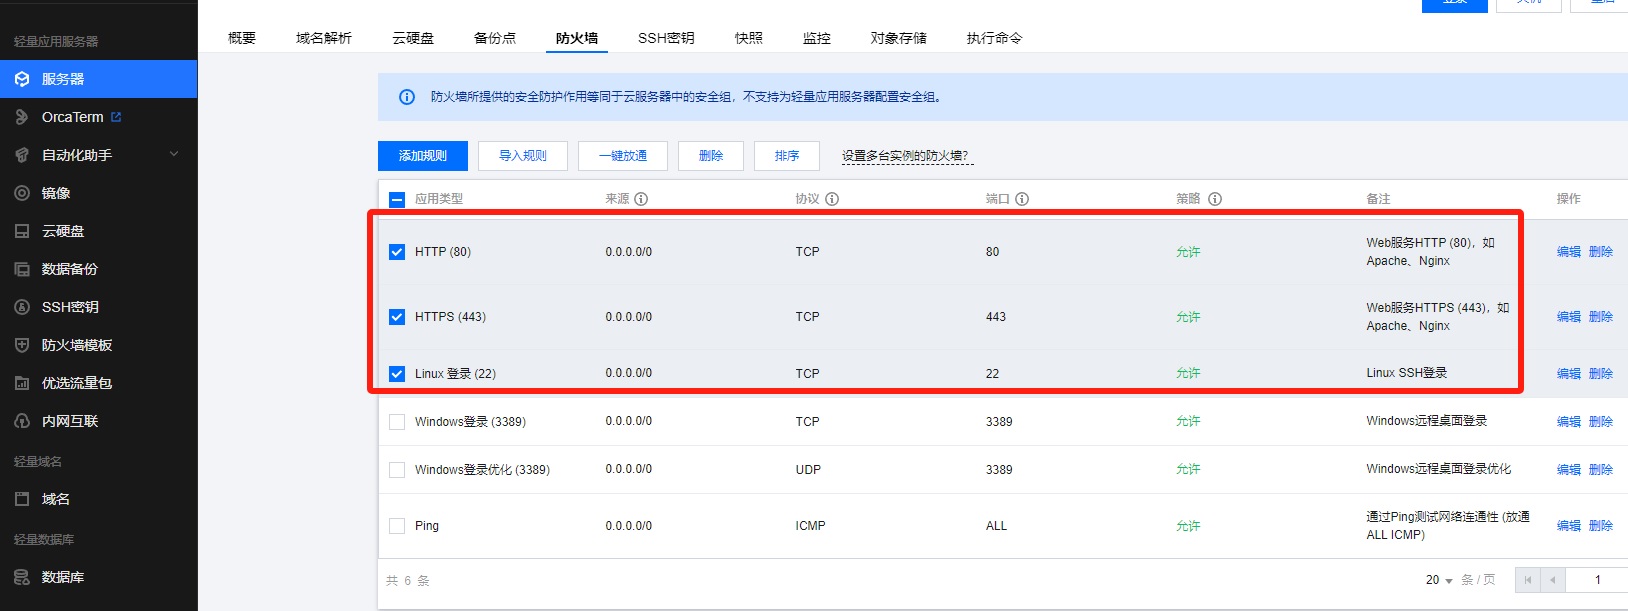
配置xshell的免密登录
方便用xshell重免密登录,还有上传文件,编辑文件等。
生成ssh密钥
在轻量云控制台的SSH密钥里面生成一个密钥,其中pem文件只能下载一次,要保留好。如果丢了就只能重新生成新的了。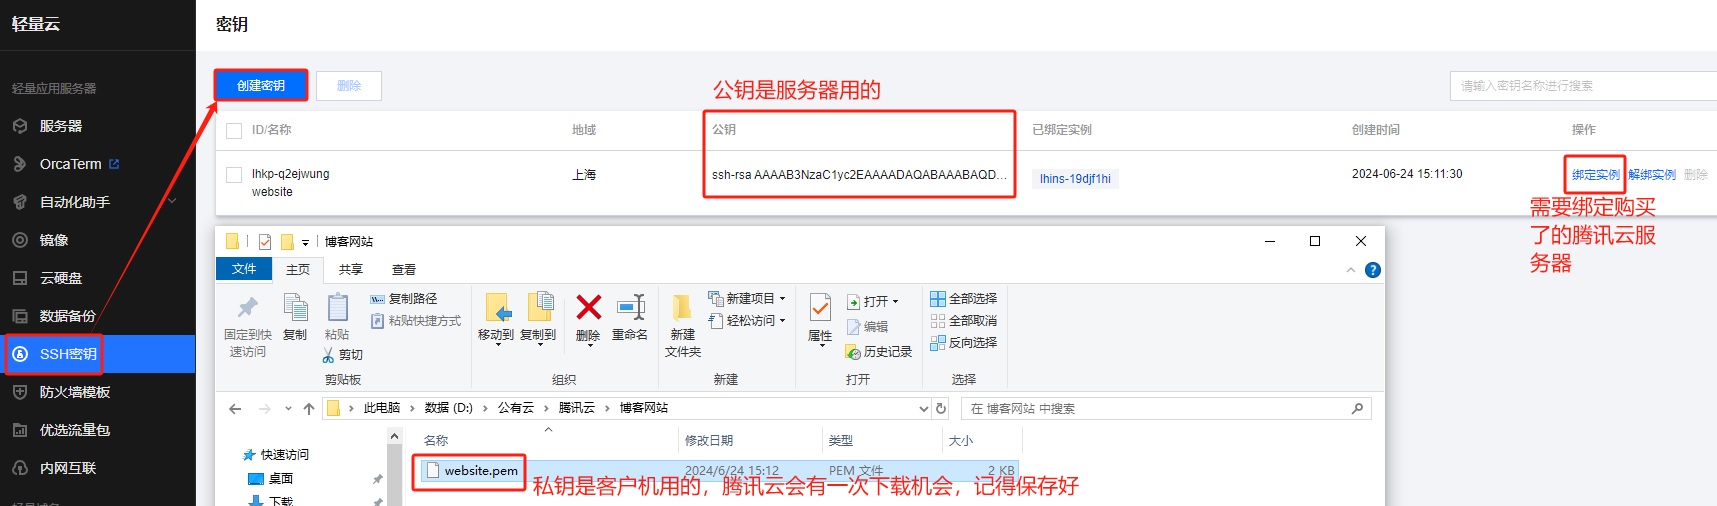
配置xshell登录
配置一个新的链接,如图: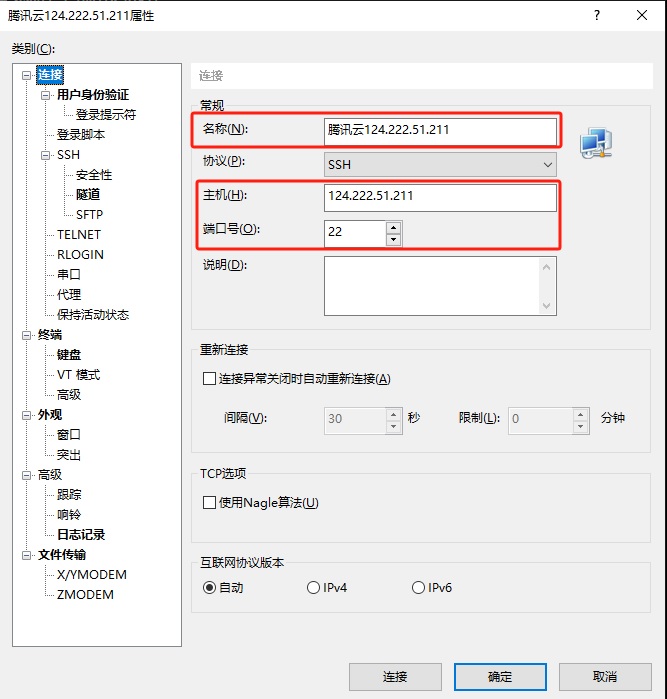
导入私钥,如图: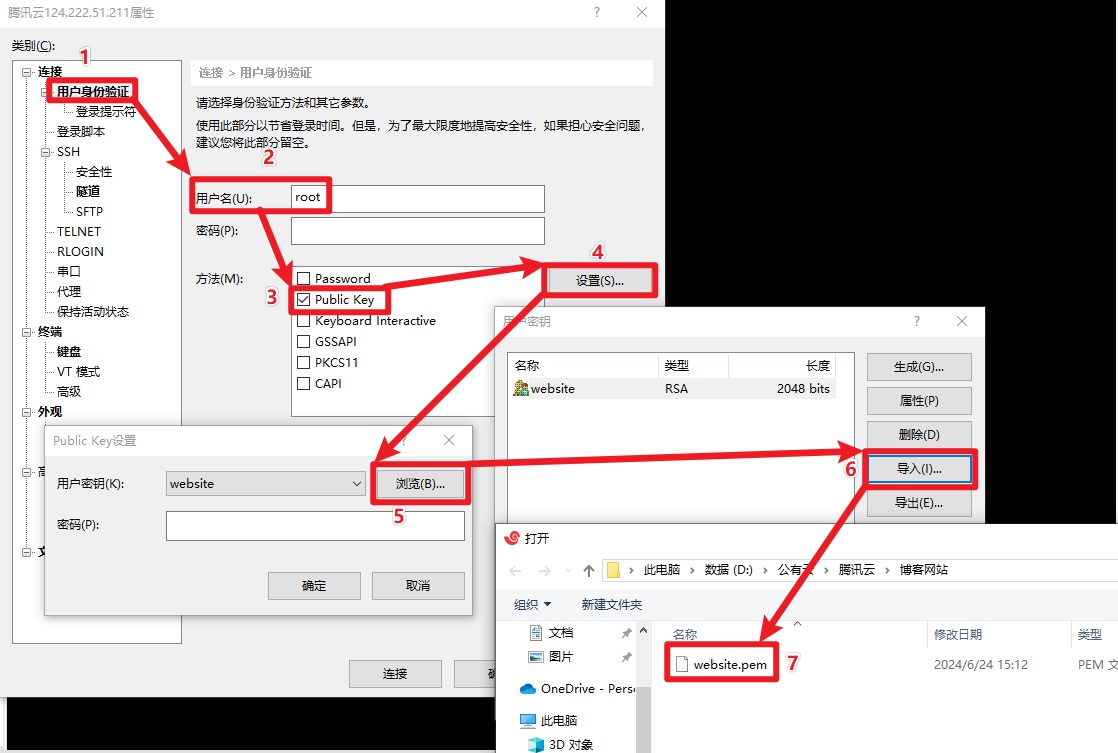
尝试链接成功
配置WindTerm免密登录
因为Xshell有版权风险,公司的大神推荐了WindTerm。
这里是下载地址:https://windterm.net/
下载安装都很简单,配置的关键在哪里选择私钥文件。尝试过后发现这些配置,如下图: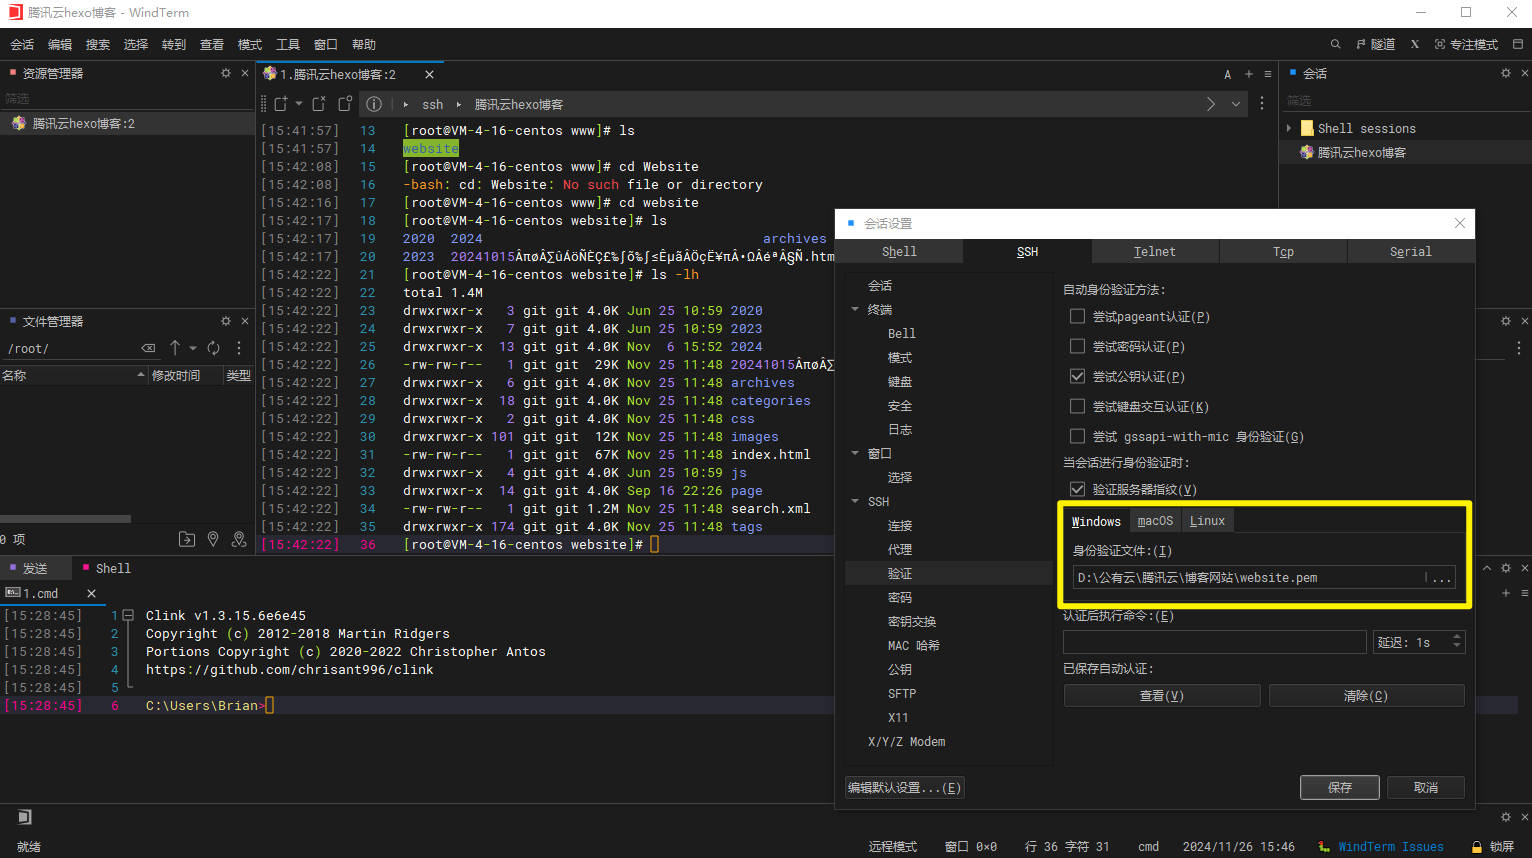
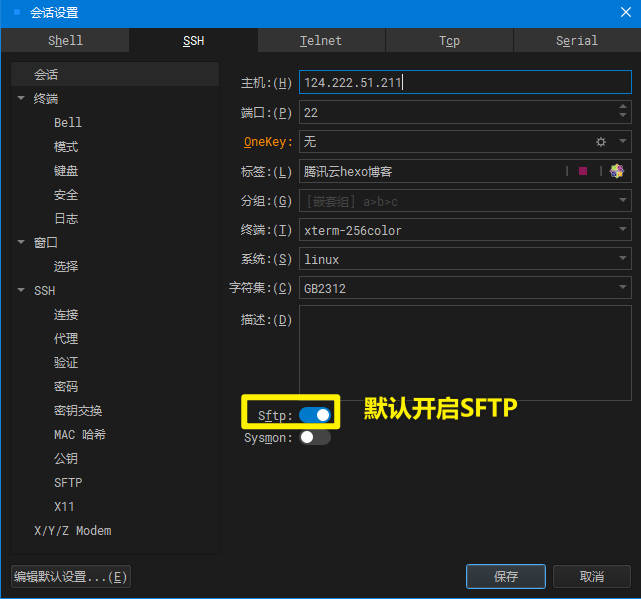
SSH免密私钥链接方法
- 默认进入就是中文,点击【新建会话】就行
- 选择SSH页签,并填写【主机】的IP,端口默认22,【标签】就是会话名字
- 在【验证】目录只勾选上尝试公钥认证,如果是通过密码的就选择尝试密码认证,建议只选一种方式。我这里只选择尝试公钥认证,在验证服务器指纹勾选状态下,身份认证文件选择Windows并选择腾讯云服务器给的私钥文件website.pem
- 在【会话】窗口找到刚刚新建会话,右键选择打开。
- 弹出的登录窗口,用账户方式登录,并输入登录账号名,如我这里输入了
root,点击链接。 - 如无意外就登录成功了,其他配置都默认就好,我们也不懂怎那样配置。
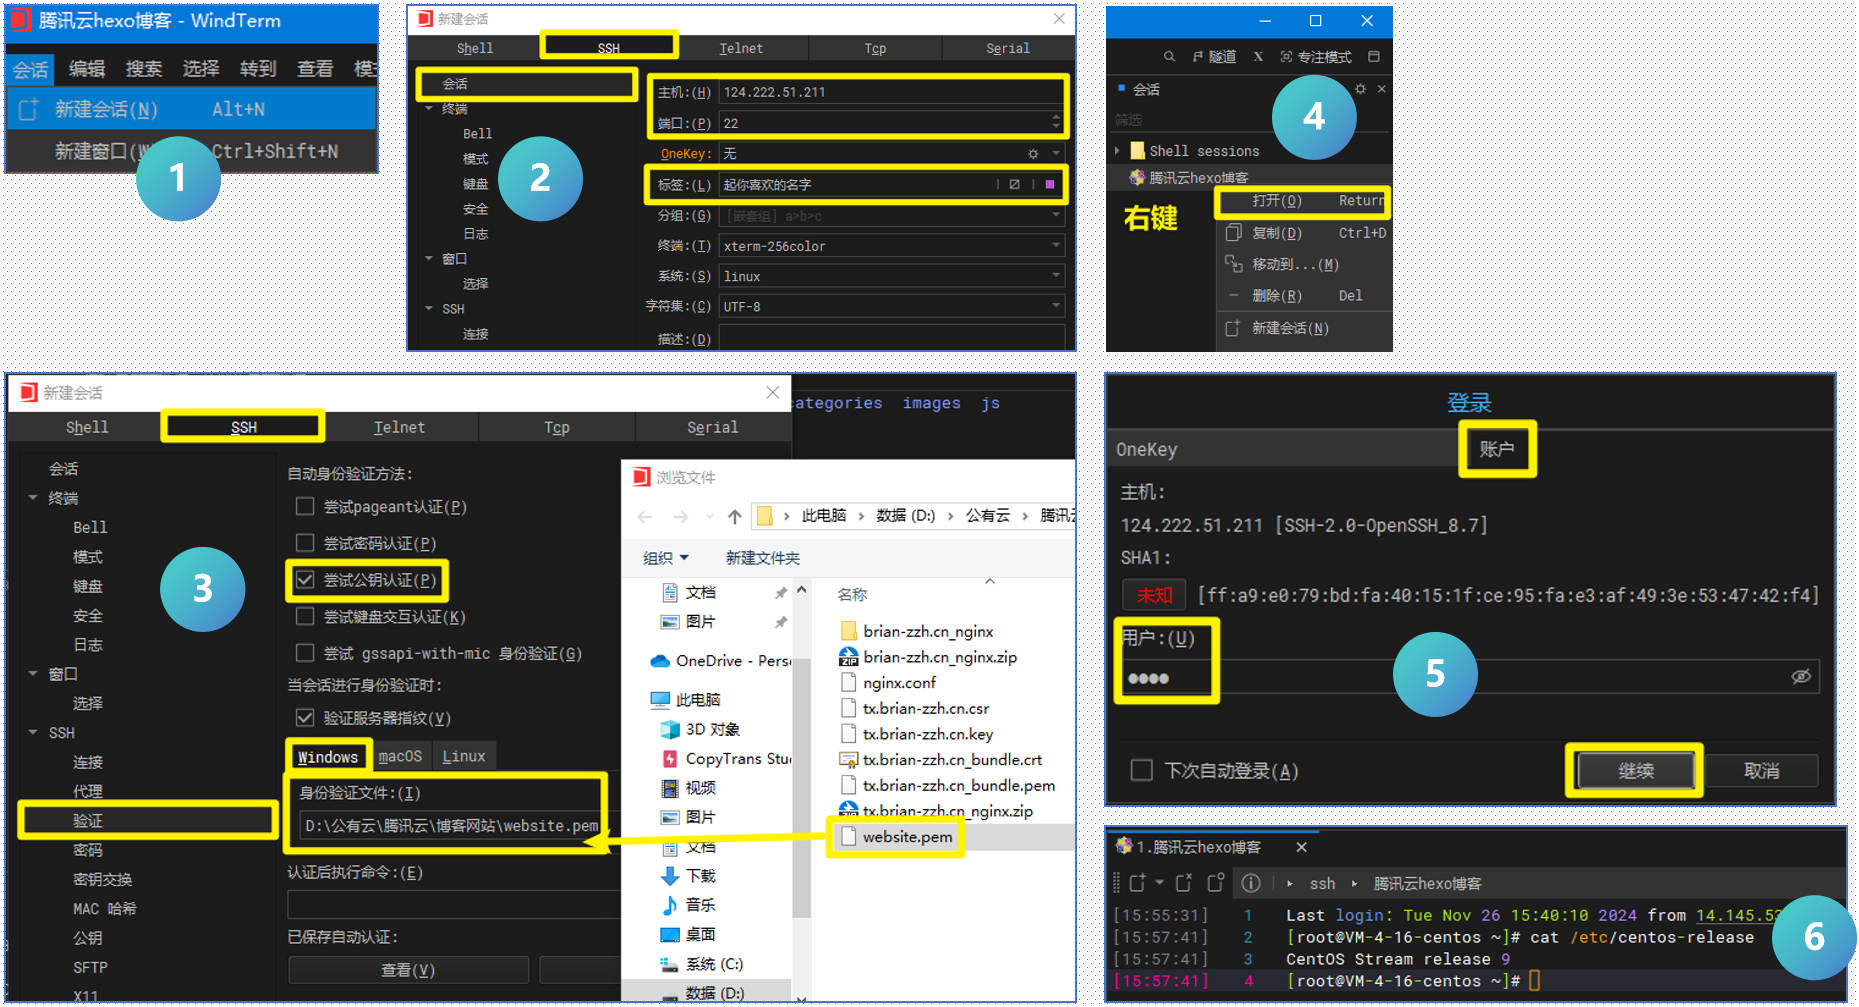
SFTP链接
SFTP是默认勾选上的,不需要额外配置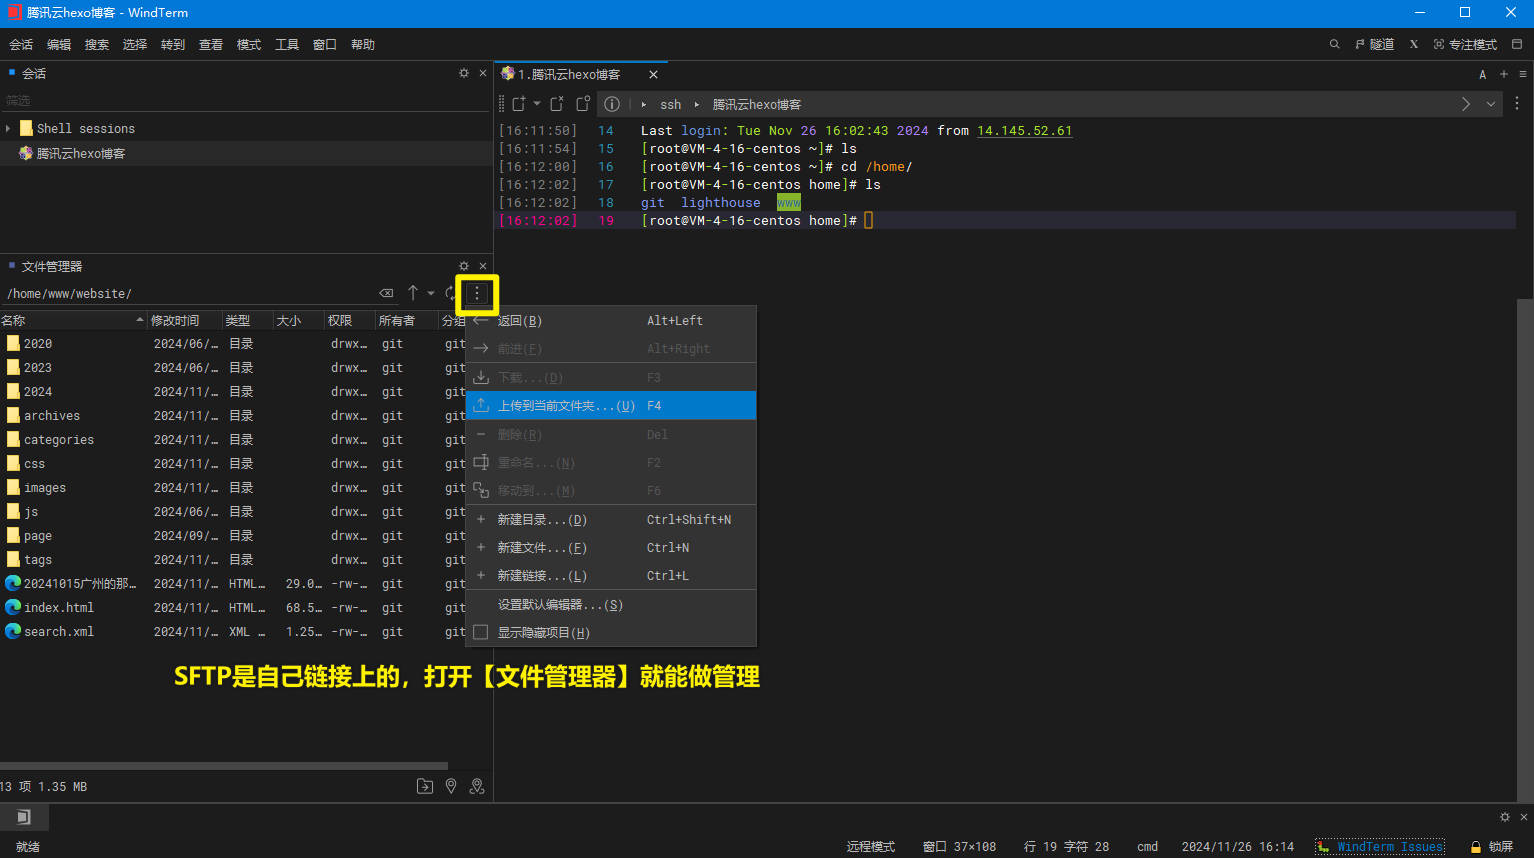
存在问题
- 容易断开
- 命令行显示不了中文
dnf更新CentOS Stream 9
root用户中进行
把系统更新到最新,因为CentOS Stream现在定位不是稳定版的系统,所以bug应该会相对更多。但是用于自己搭建博客是够用了,而yum命令切换到dnf命令会更好用。
1 | sudo dnf update |
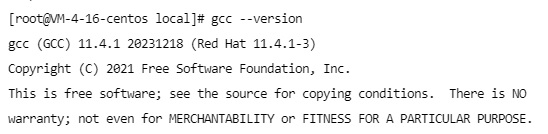
安装gcc
root用户中进行
1 | # 安装gcc gcc-c++ |
安装其他依赖
root用户中进行
1 | # 安装 openssl 、zlib 、 gcc 依赖 |
安装Nginx
root用户中进行
1 | sudo dnf install nginx # 使用dnf来安装 |
创建hexo网站文件的存放目录
root用户中进行
1 | cd /home #进入home文件夹 |
配置nginx.conf
在里面加入主页的路径是/home/www/website
root用户中进行
如果是用dnf安装的,就在/etc/nginx/nginx.conf。
用二进制文件安装的,参考前面CentOS7的安装方法。
1 | # 去到nginx.conf所在目录 |
只需要分别修改默认配置中的黄色部分即可。
其中如果还没有域名和配置SSL证书的话,443端口部分切勿配置,保持注释状态即可。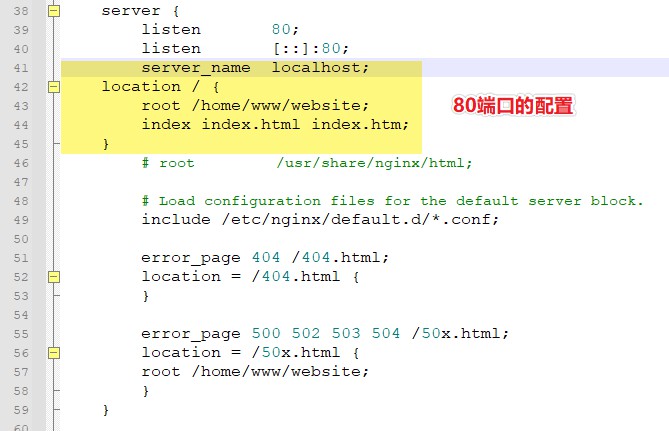
1 | # For more information on configuration, see: |
启动Nginx
root用户中进行
1 | # 下面两种方法都一样,那种生效就用那种 |
其中启动nginx的返回结果查看: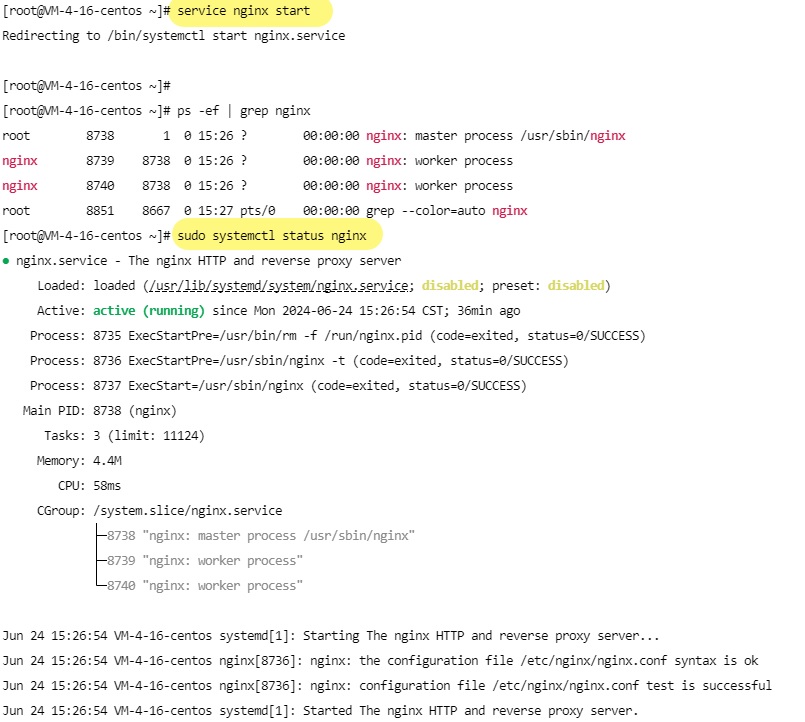
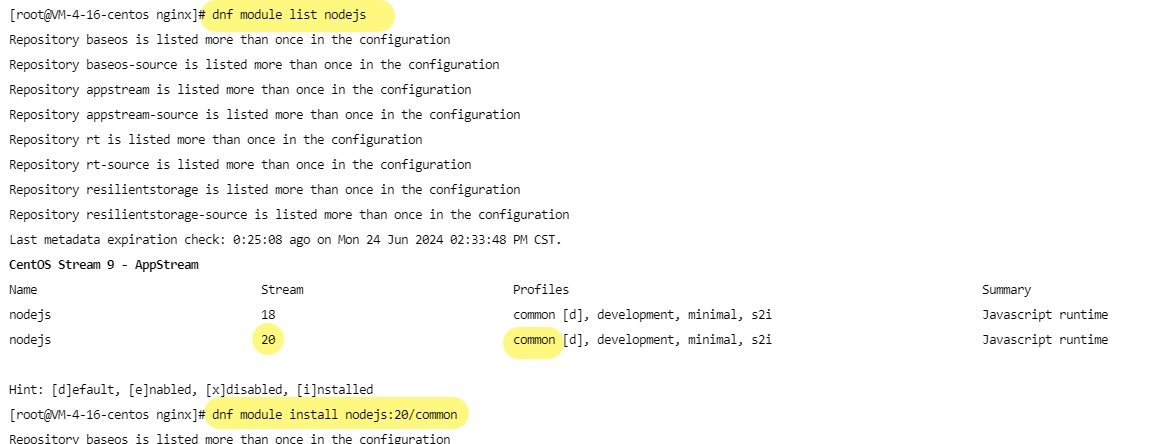
安装nodejs(服务端)
root用户中进行
下面是nodejs官网推荐的安装方法
1 | dnf module list nodejs # 用来查看能安装哪些nodejs版本 |
测试存入hexo文件看看能否运行
来到这一步,基本上可以先上传一些html页面去/home/www/website验证一下是否能通过IP进行访问了。
在浏览器输入IP看看能不能浏览到网站页面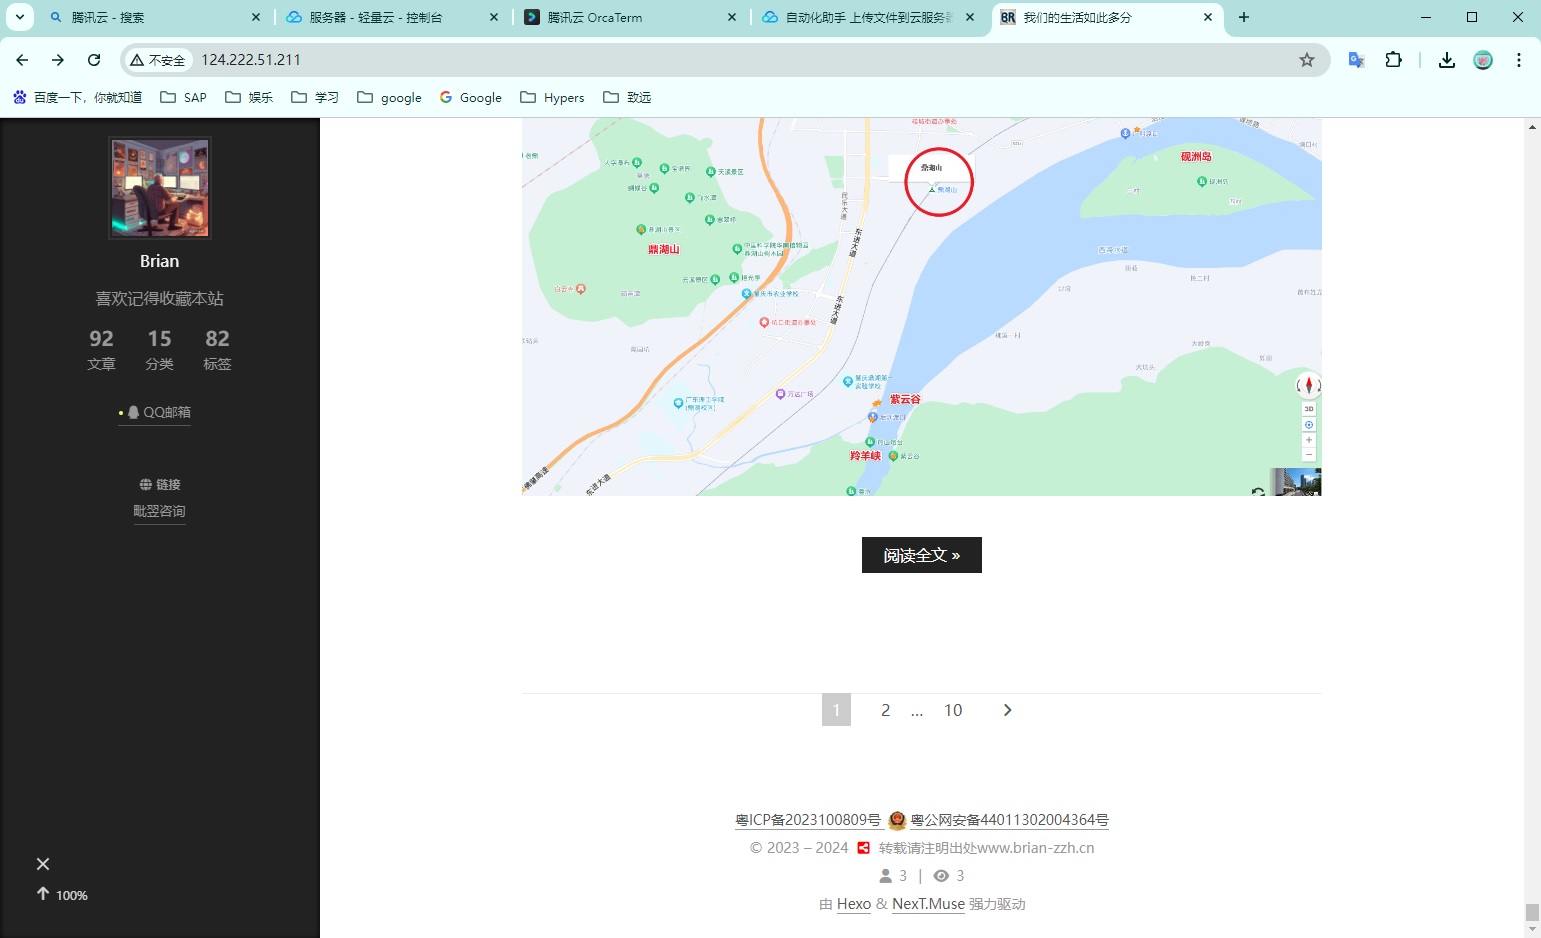
如果你没有现成的html文件,让AI给你生成一个简单html代码,然后你用记事本存为index.html文件就行。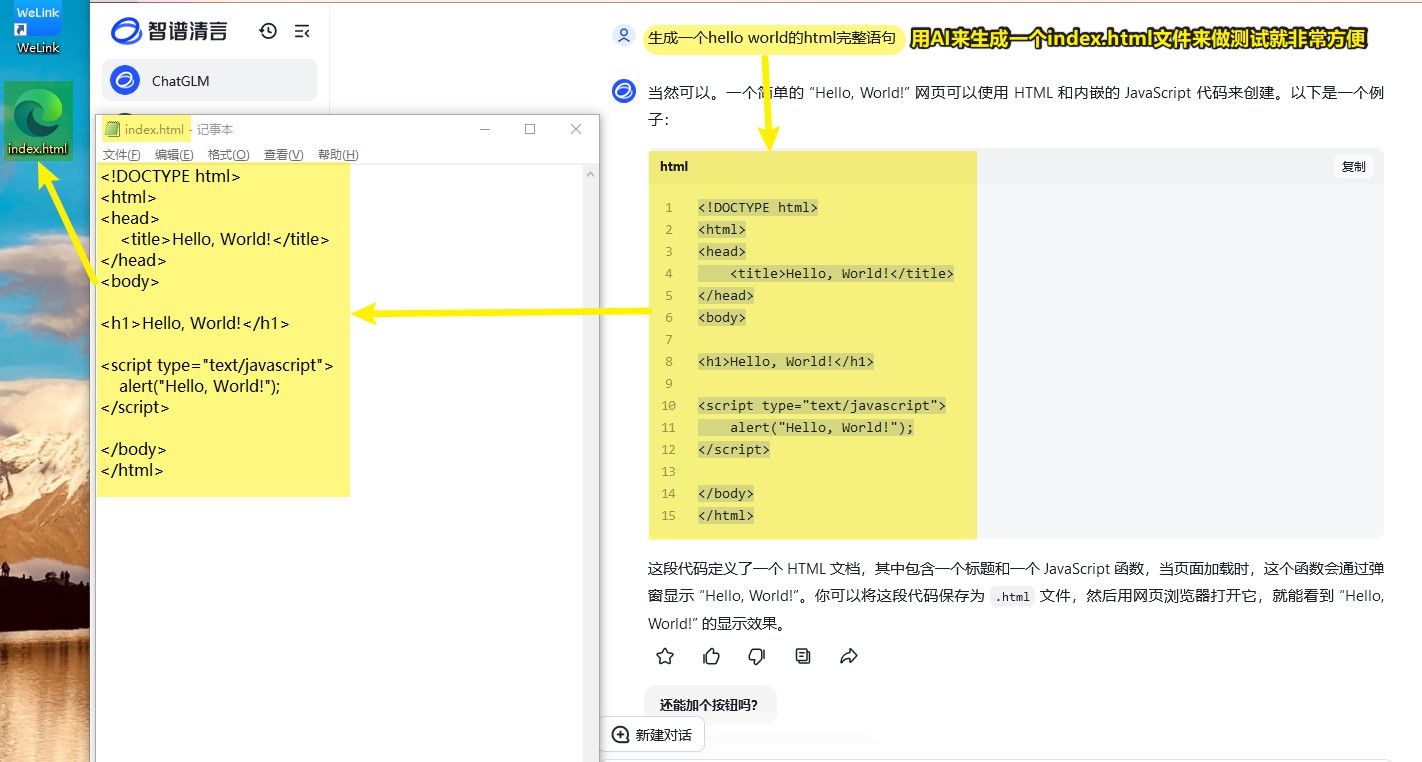
腾讯云证书+阿里云域名DNS认证
本章节技术过时,建议看acme.sh部分
在腾讯云申请一个SSL证书,如下图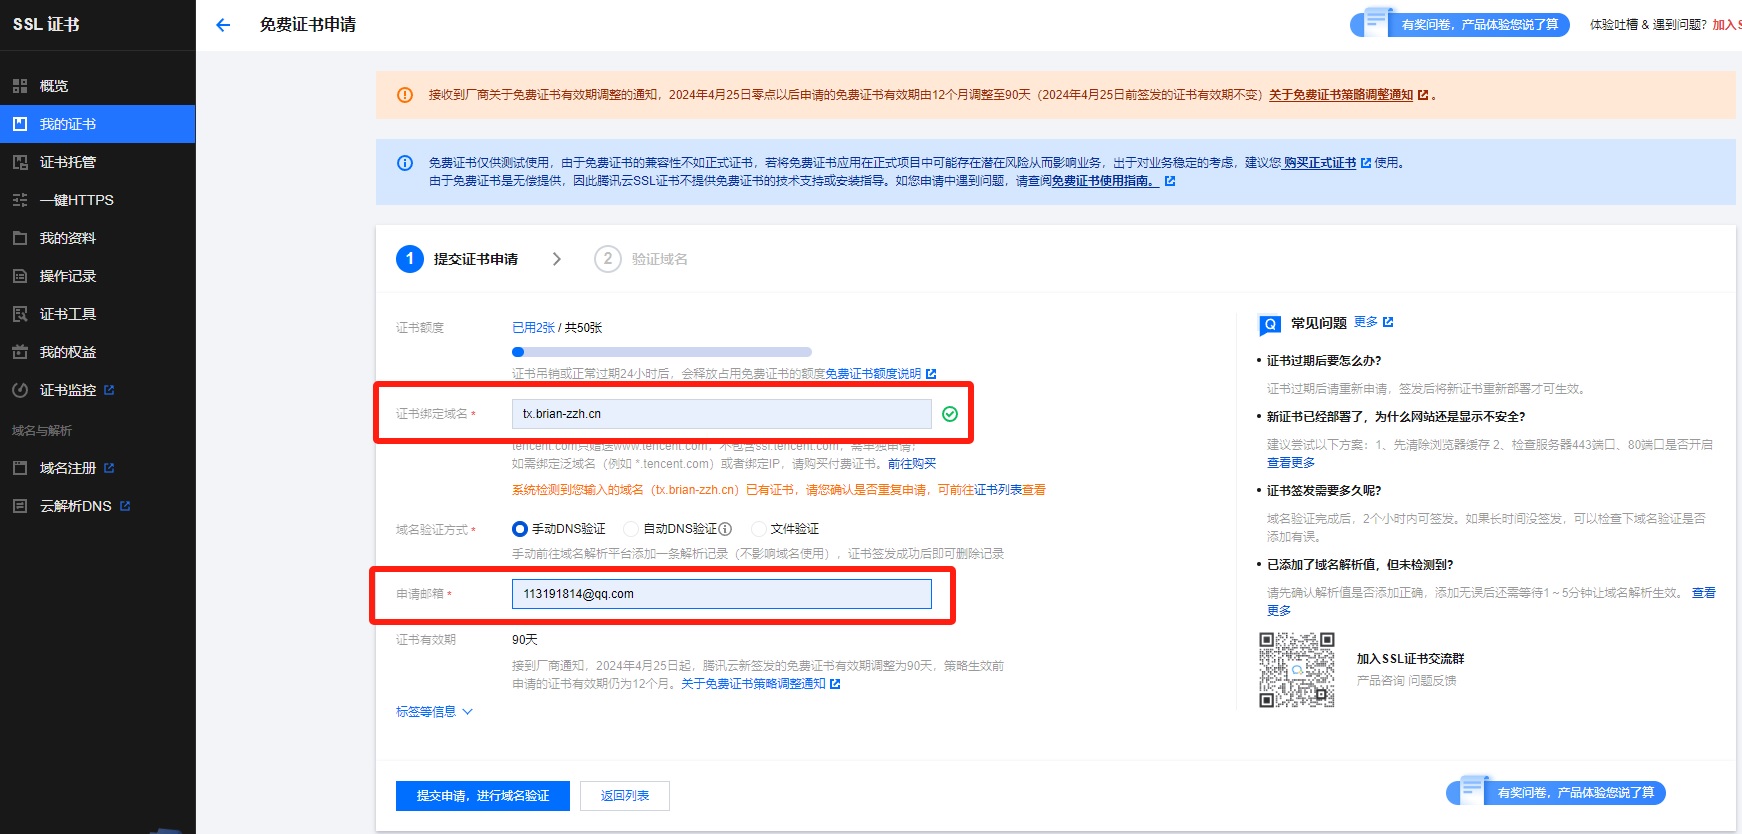
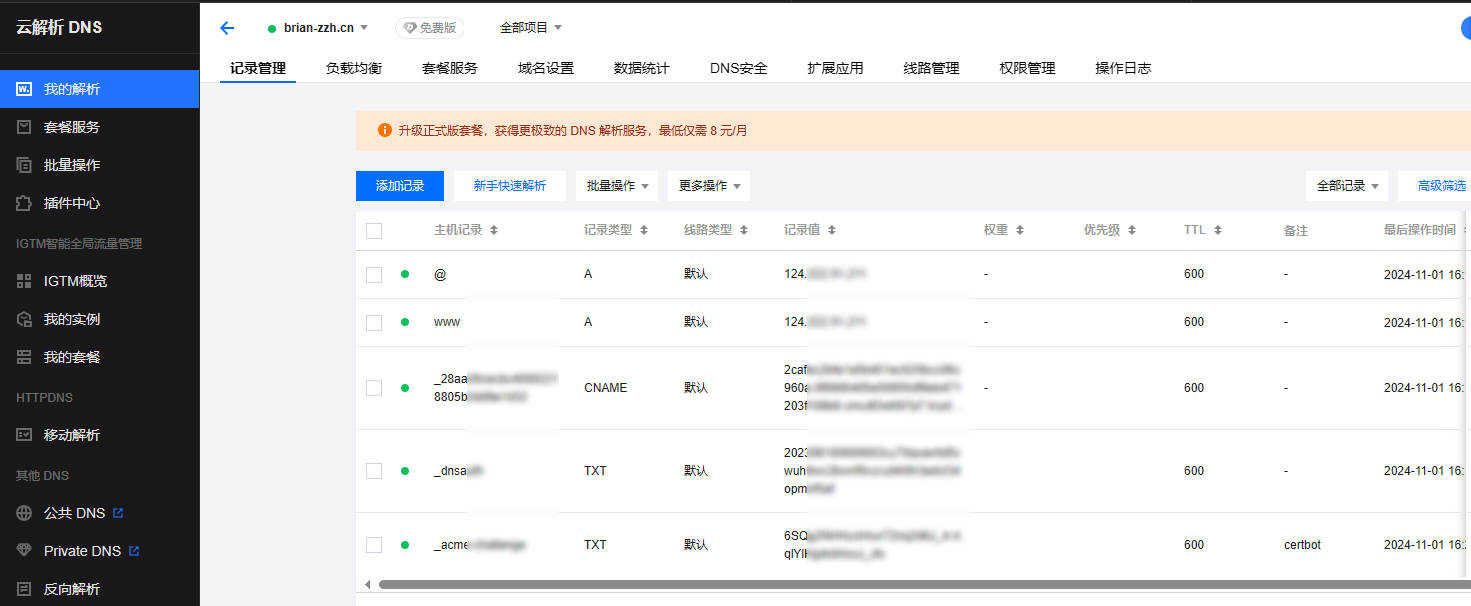
去到阿里云,根据需求配置DNS的解析,来做验证。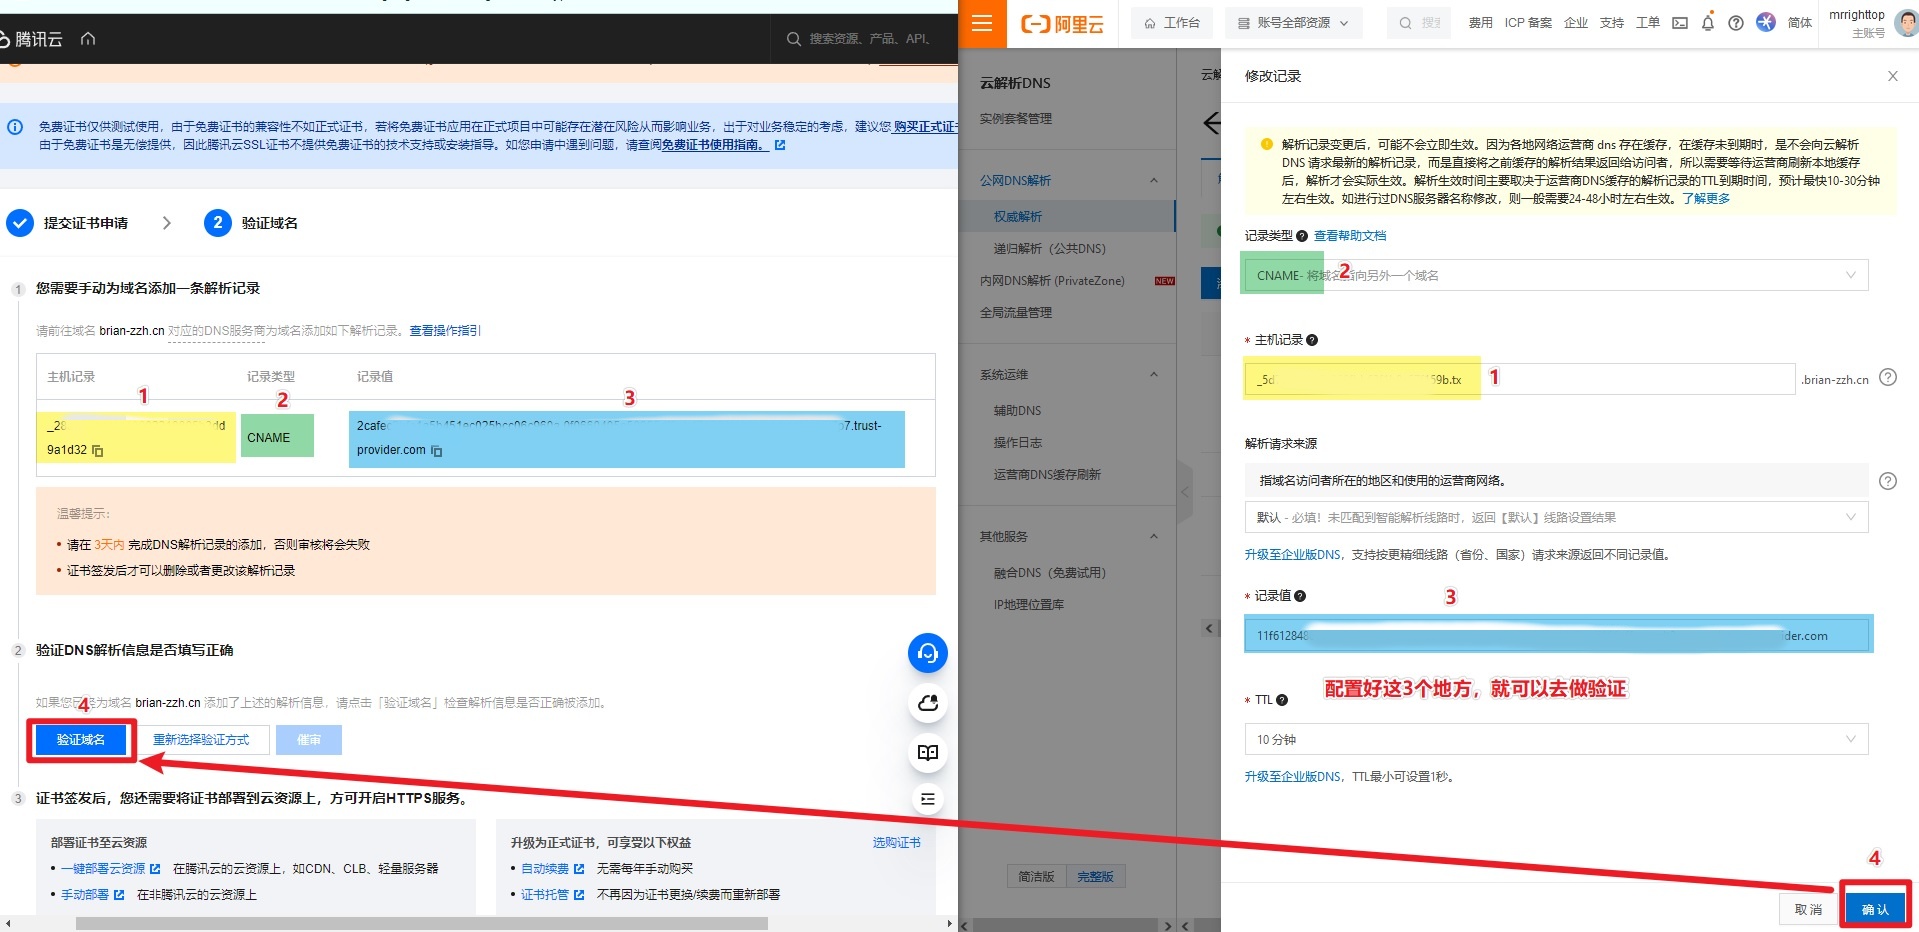
在阿里云中添加子域名的指向的服务器,通过ping命令来看是否畅通。
我这里的测试是新建了子域名xt.brian-zzh.cn。 换成brian-zzh.cn也是一样的,在腾讯云证书申请的时候前缀的www留空就是默认是www.brian-zzh.cn一个意思。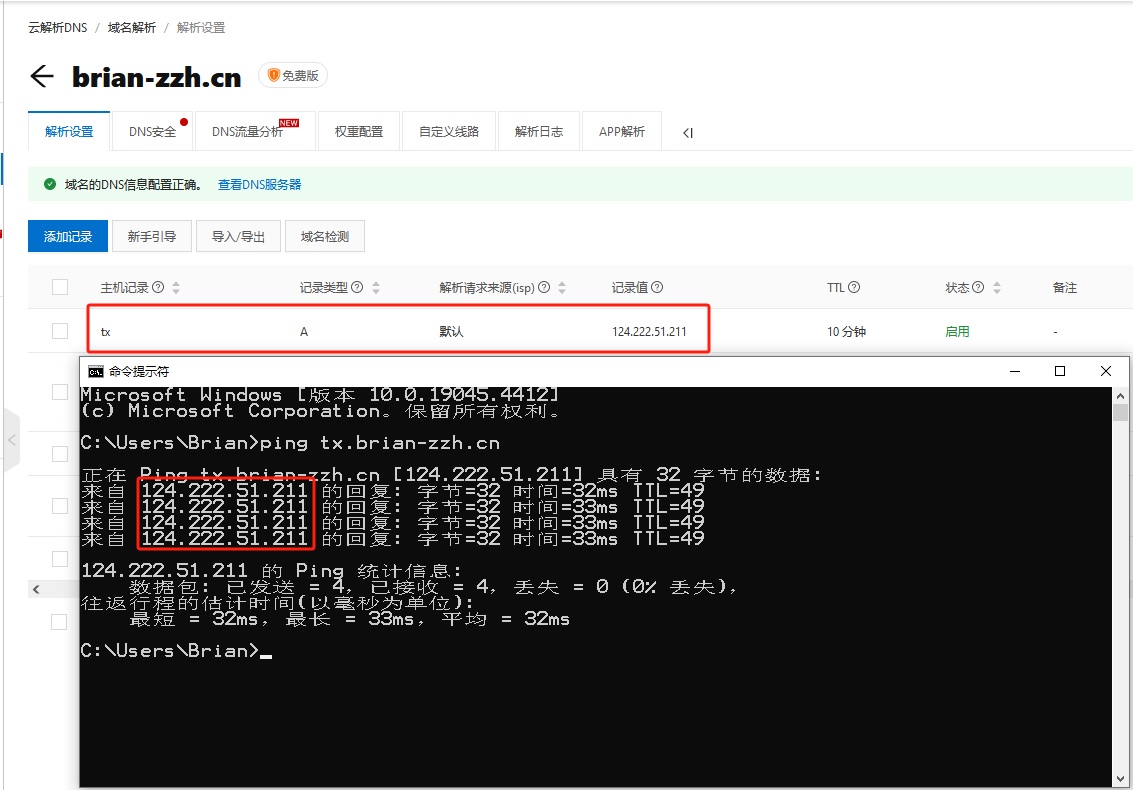
因为域名是在阿里云购买的,也是用阿里云的DNS来做跳转,所以证书认证、域名跳IP、域名跳主机名都是在阿里云的DNS里面做配置的。
在阿里云的配置如下图:
(1)腾讯云申请的3个月免费证书解析,CNAME记录类型,按照腾讯云的提示来配置验证。主机记录和记录值,都是由腾讯云提供。
(2)指向腾讯云服务器的解析,A记录类型,主机记录是www,记录值是腾讯云的你购买的轻量云服务器的公网IP
(3)指向腾讯云服务器的解析,A记录类型,主机记录是@,记录值是腾讯云的你购买的轻量云服务器的公网IP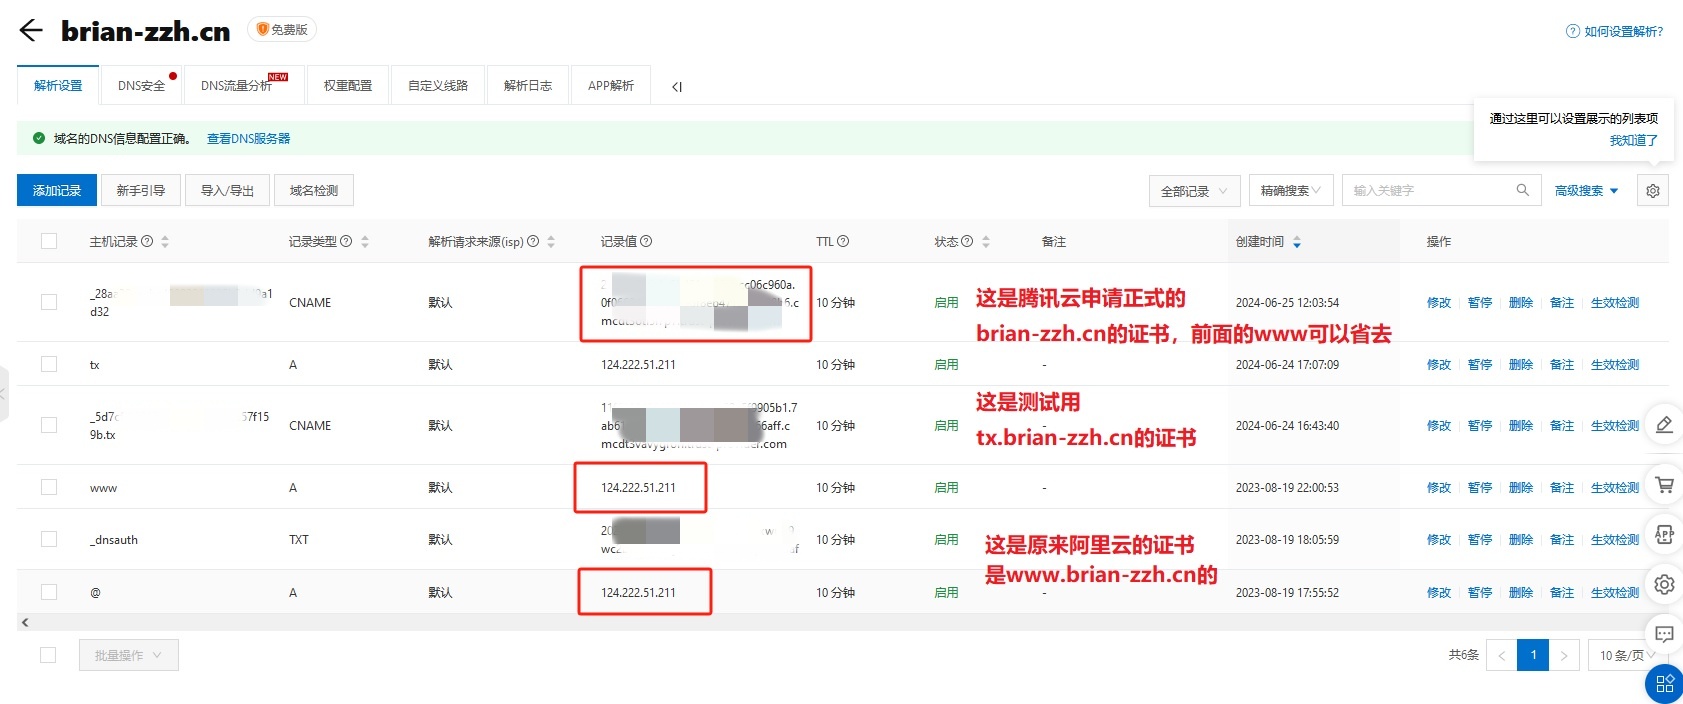
而证书是在腾讯云申请的3个月免费的,现在的免费证书都只有3个月了。也就是每3个月就要手动换一次了。更换操作是:
(1)去腾讯云申请新SSL证书
(2)去阿里云DNS认证解析证书
(3)下载通过认证的腾讯云SSL证书
(4)解压到腾讯云服务器的etc/ssl文件夹里面,替换旧的证书
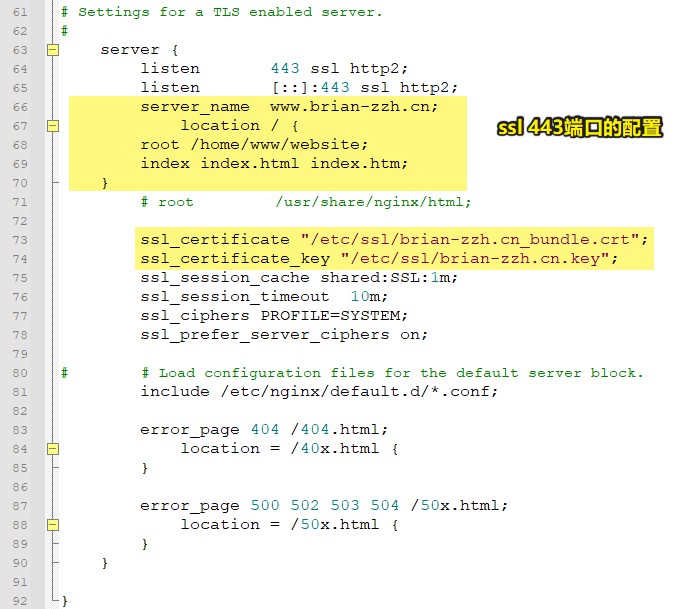
配置Nginx.conf文件来实现域名访问
在腾讯云下载Nginx用的证书文件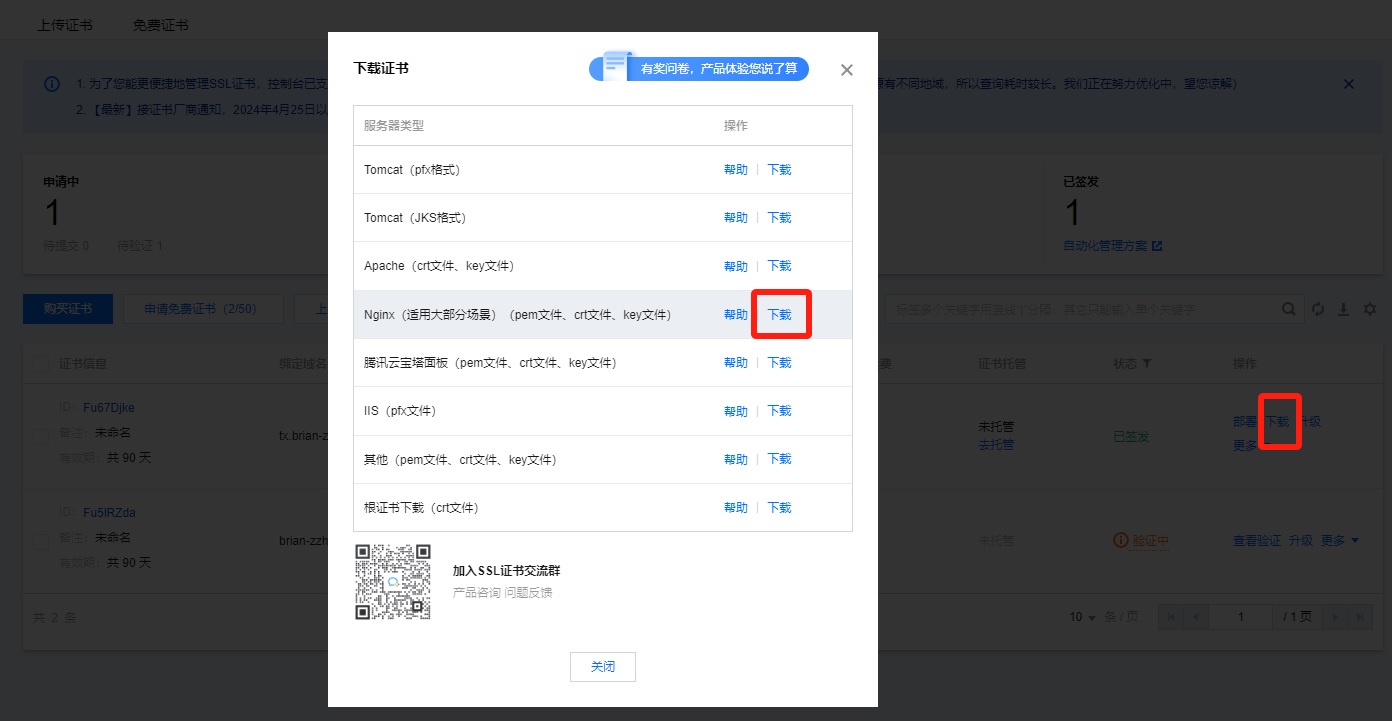
把解压出来的4个文件放到服务器的etc/ssl文件夹里面
Nginx的配置确保/etc/nginx/nginx.conf文件,如下:
只需要分别修改默认配置中的黄色部分即可。
1 | # For more information on configuration, see: |
通过域名访问,可以查看证书是否也存在。
遇到nginx启动失败处理方法:
一般是nginx.conf配置的错误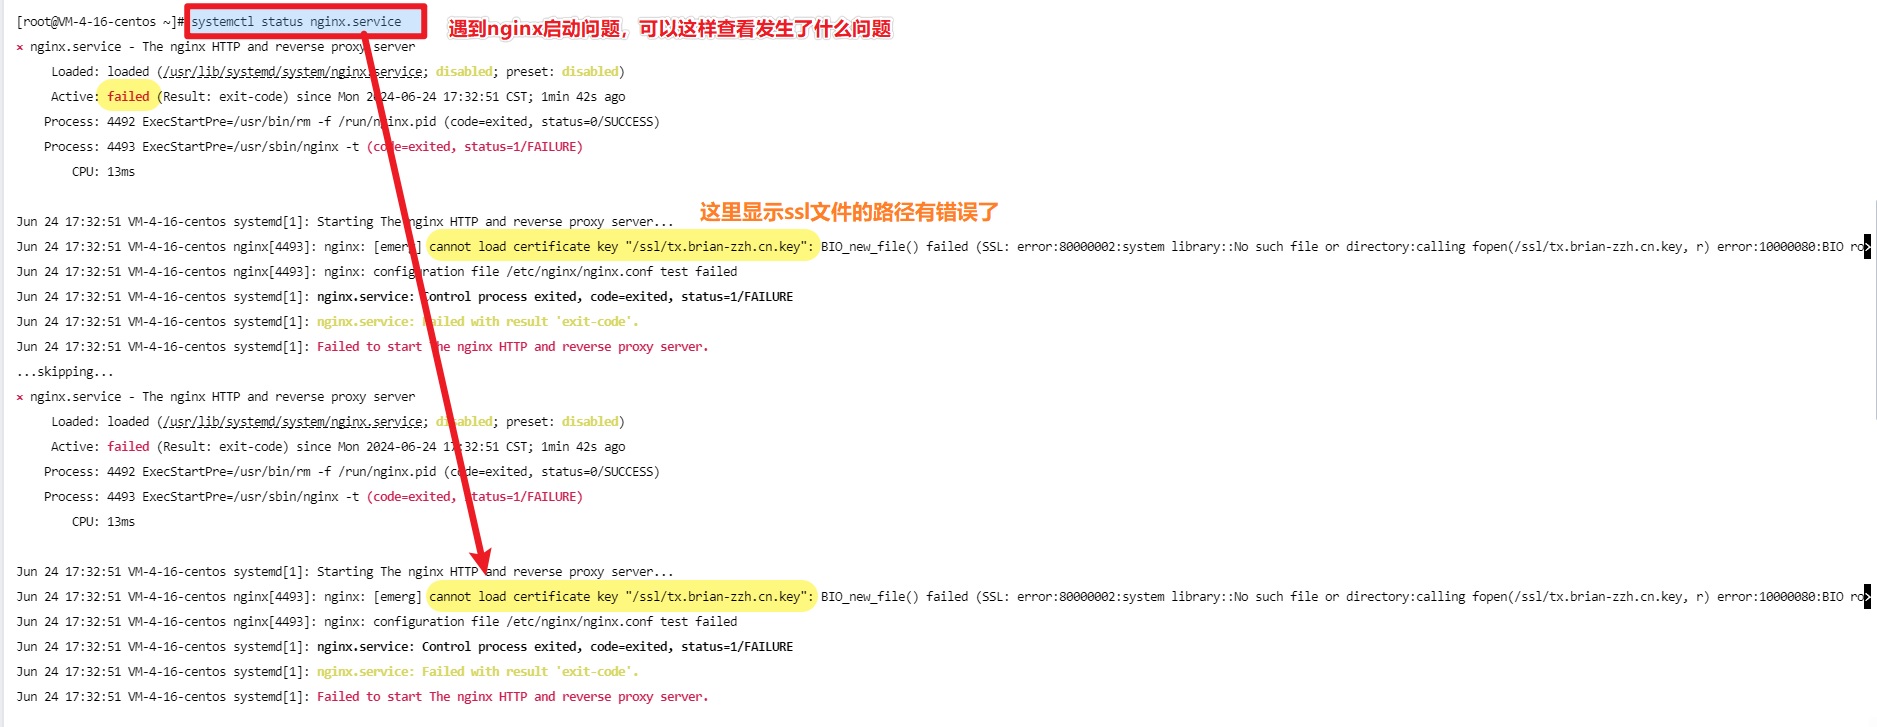
安装git(服务端)
root用户中进行
1 | # 用官方的方法安装git |
1 | chmod 740 /etc/sudoers #给/etc/sudoers赋权 |

1 | chmod 400 /etc/sudoers #修改完后,把文件权限改小 |
配置密钥,让Windows免密登录云服务器
root用户中进行
这个配置是为了让hexo中利用git仓库同步功能来同步本地的静态网页文件到服务器的指定目录
1 | adduser git #新建一个叫git的linux账号 |
git用户中进行
1 | cd ~ #去到git用户的主目录/home/git |
把windows的登录用户中的C:\Users{用户名}.ssh 下面的 id_rsa.pub的内容复制出来,放在/home/git/.ssh目录中的authorized_keys文件中,当然用xftp放也行。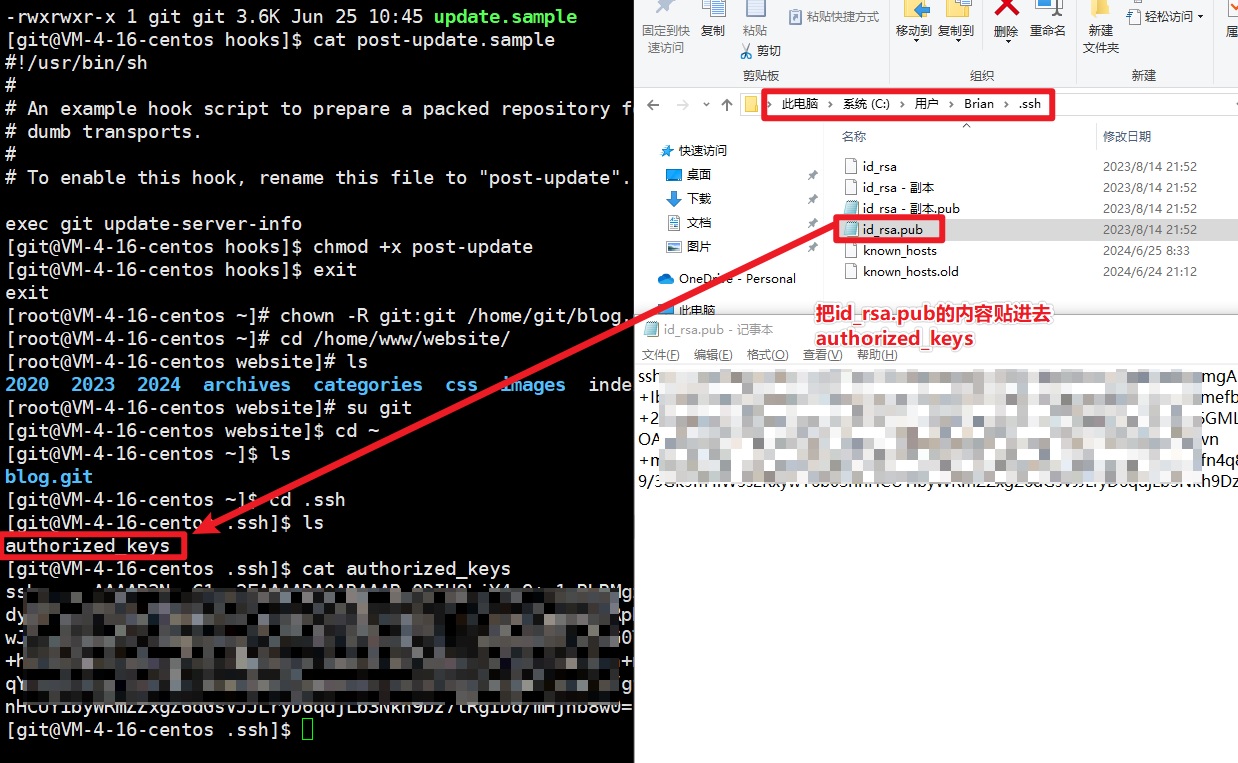
1 | #继续实使用git用户操作 |
配置好后,在windows的powershell用ssh -v {linux用户名}@{linux公网IP} 来尝试连上服务器
1 | #如 |
报错解决01-无法用ssh连上或每次都需要输入密码
如果报如下错误了,应该是git对文件权限不够,尝试下面的解决方式。
(1)删除C:\Users\Brian.ssh下面的known_hosts和known_hosts.old两个文件
(2)给服务器重的authorized_keys文件和目录~/.ssh授权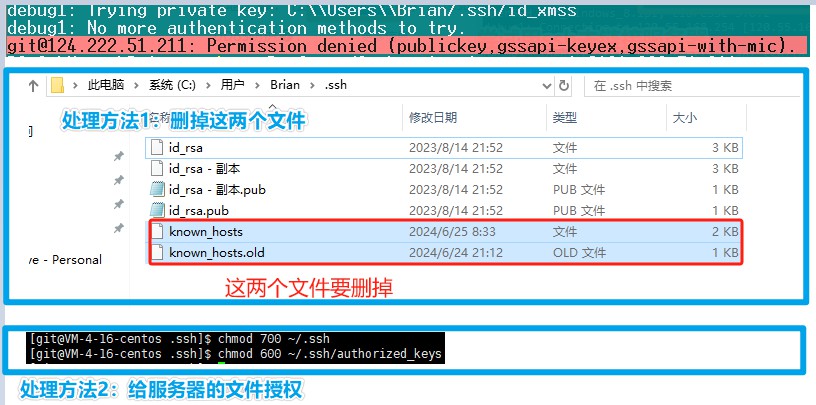
1 | #继续使用git用户操作 |
成功了就能下一步了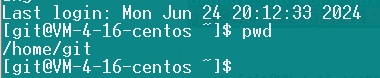
创建git空仓库(服务端)
git用户中进行
1 | cd ~ #回到git的home/git目录中 |
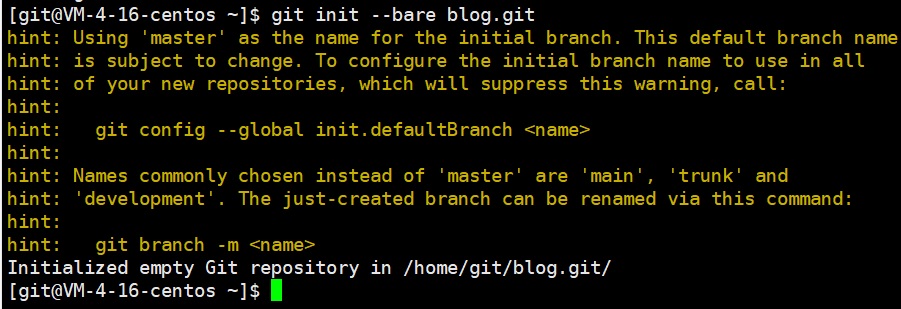
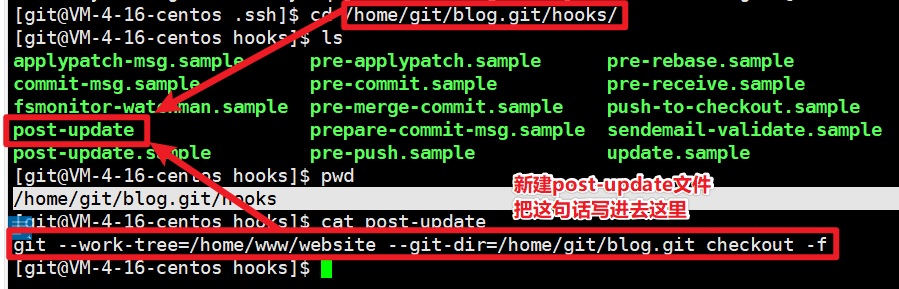
1 | #去到这个目录 |
把这句话写入post-update文件
1 | git --work-tree=/home/www/website --git-dir=/home/git/blog.git checkout -f |
- /home/www/website 这是放博客静态网站文件的地方
- /home/git/blog.git 这是放hexo库的地方
配置hexo的_config.yml(客户端)
1 | # 配置_config.yml |
测试通过hexo d发布成功
遇到问题01-hexo d无法同步文件
配置过程中遇到了这个问题:在执行hexo d命令的时候没有任何报错,就是文件同步不过去服务器。
解决思路:
(1)备份hexo里面的三个文件夹/文件夹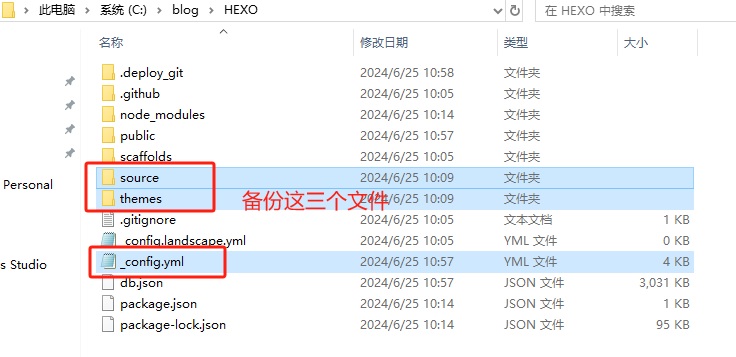
(2)删除hexo里面的所有文件
(3)安装最新的git和nodejs,都是基于windows的
Git:https://registry.npmmirror.com/-/binary/git-for-windows/v2.45.2.windows.1/Git-2.45.2-32-bit.exe
nodejs:https://nodejs.org/zh-cn/download/prebuilt-installer
(4)重新安装hexo,在hexo文件夹中执行open git bash here。在C:\blog\HEXO中执行,这个目录就是hexo初始化所有在的目录,也是存hexo全部文件的目录。每次进行命令操作都只能在这个个文件夹中使用open git bash here。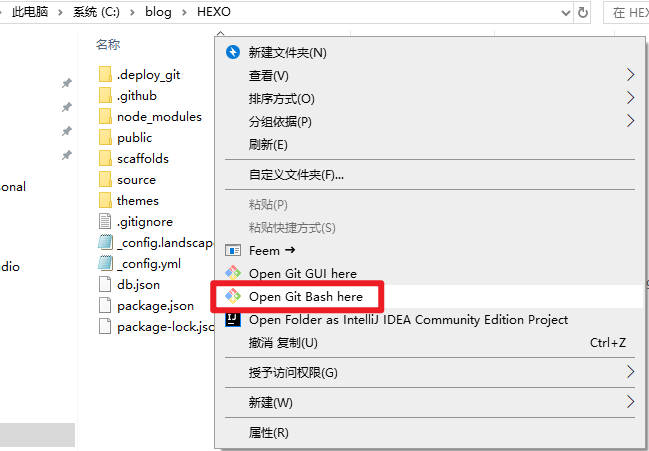
1 | npm install -g hexo-cli |
(5)把备份的三个文件,还原回到C:\blog\HEXO中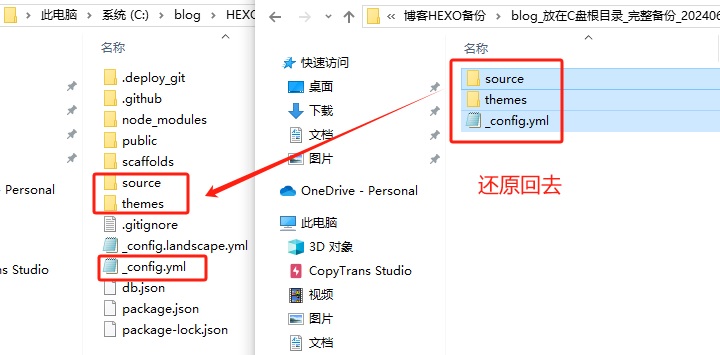
1 | # 执行尝试能否hexo d可用,下面3句命令依次执行 |
如果还不行,继续尝试重建服务器中的git仓库
(6)删除服务器中,/home/git目录下的blog.git
git用户中进行
1 | cd /home/ |
(7)继续重复上一步创建空仓库的操作。最终解决了hexo d不报错但是不能同步文件的问题。
腾讯云重新备案问题
因为网络设备从阿里云换成腾讯云,ICP需要重新备案,不然站用http无法访问了。
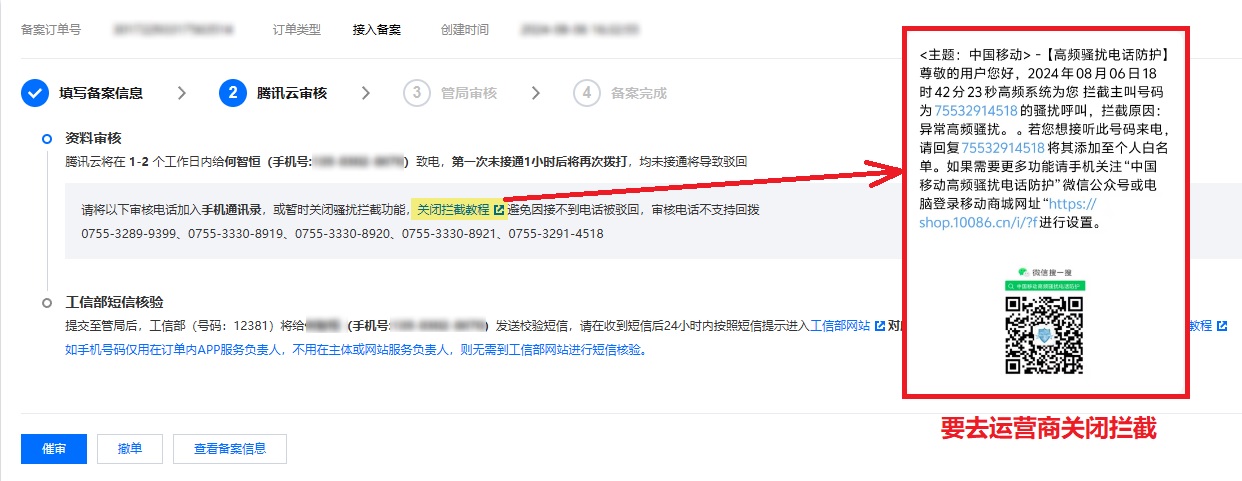
腾讯的备案真实太烂了,只能用电话,被所有运营商都拦截了电话,根本接不到电话。人家阿里都用钉钉了,你用微信或QQ会死人吗?
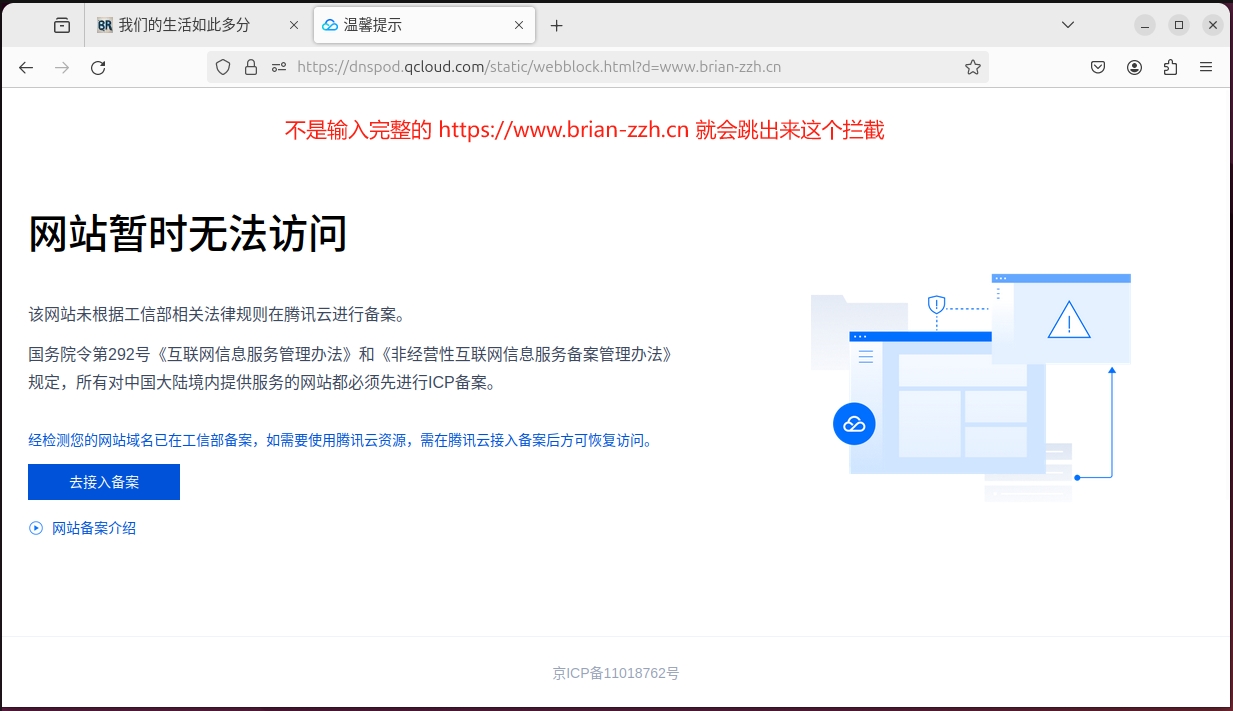

只有一个手机是无法成功备案的,垃圾腾讯,垃圾政策,强迫人无止尽的开电话号码,为了救运营商是真不要脸了。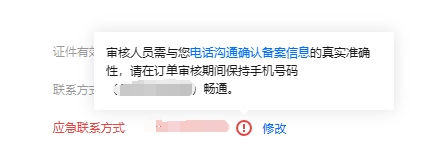
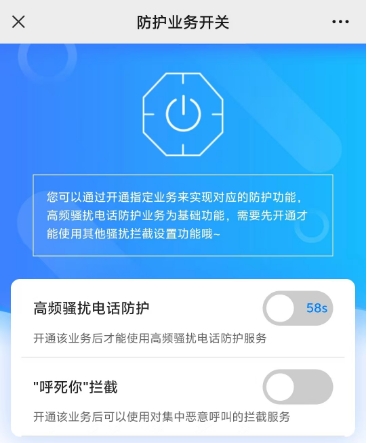
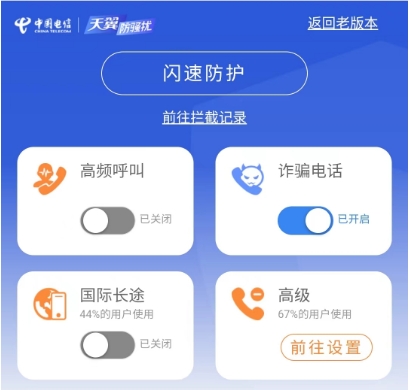
已经关了高频拦截,腾讯的电话还是打不进来
最后还是接了别人的手机号码来做认证
- 主手机:会问你的认证域名和身份证号
- 紧急联系手机:会问备案人的全名
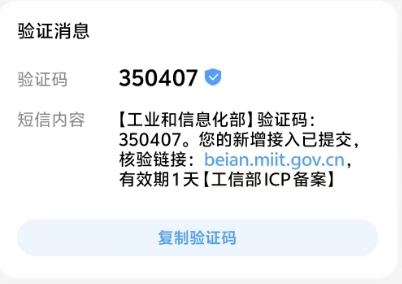
终于去到工信部的验证了,在提供的网址输入验证码、主手机号、身份证号就能验证成功,继续等通知就好。
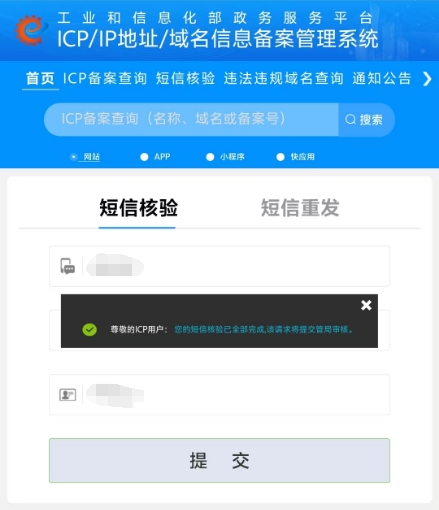
大概7天就会验证通过,备案号会+1,所以现在就变成粤ICP备2023100809号-1了。
接着还要去公安部继续备案,因为之前主体和网站都备案过了,只需要做变更改IP和上存新的域名证书就好了,所以备案号是不会变的。具体可以看第五大点的【5. 网络安全备案】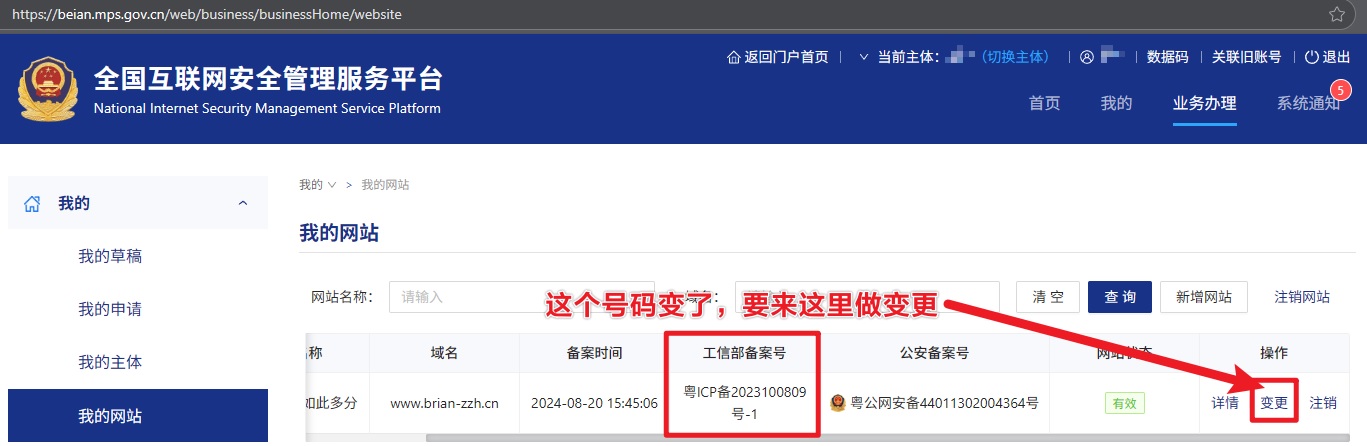
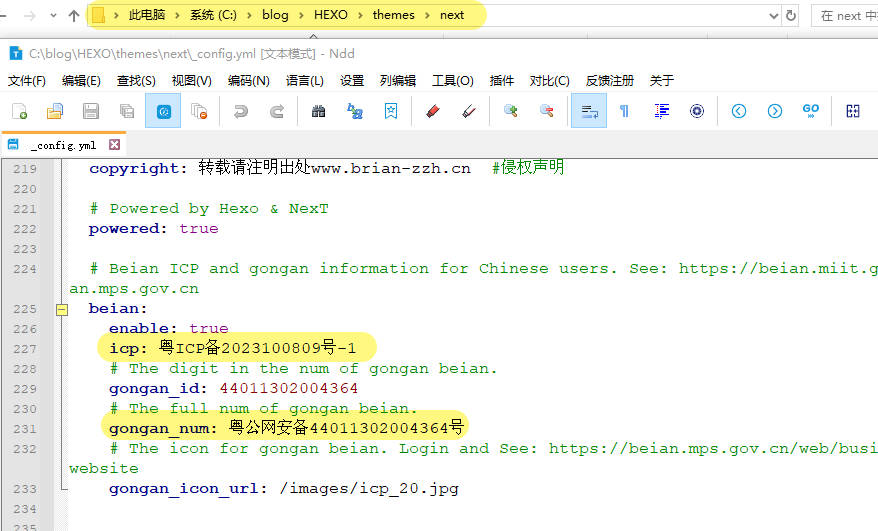
记得修改就好C:\你的路径\HEXO\themes\next_config.yml
利用cerbot自动部署ssl证书【经过验证无法自动续】
本章节技术过时,建议看acme.sh部分
最近腾讯云一直催我ssl证书到期了,B站大佬教了我一个自动申请和部署的方法,就试试看了。想不到成功了。

安装epel
1 | sudo su # 必须要在root用户中操作 |

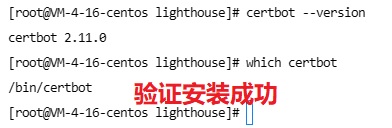
安装certbot
1 | [root@VM-4-16-centos lighthouse]# yum install -y certbot |
申请证书并做DNS认证
执行语句certbot certonly --server https://acme-v02.api.letsencrypt.org/directory --manual --preferred-challenges dns --email 113191814@qq.com --agree-tos -d *.brian-zzh.cn
其中113191814@qq.com改成你自己的Email地址
其中*.brian-zzh.cn改成你自己的域名
如果你是首次申请,需要输入y来确认邮箱注册
1 | [lighthouse@VM-4-16-centos ~]$ sudo su |
来到这一步,需要去域名提供商里面做txt的dns认证,我用的是阿里云。填写的方法如下图:
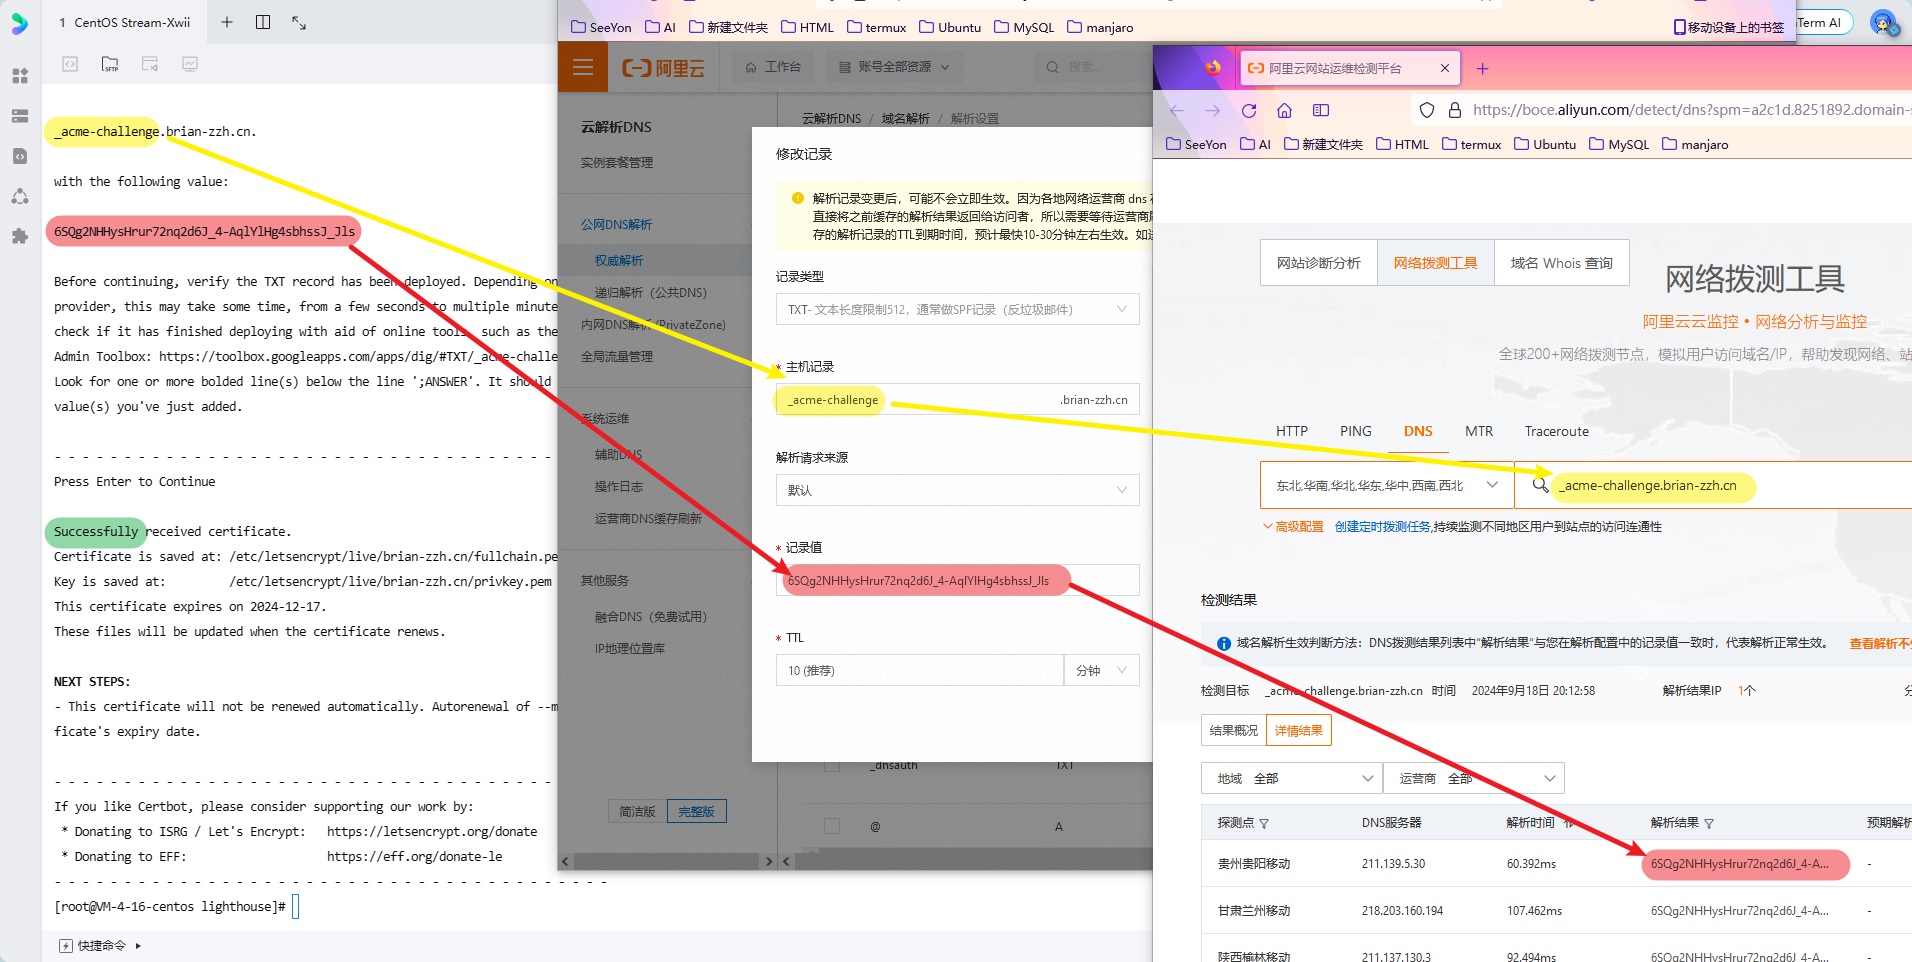
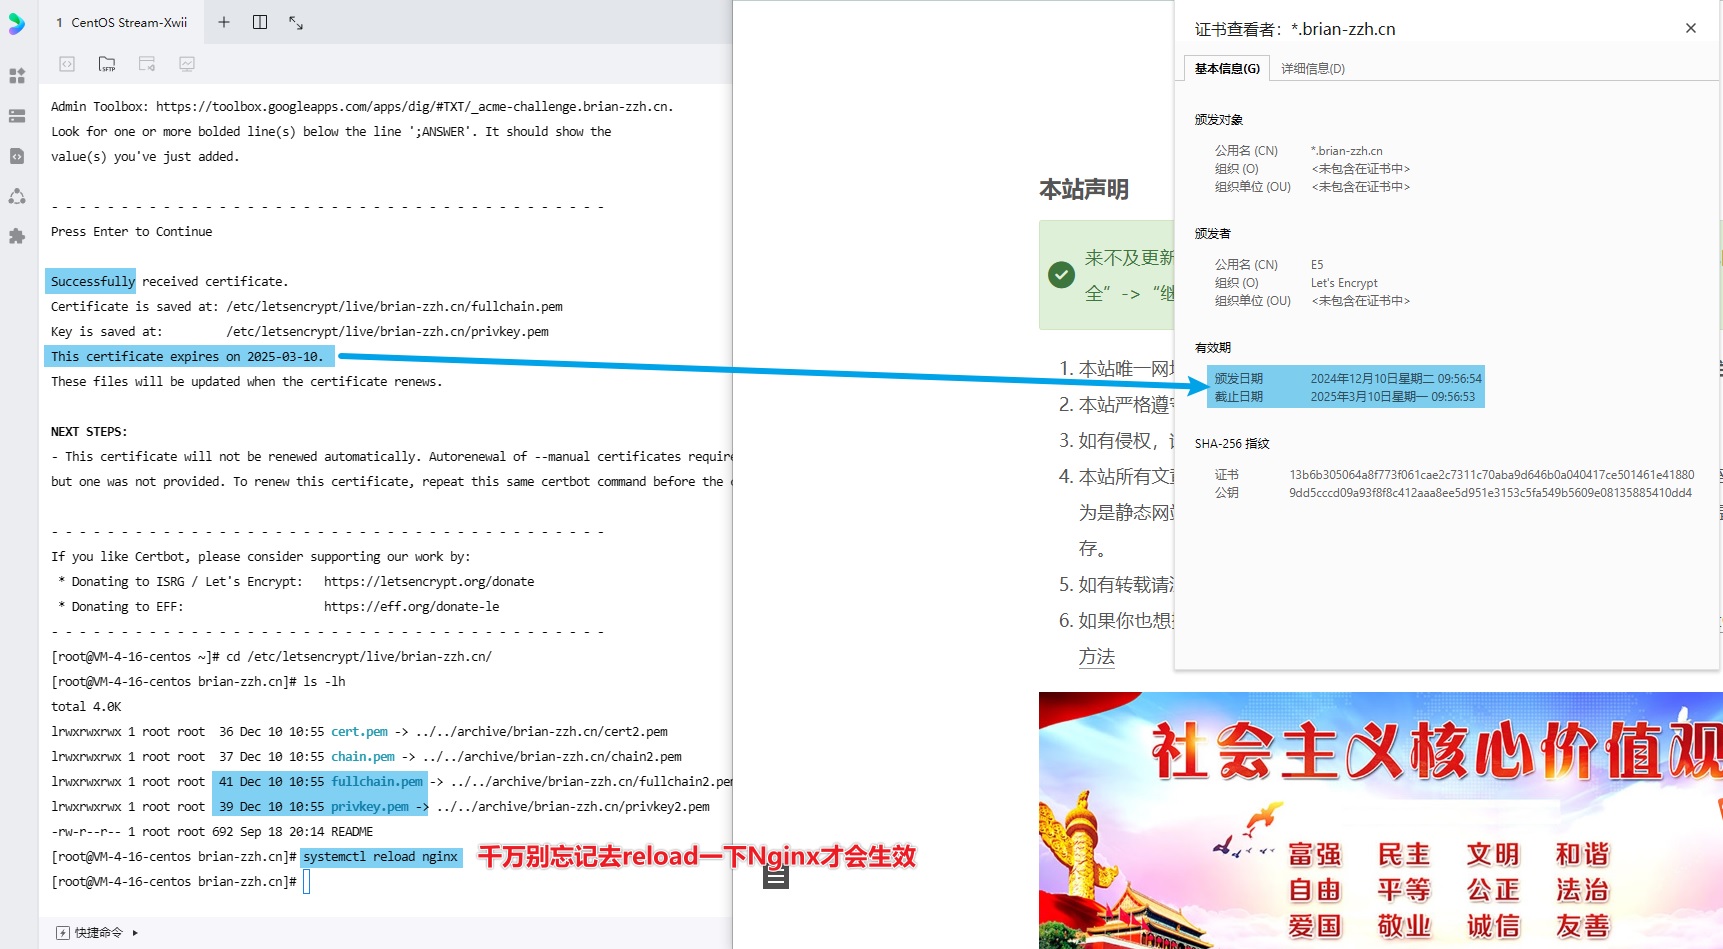
接着点【回车】继续下一步。看到Successfully就是成功了。
1 | Successfully received certificate. |
去到/etc/letsencrypt/live/brian-zzh.cn/就能找到申请下来的证书文件了
1 | [root@VM-4-16-centos lighthouse]# cd /etc/letsencrypt/live/brian-zzh.cn/ |
配置nginx.conf的新证书位置
修改/etc/nginx/nginx.conf文件中的ssl证书位置,修改的地方如图所示:
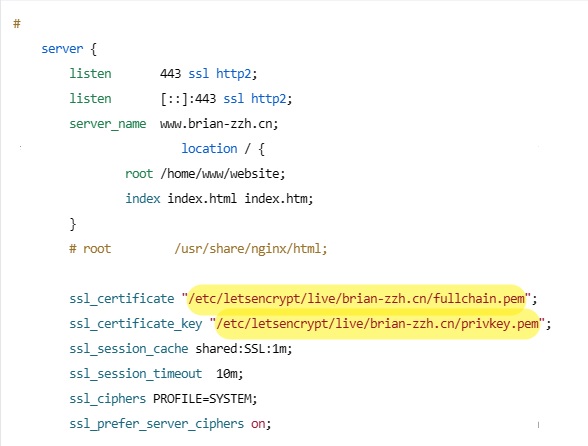
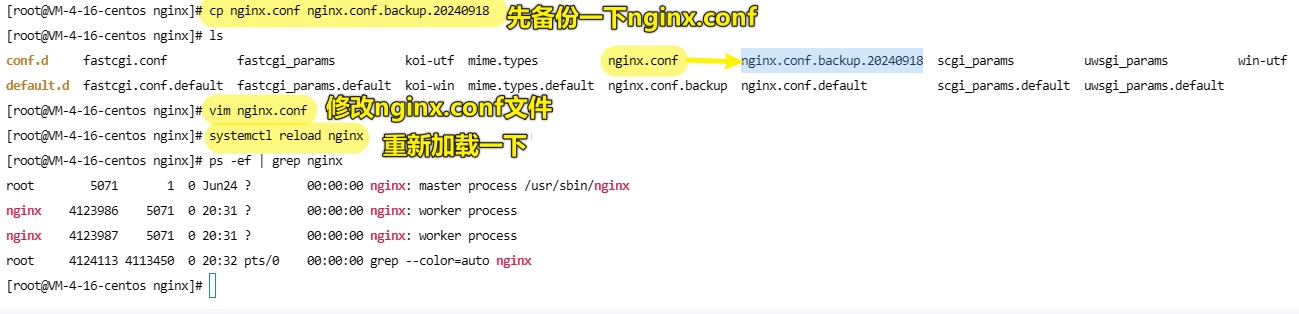
具体操作如下:
1 | # 备份一下nginx.conf文件 |
访问https域名确认证书成功
通过访问https://www.brian-zzh.cn/ 查看证书是否成功。

在手机浏览器上这个证书还是会报错?其实是来自网站的内容分析,被标记为广告网站了,我也想有广告收入,报错的VIVO是不是给我投一个?🤣
自动证书续期(测试不能用)
1 | # 通过这个命令可以续期,经过测试是要配置腾讯云DNS解析的API,看起来很复杂就没有去研究了。 |
手动证书续期(可以用)
自动更新证书续期,需要调用API去改DNS做认证,这个配置不会,还是手动吧。
继续执行申请证书的语句
1 | certbot certonly --server https://acme-v02.api.letsencrypt.org/directory --manual --preferred-challenges dns --email 113191814@qq.com --agree-tos -d *.brian-zzh.cn |
获得了如图的值,去腾讯云的域名解析上做一个解析,因为之前配置过一次了,修改以下记录值就行了。等1分钟后,回到命令行点一下回车。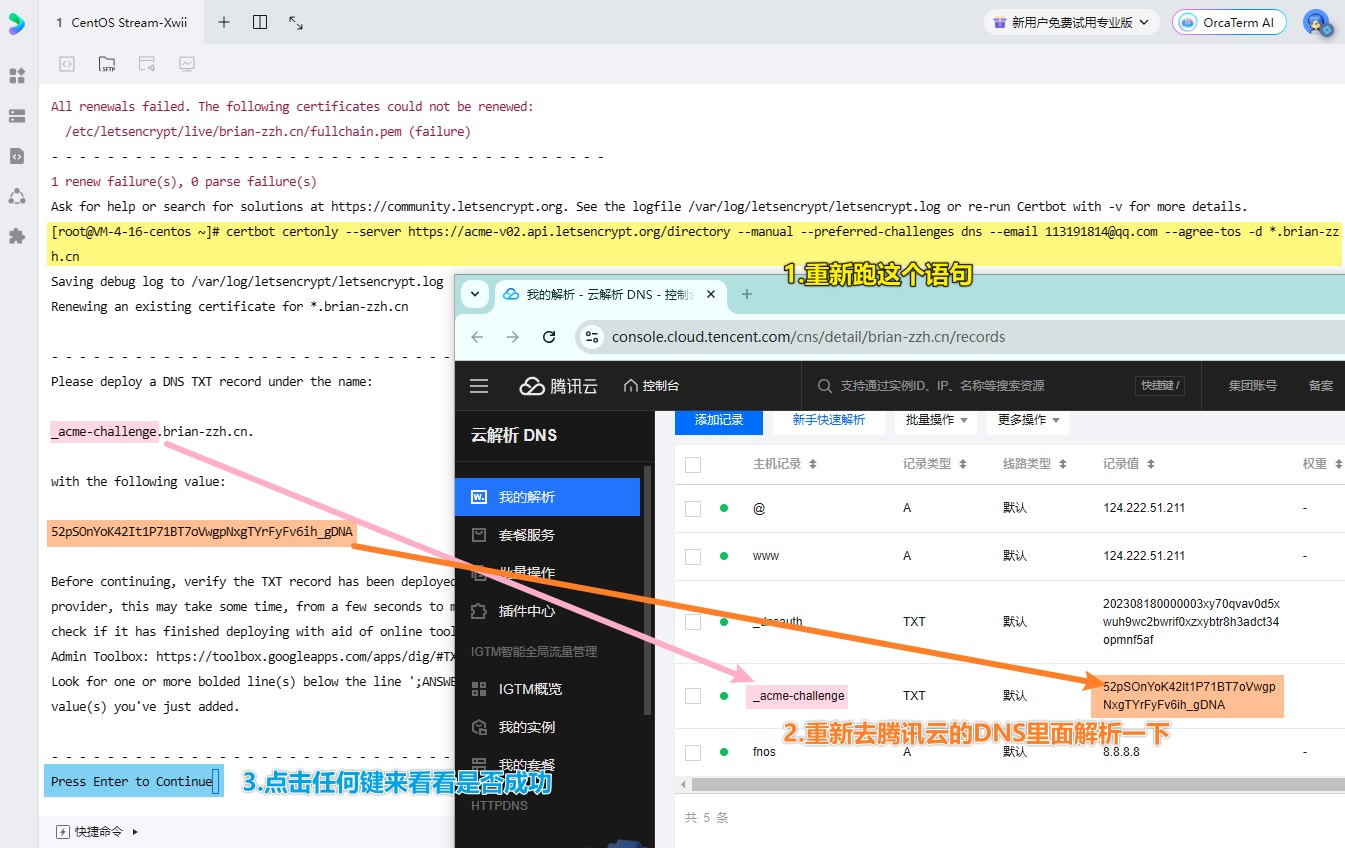
返回的信息带有Successfully就是成功了。
进去存放证书的目录看看,pem文件也是最新的日期。
继续执行reload一下nginx,就可以刷新一下网站,发现证书续期成功呢了。操作还是比纯在腾讯云手工申请、手工认证、手工下载、手工更新证书文件这一套下来快很多的。
1 | systemctl reload nginx |
腾讯云官方cerbot用法
没有测试过,等下次换证书的时候折腾一下。感觉是需要用腾讯的收费证书才行。
https://cloud.tencent.com/document/product/302/105900
域名从阿里云迁到腾讯云
霸道的阿里云,他们家的域名只能用在自己的云服务器上。一气之下就迁出了算了。

在阿里云上申请一个迁出码
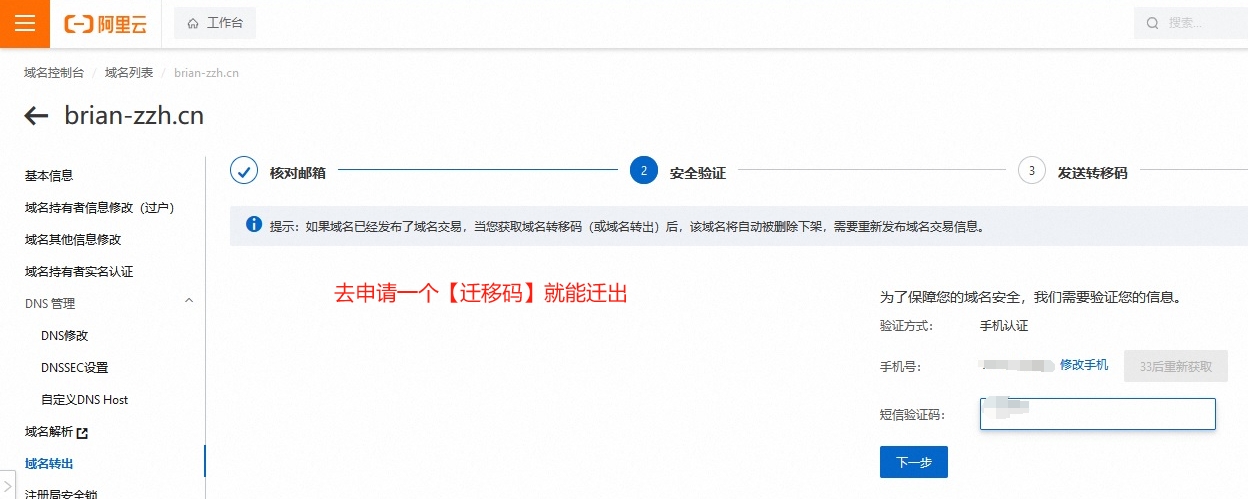
阿里云会发一个邮件告诉你迁出码,这个码在腾讯云中输入
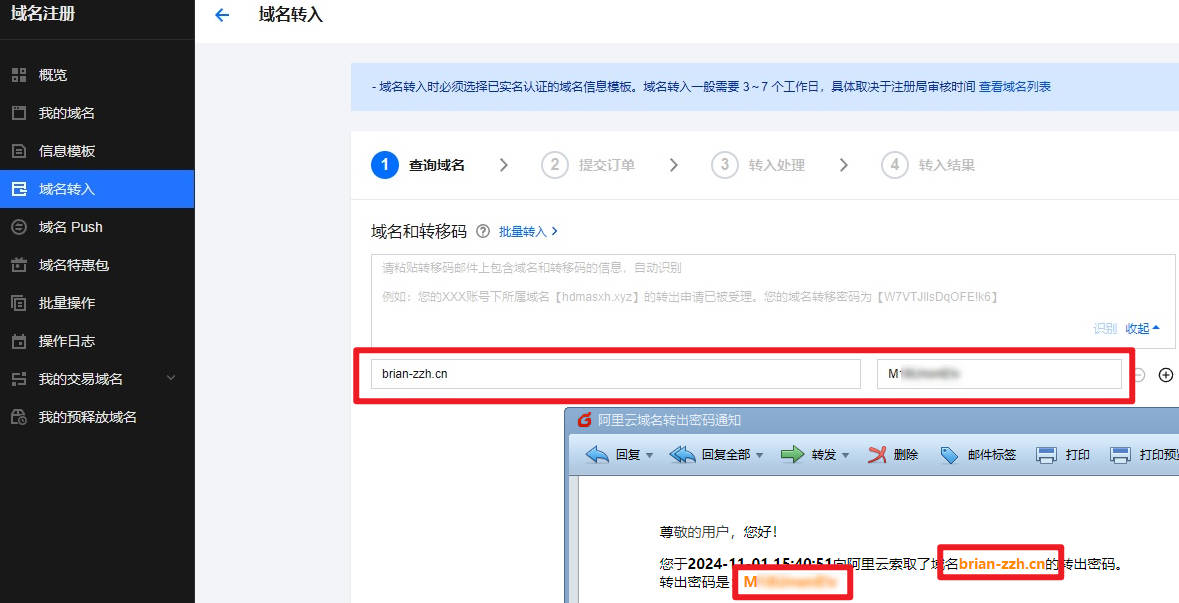
然后在腾讯云中给钱就好了。
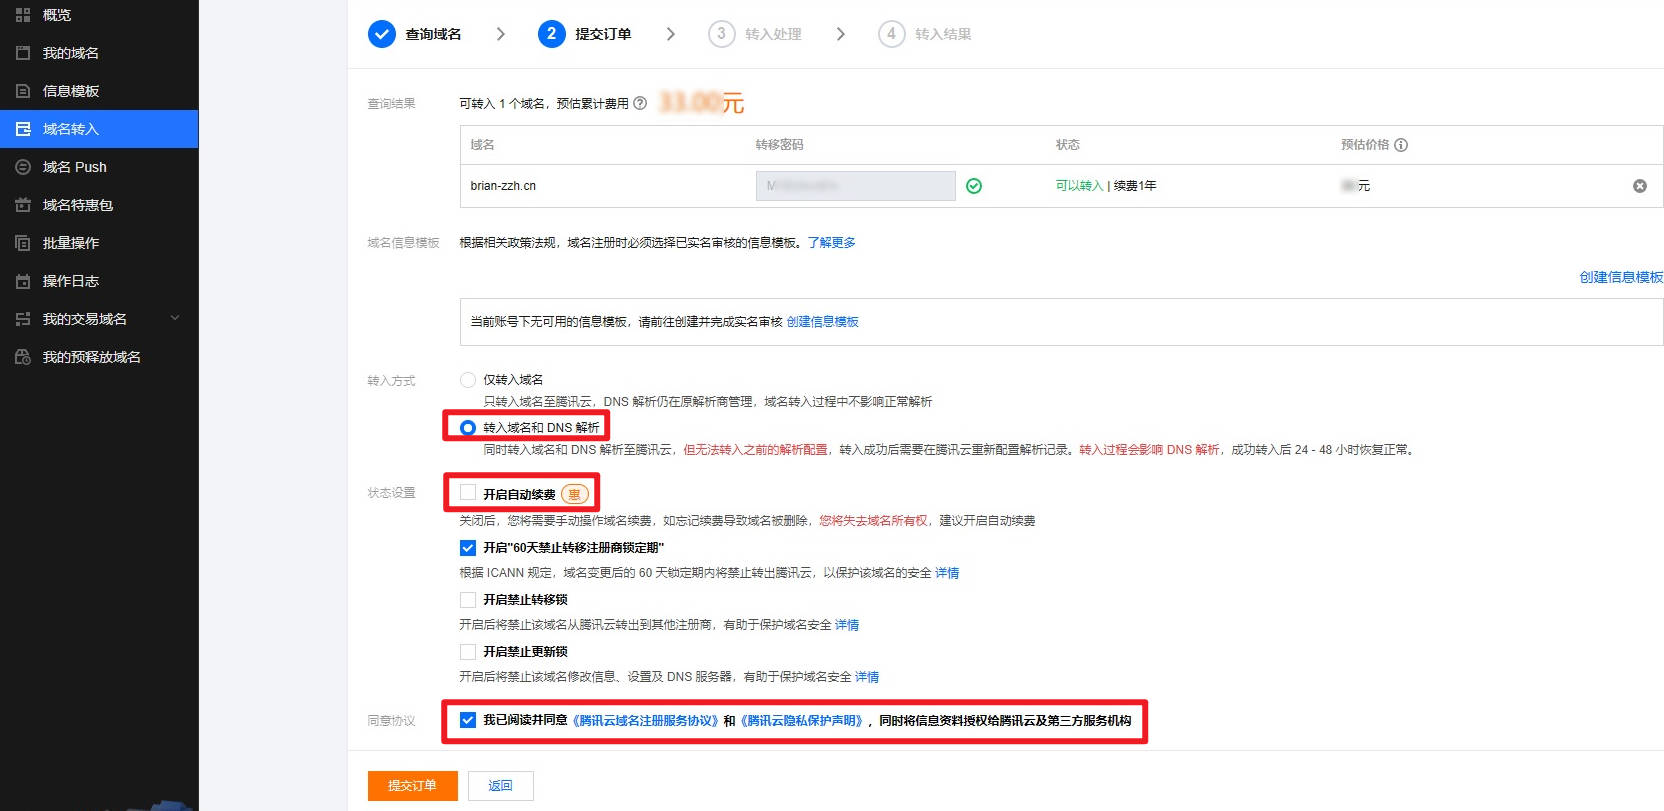
PS:如果之前还没有做实名认证的话,要先做实名认证【信息模板】
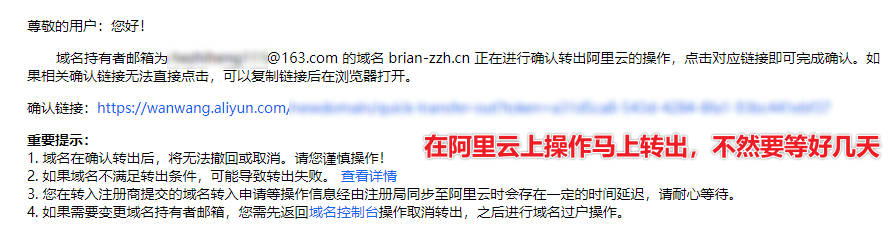
记得在阿里云中选择【马上转出】,会收到一封邮件,然后点击链接确认马上转出就好。一般30分钟就完成转出,腾讯云也会收到转入。
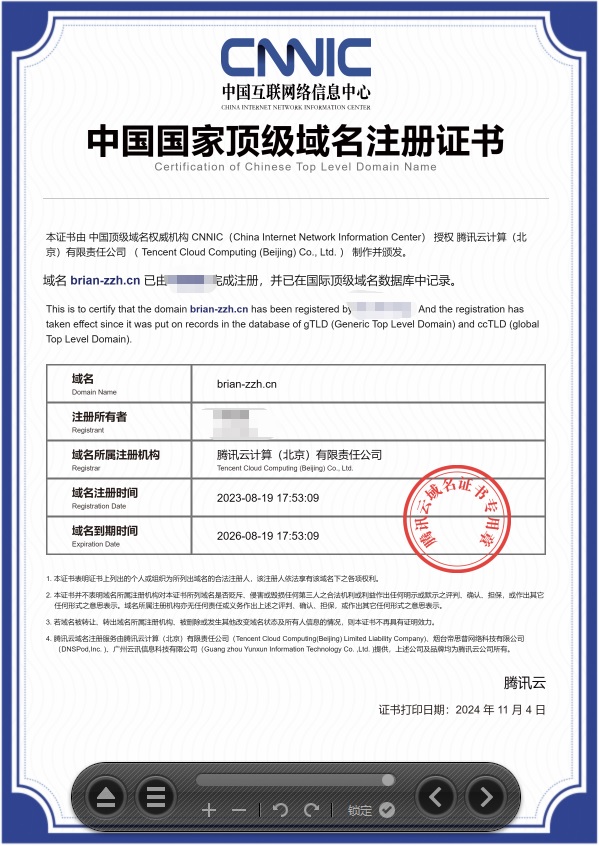
域名证书也到手了
在腾讯云中完成DNS的域名解析配置,让域名可以转到去你的腾讯云服务器。
工信部也发来了备案更新的通知,应该是不用再去更新备案了吧?
过了几天了,网站还能正常访问。域名所有人没有变,服务器没有变,IP地址没有变,只是域名服务商变成腾讯云了,应该不用去申报啥的。

重启腾讯云服务器
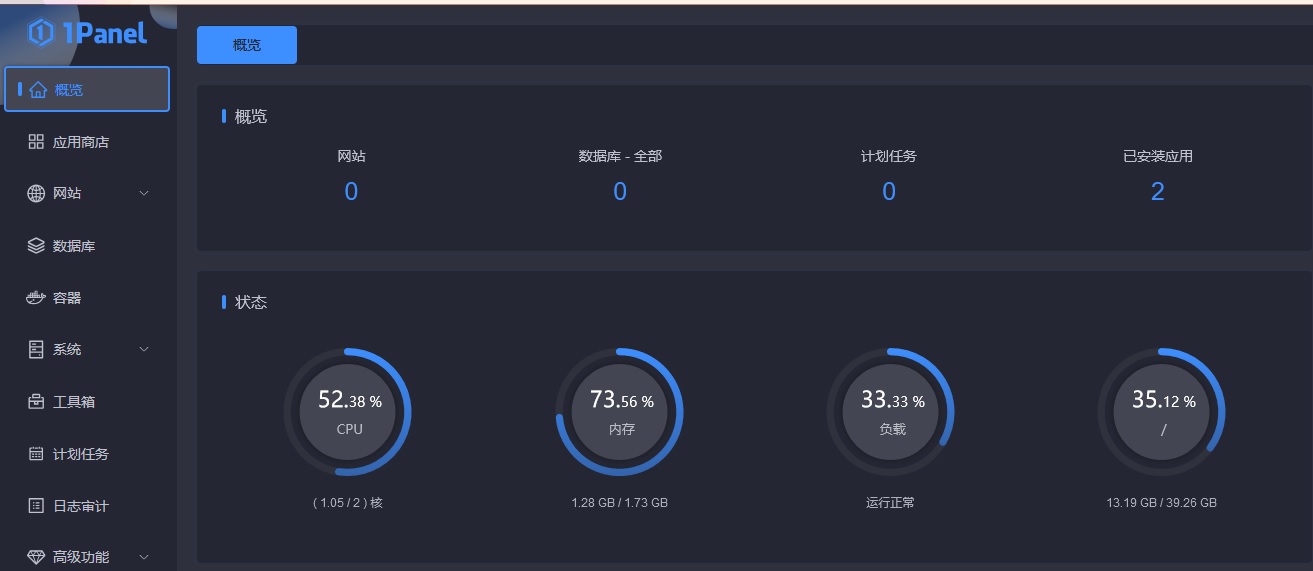
因为在1Panel上手贱安装了Only Office的Docker版,直接就把腾讯云服务器搞崩了。正好练练手重启,之前一次都没有重启过。
因为服务器太卡了,最终是等了5分钟后,腾讯云才执行的强制重启。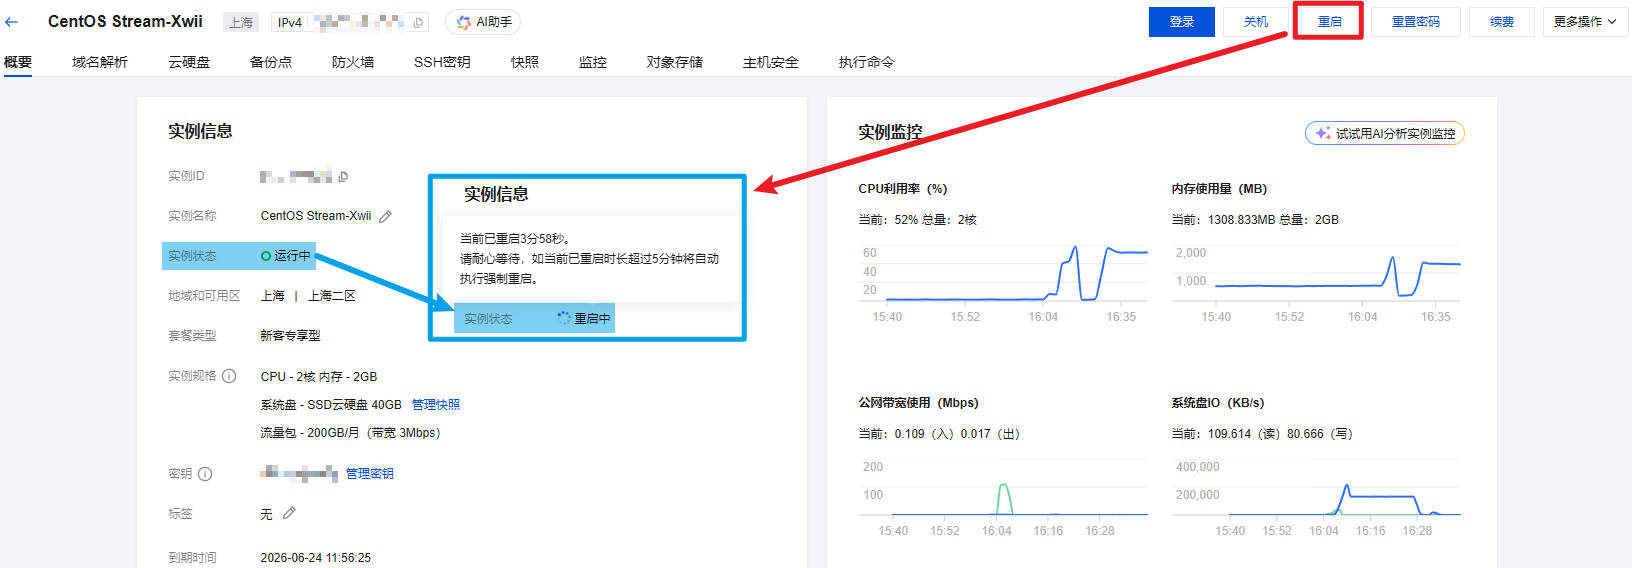
因为腾讯云上安装了有
- hexo
- git
- nginx (需要手工启动)
- nodejs
- Docker
- 思源笔记(docker)
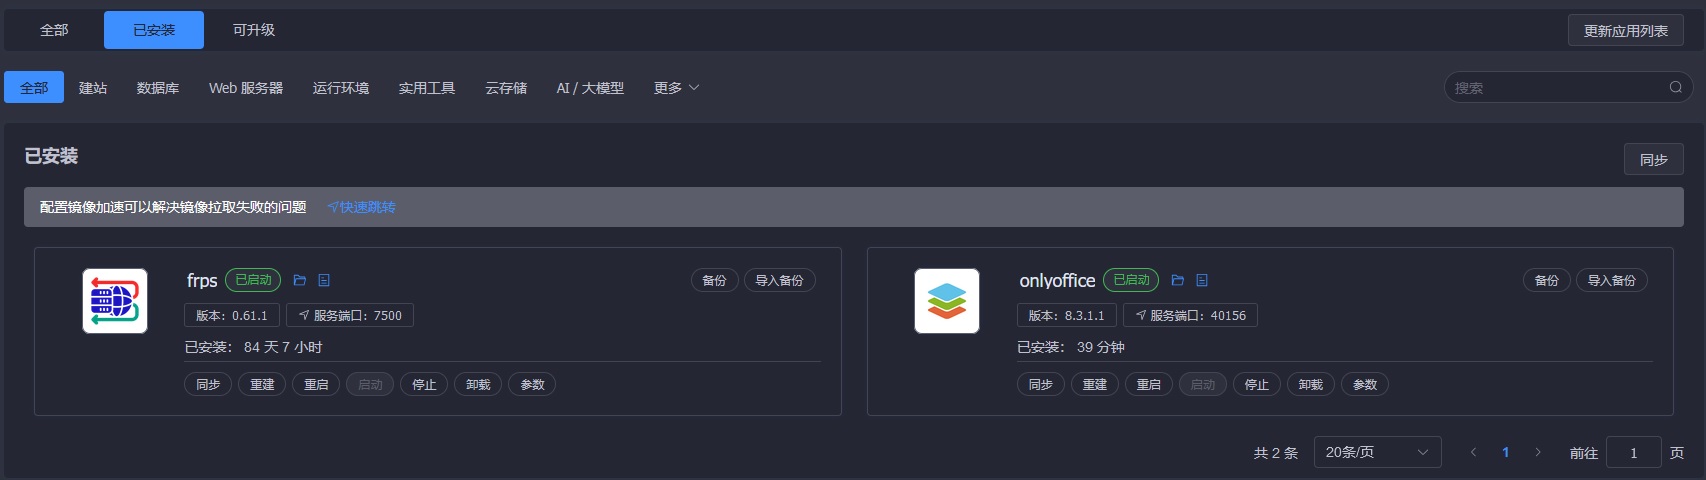
- 1Panel (会自动启动)
- frps(内网穿透服务端 docker)
- Only Office(docker)
需要手工启动的有nginx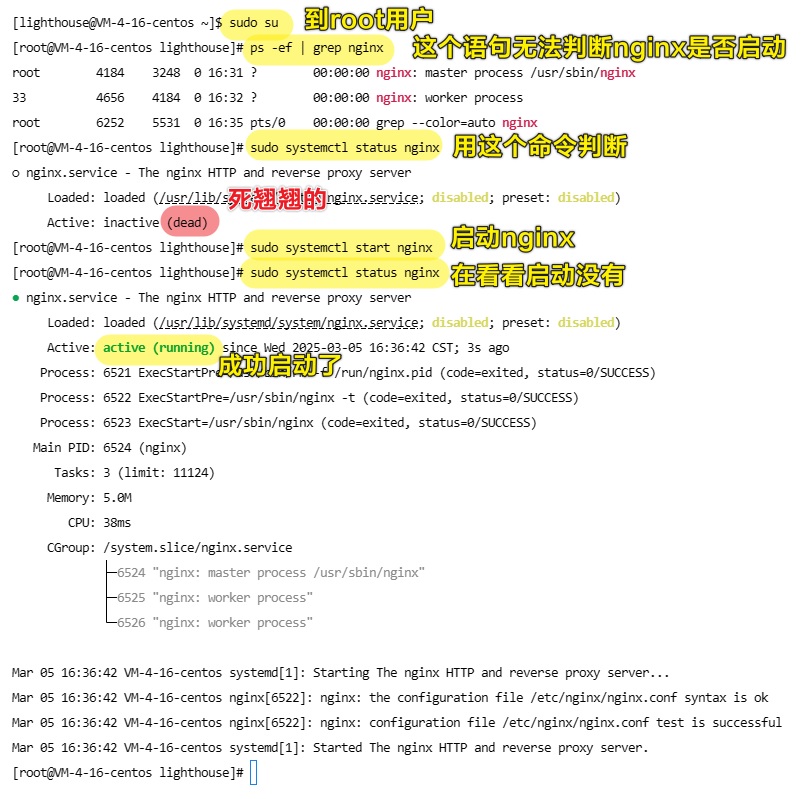
需要在1Panel中手工启动的有Docker自身服务、思源笔记服务(docker)。其中OnlyOffice服务(docker)和frps(docker)因为是通过1Panel安装的,会在1Panel启动Docker时候一同启动,应该是1Panel自己配置的compose了。
最后重启完腾讯云,OnlyOffice服务也启动起来了,占了1个G内存,CPU也占了1个核的99%。能用,但是没有必要,2C2G的服务器来说太勉强了。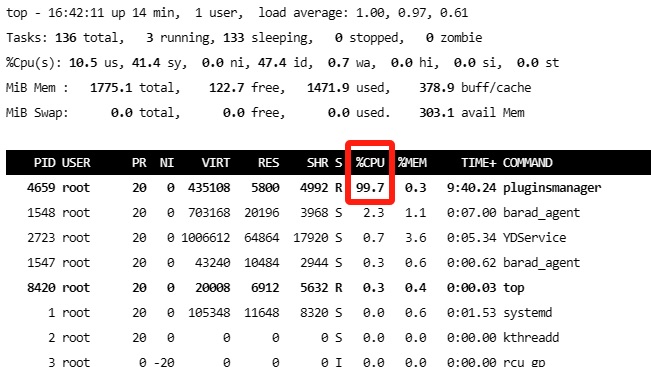
利用acme.sh自动部署ssl证书
安装acme.sh(中国版)
先切换到root用户
1 | [lighthouse@VM-4-16-centos ~]$ sudo -i |
克隆中国gitee仓库的acme.sh
1 | git clone https://gitee.com/neilpang/acme.sh.git |
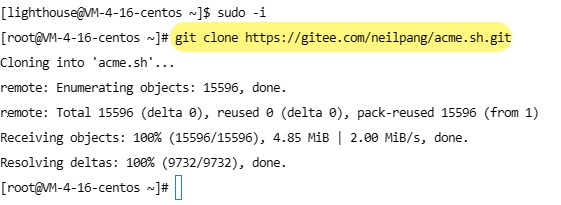
cd进去/root/acme.sh目录,看到有内容就证明克隆成功了
1 | cd acme.sh |

1 | # 安装acme.sh |

申请证书DNSPod腾讯云
前提1:先要保证你的Email注册过zerossl的账号,如果没有注册过就这样解决。
1 | root@DESKTOP-FH09R9R ~/.acme.sh # acme.sh --register-account -m hezhiheng111@163.com --server zerossl |

⚠️不然会出现如下报错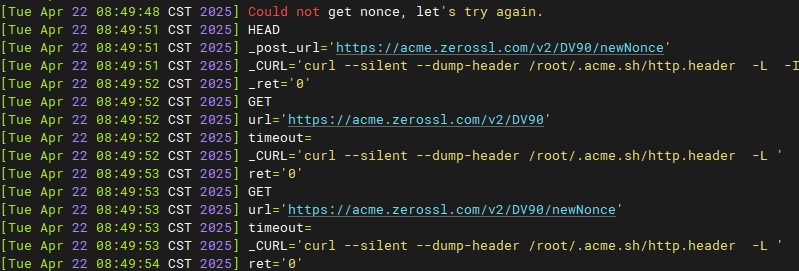
前提2:在你的腾讯云上开通DNSPod Token
开通地址是:https://console.dnspod.cn/account/token/token
确保你的域名brian-zzh.cn是在腾讯云购买,并且已经指向去你的腾讯云服务器。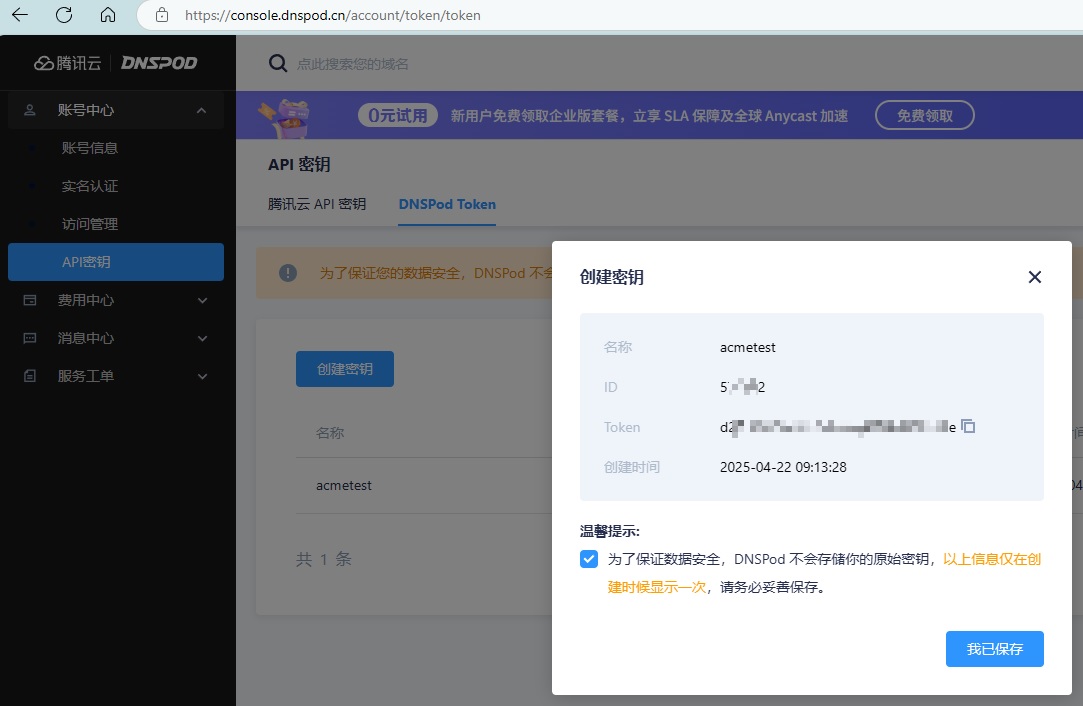
把获得的ID和KEY写入~/.acme.sh/account.conf中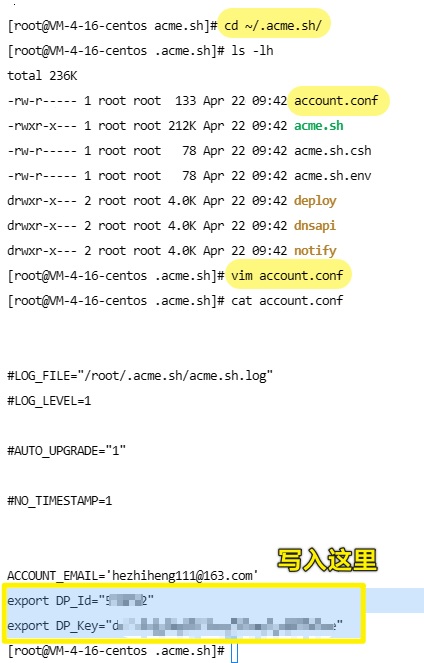
1 | # 进入~/.acme.sh/目录 |
1 | export DP_Id="你的ID" |
⚠️不然会出现如下报错
通过命令来申请证书
1 | acme.sh --issue --dns dns_dp -d brian-zzh.cn -d *.brian-zzh.cn |
有这样的返回值就是成功了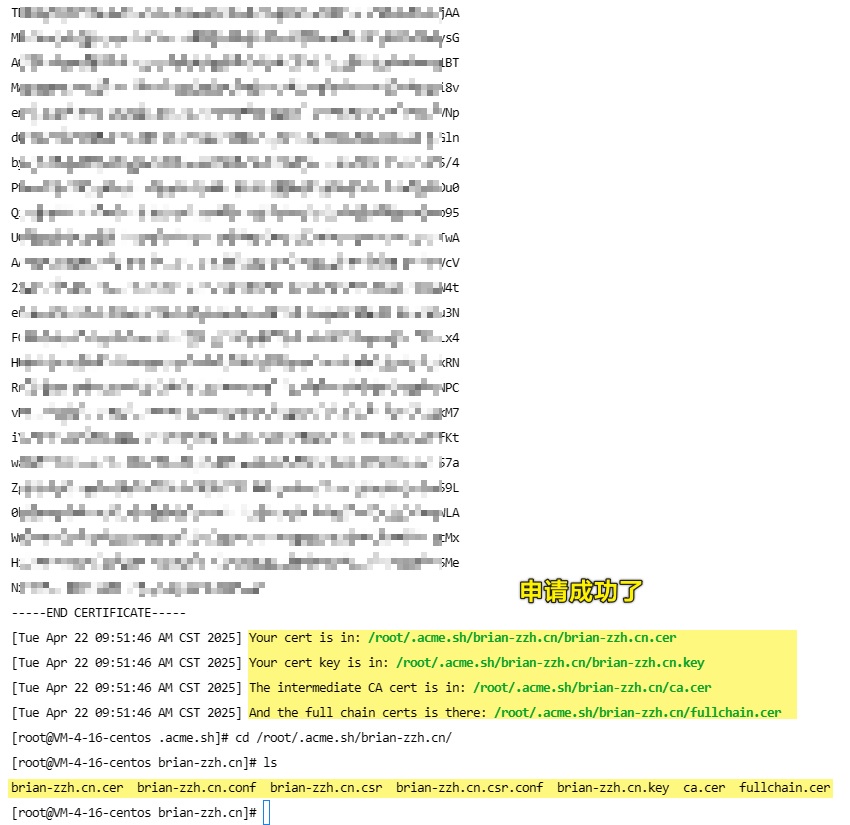
进去目录看看是否文件申请下来了
1 | root@DESKTOP-FH09R9R ~/.acme.sh # cd brian-zzh.cn/ |
配置Nginx
前提:确保/etc/nginx/nginx.conf中SSL证书配置跟acme.sh --install-cert的配置是一样的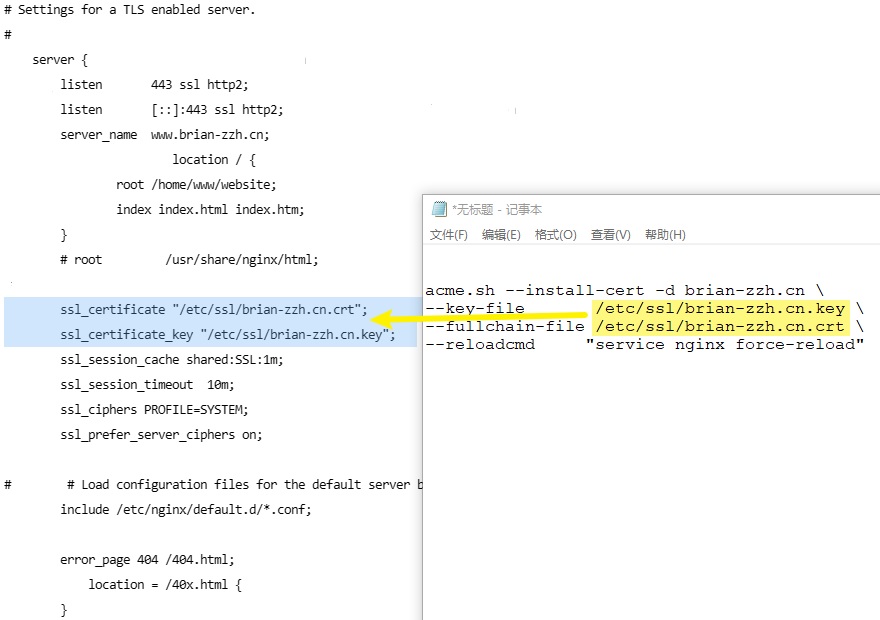
1 | acme.sh --install-cert -d brian-zzh.cn \ |
到浏览器刷新一下页面,看看证书有没有更新。有更新就是成功了。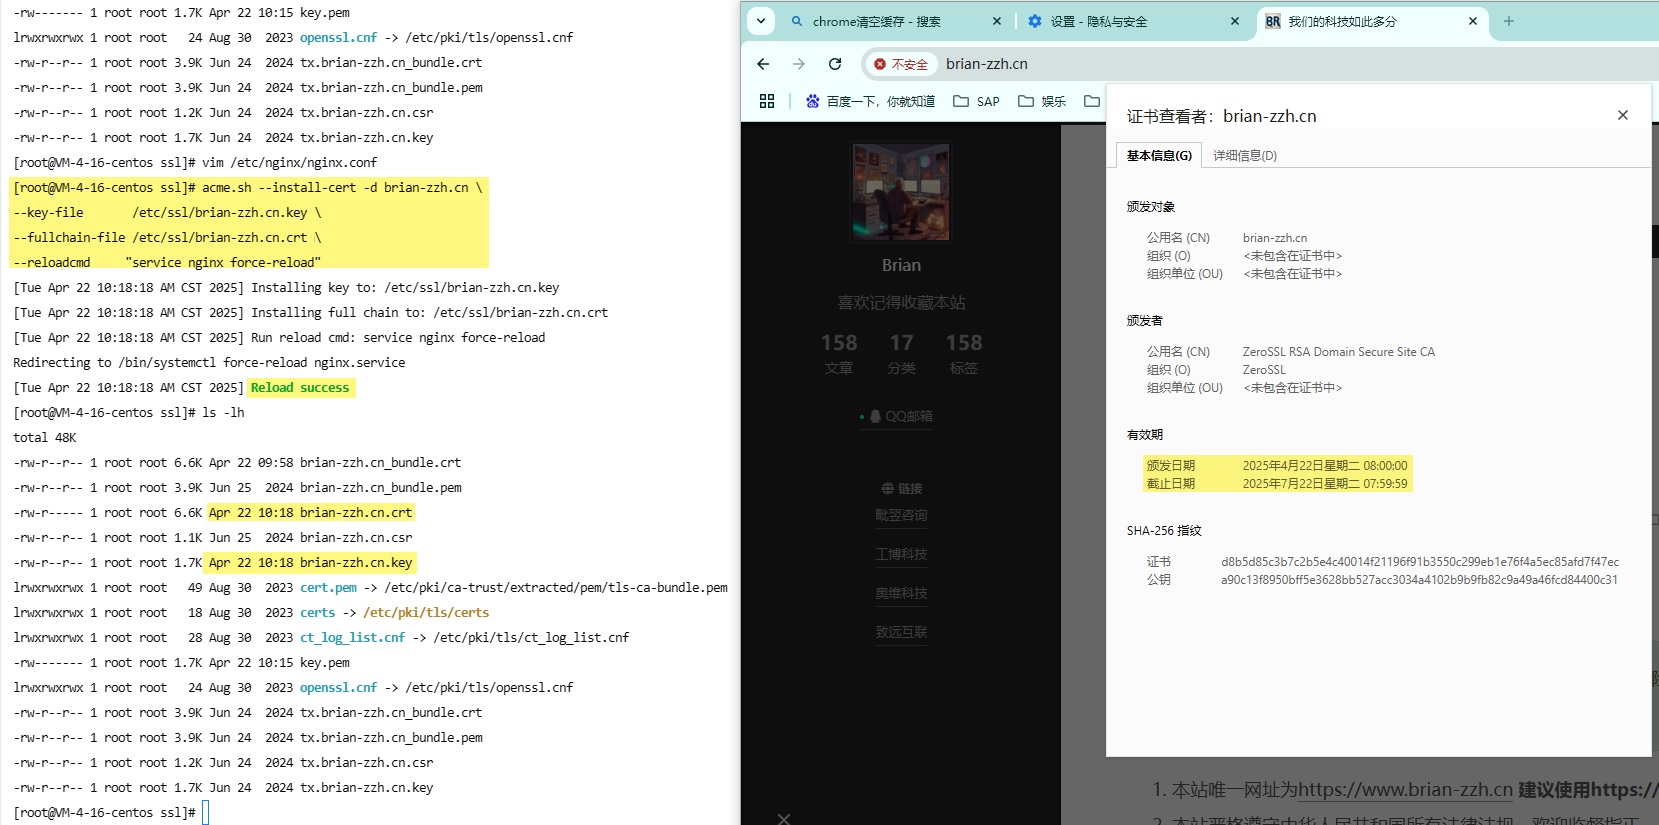
其他操作
通过crontab -l命令查看cron有没有在运行,这是自动续期证书的任务。
1 | [root@VM-4-16-centos ssl]# crontab -l |
通过acme.sh --list命令可以查看证书申请的情况
1 | acme.sh --list |
自动更细失败
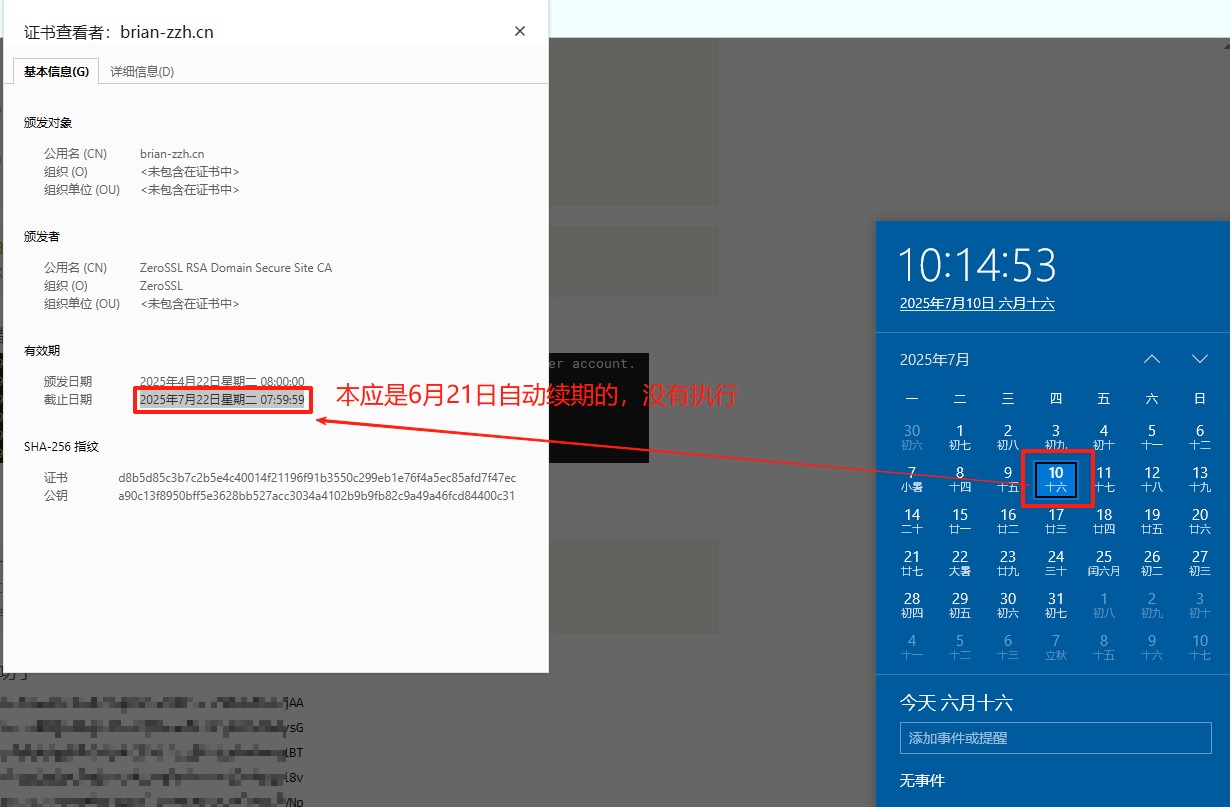
最近去看看SSL证书是不是成功更新了,发现没有。手工执行报这个错误。找AI问问,做了以下的操作,就又可以了。奇怪!
1 | [root@VM-4-16-centos .acme.sh]# acme.sh --issue --dns dns_dp -d brian-zzh.cn -d *.brian-zzh.cn |
这是问了AI推荐处理的工作:
1 | # 看看时间对不对 |
然后再执行一次申请证书,就莫名其妙的好了?真是奇怪。
1 | [root@VM-4-16-centos .acme.sh]# acme.sh --issue --dns dns_dp -d brian-zzh.cn -d *.brian-zzh.cn |
看了一下,brian-zzh.cn.key没有更新成功呀,还是4月22日的文件,搞不懂。问了一下AI,说brian-zzh.cn.key是私钥,可以不更新的。
1 | [root@VM-4-16-centos .acme.sh]# cd brian-zzh.cn/ |
再执行一次这个命令,让证书放过去/etc/ssl/,就完成了。
1 | acme.sh --install-cert -d brian-zzh.cn \ |
成功了,还是要手动,还真是没省多少事。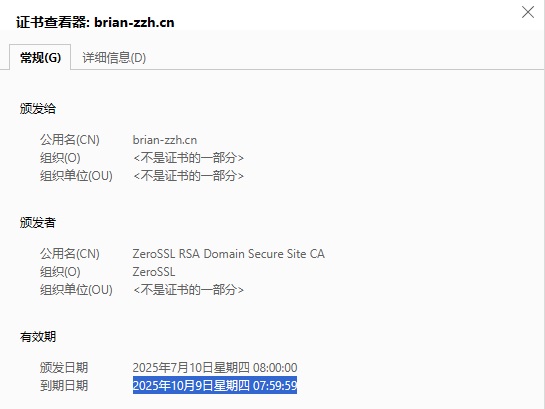
清理日志/var/log/journal/
最近发现有个日志目录非常大,有2.7G的空间,尝试清理一下。清理完发现剩下100M了。
1 | [root@VM-4-16-centos ~]# du -sh /var/log/journal/* | sort -rh |
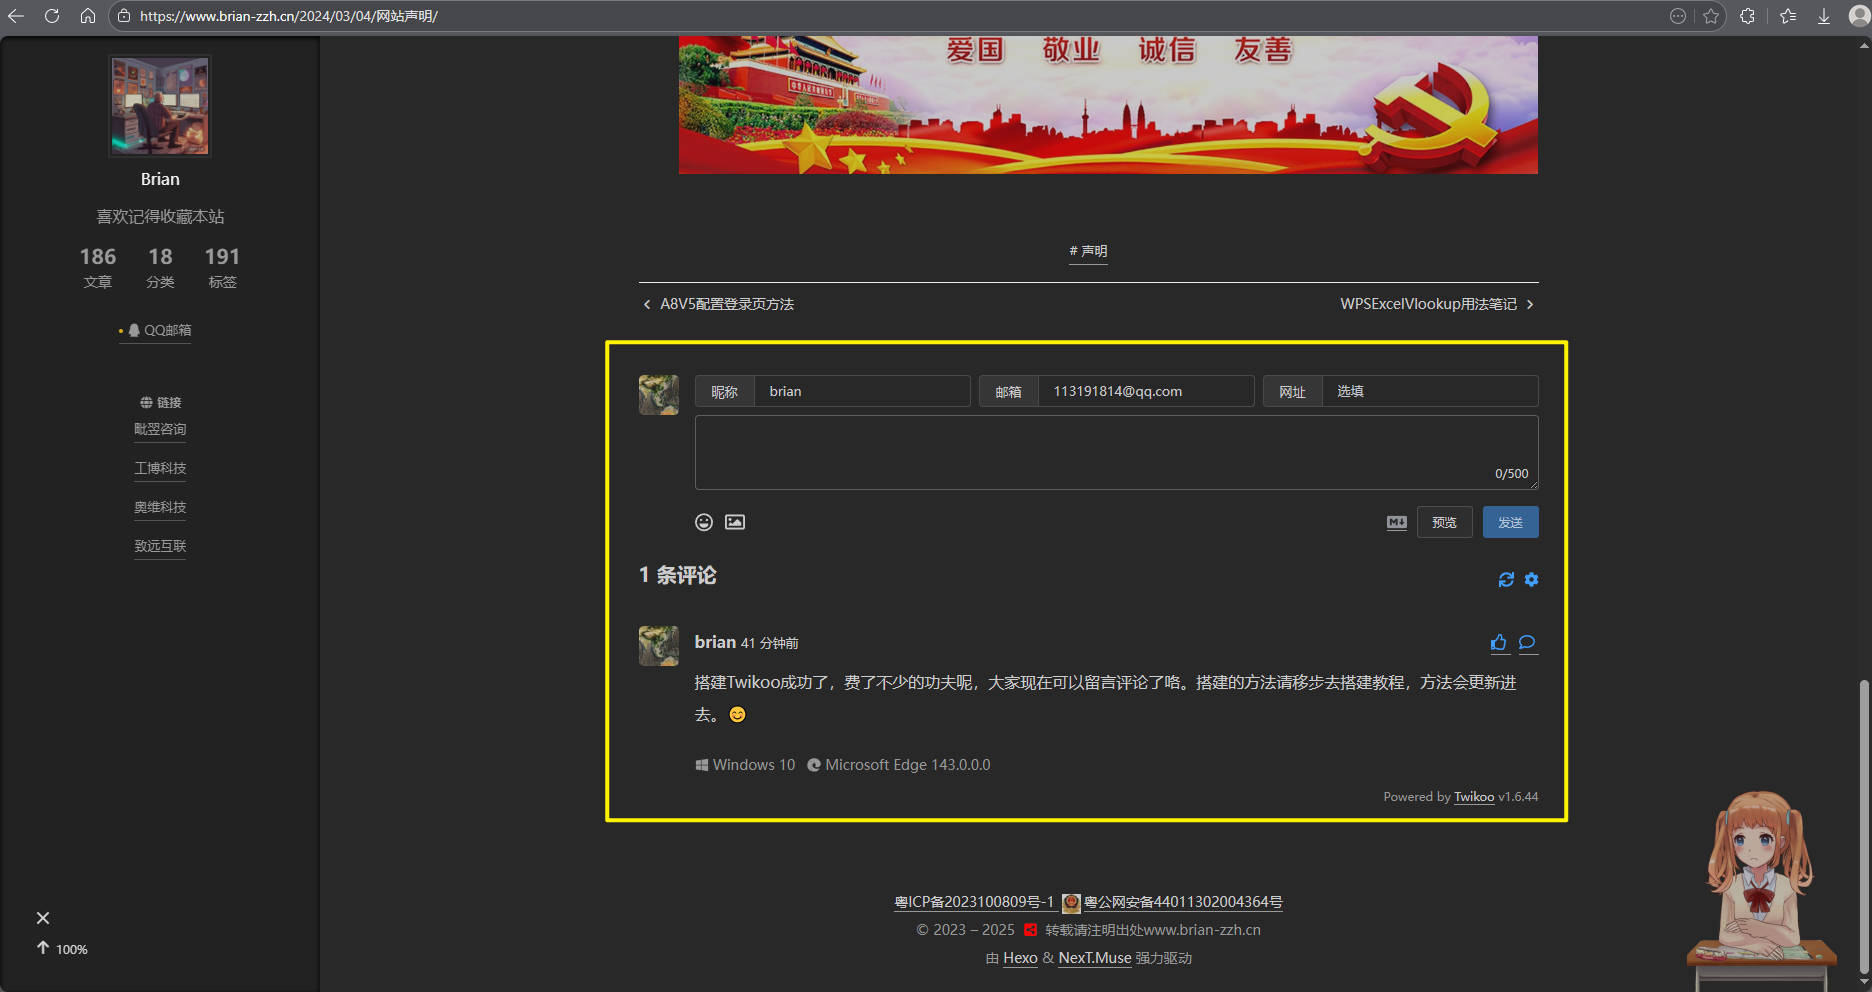
hexo + Twikoo评论搭建
这个功能在公网用需要部署有https的一级域名的自己的服务,不然就只能去找公开的收费服务。
(1)腾讯云的轻量云服务器上安装了Twikoo并启用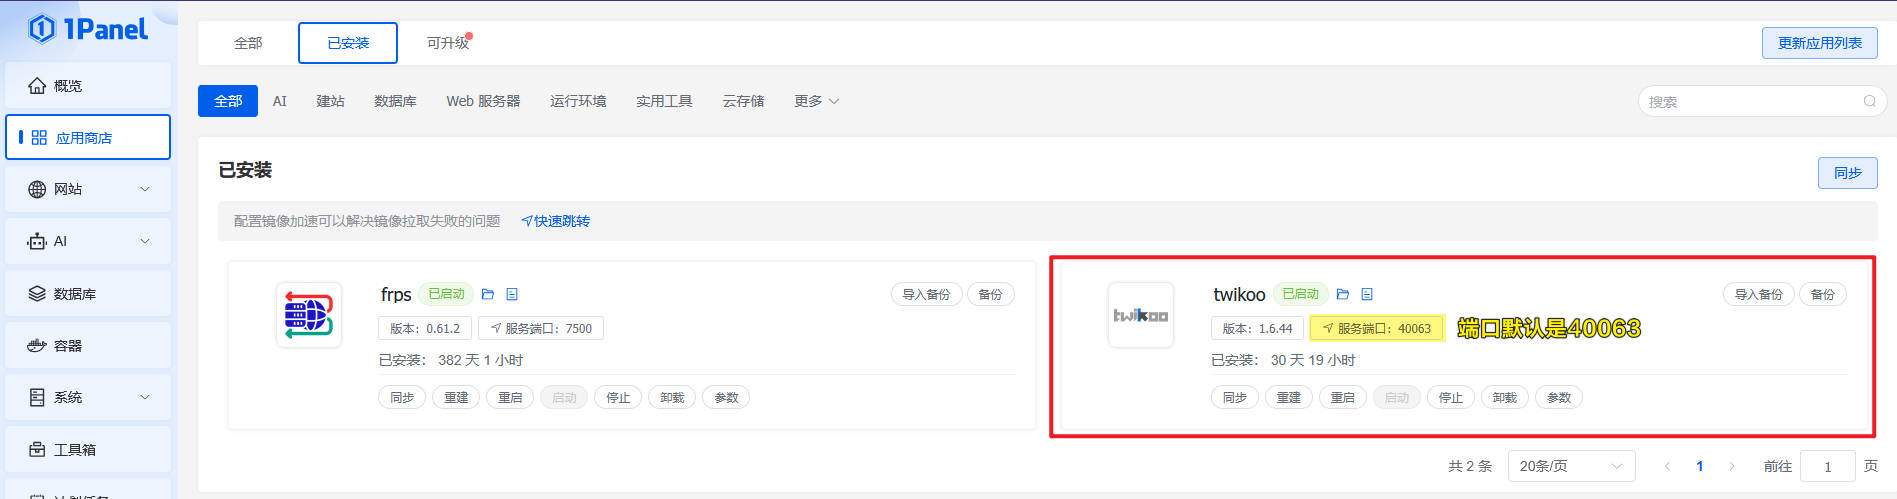
(2)端口是:40036,要在轻量云上开放防火墙的端口。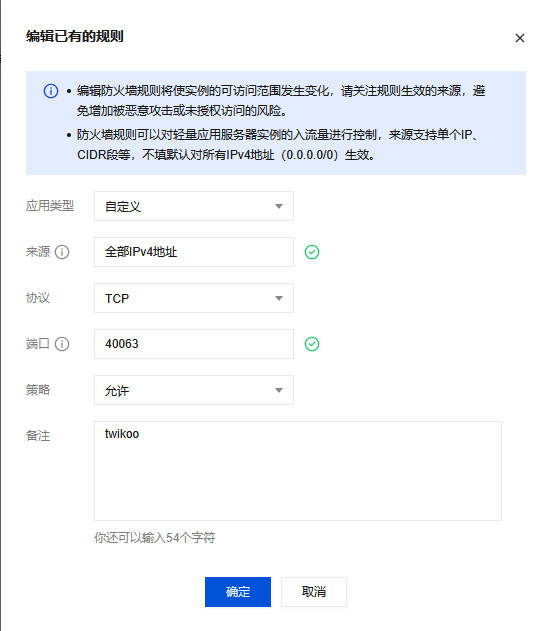
(3)配置hexo和next主题的_config.yml文件
hexo的配置是:我的存放目录是:C:\blog\HEXO中的_config.yml文件,修改前记得养成备份好习惯
1 | twikoo: |
next的配置是:我的存放目录是:C:\blog\HEXO\themes\next中的_config.yml文件,修改前记得养成备份好习惯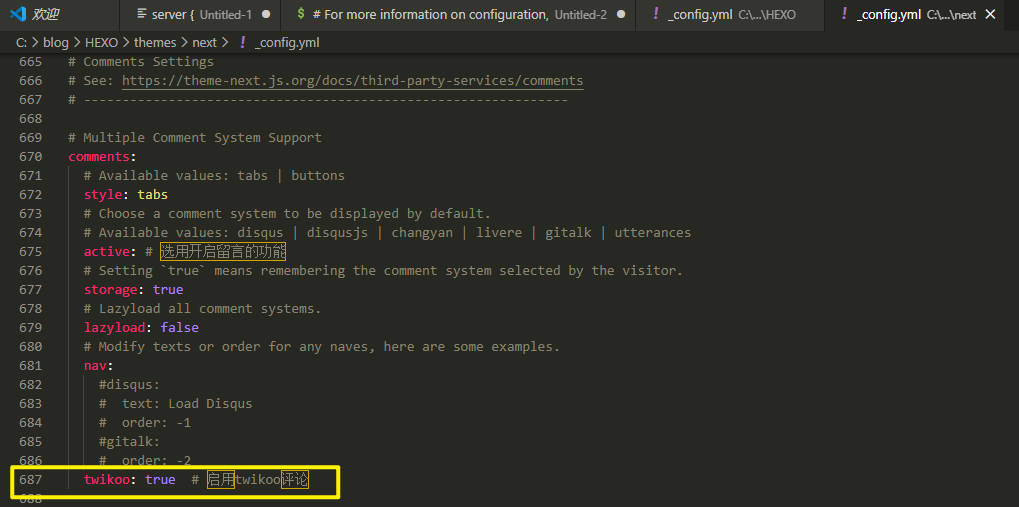
1 | # Multiple Comment System Support |
(4)利用acme.sh申请好*.<顶级域名>.com的证书,这样你的一级域名https://<你的一级域名>.brian-zzh.cn才能使用。这里就不详细说,状况百出,多问AI多测试就行。
(5)配置腾讯云上的DNS解析
- 主机记录:你的一级域名名字,譬如你想用
https://twikoo.brian-zzh.cn,那这里就填写twikoo - 记录类型:A
- 线路类型:默认
- 记录值:你云主机的公网IP
- 权重:不填
- 优先级:不填
- TTL:600
一般是马上生效的,保守是10分钟内,官方说也有可能需要72小时。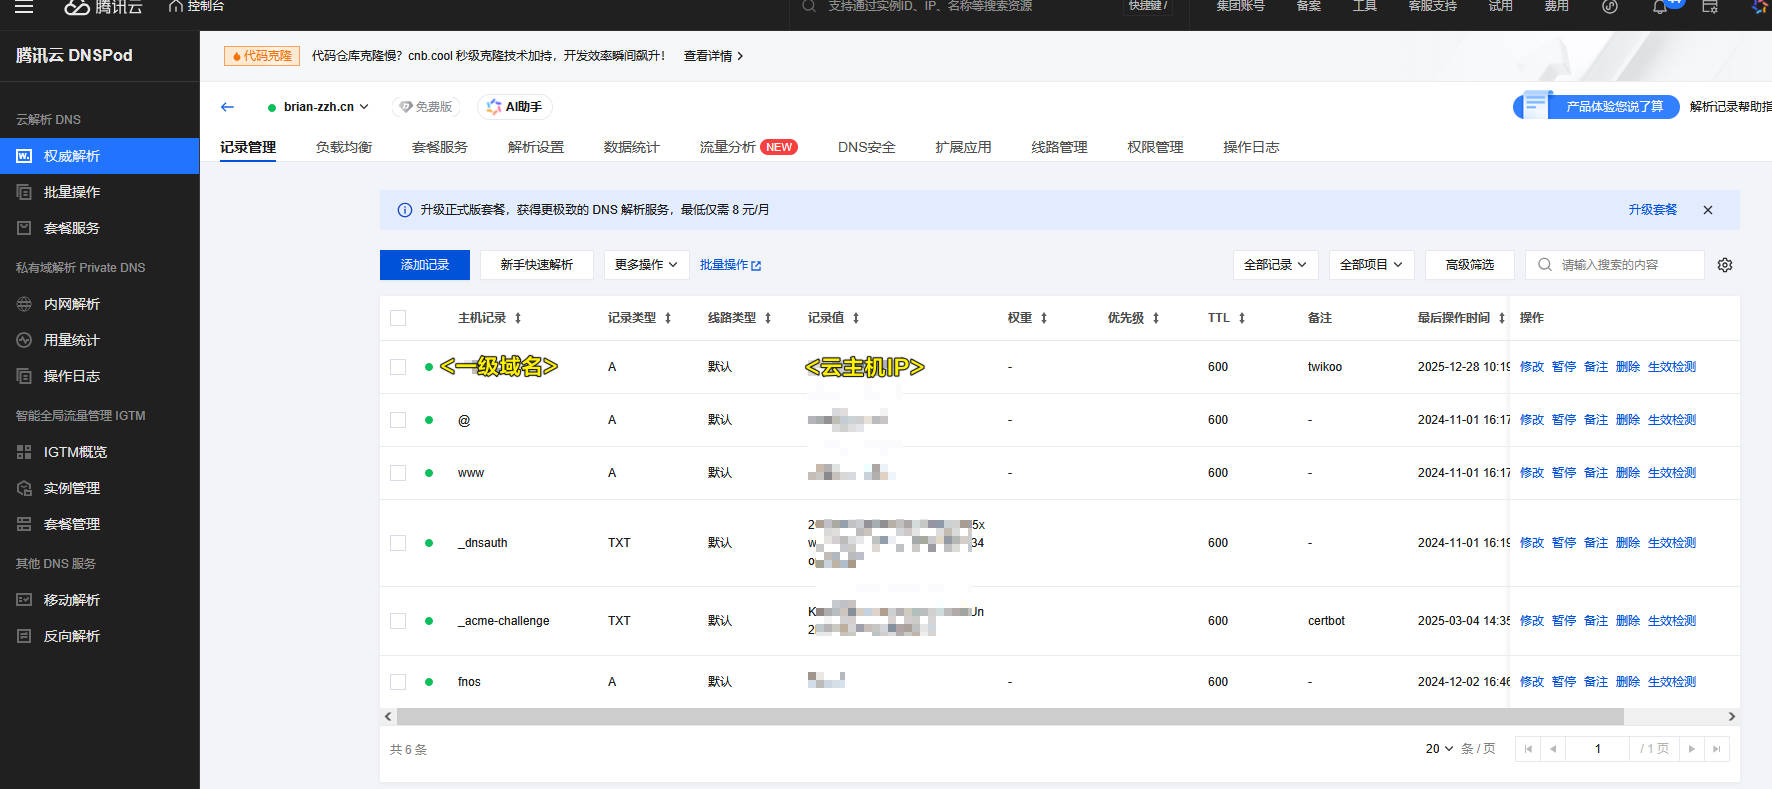
(6)修改Nginx.conf,要在Nginx的配置里面加入https://twikoo.brian-zzh.cn和127.0.0.1:40036的代理。让AI给你重新一份就好,我的就是AI写的。我是要替换/etc/nginx里面nginx.conf的配置,替换前记得备份好原有的文件。替换好了,运行1
2
3
4
5
6
7
8
9
10
11
12
13
14
15
16
17
18
19
20
21
22
23
24
25
26
27
28
29
30
31
32
33
34
35
36
37
38
39
40
41
42
43
44
45
46
47
48
49
50
51
52
53
54
55
56
57
58
59
60
61
62
63
64
65
66
67
68
69
70
71
72
73
74
75
76
77
78
79
80
81
82
83
84
85
86
87
88
89
90
91
92
93
94
95
96
97
98
99
100
101
102
103
104# For more information on configuration, see:
# * Official English Documentation: http://nginx.org/en/docs/
# * Official Russian Documentation: http://nginx.org/ru/docs/
user nginx;
worker_processes auto;
error_log /var/log/nginx/error.log;
pid /run/nginx.pid;
# Load dynamic modules. See /usr/share/doc/nginx/README.dynamic.
include /usr/share/nginx/modules/*.conf;
events {
worker_connections 1024;
}
http {
log_format main '$remote_addr - $remote_user [$time_local] "$request" '
'$status $body_bytes_sent "$http_referer" '
'"$http_user_agent" "$http_x_forwarded_for"';
access_log /var/log/nginx/access.log main;
sendfile on;
tcp_nopush on;
tcp_nodelay on;
keepalive_timeout 65;
types_hash_max_size 4096;
include /etc/nginx/mime.types;
default_type application/octet-stream;
# Load modular configuration files from the /etc/nginx/conf.d directory.
include /etc/nginx/conf.d/*.conf;
# =============== HTTP 强制跳转 HTTPS ===============
server {
listen 80;
listen [::]:80;
server_name brian-zzh.cn www.brian-zzh.cn twikoo.brian-zzh.cn;
# 所有 HTTP 请求跳转 HTTPS
return 301 https://$host$request_uri;
}
# =============== Hexo 博客主站 (HTTPS) ===============
server {
listen 443 ssl http2;
listen [::]:443 ssl http2;
server_name brian-zzh.cn www.brian-zzh.cn;
root /home/www/website;
index index.html index.htm;
ssl_certificate "/etc/ssl/brian-zzh.cn.crt";
ssl_certificate_key "/etc/ssl/brian-zzh.cn.key";
ssl_session_cache shared:SSL:1m;
ssl_session_timeout 10m;
ssl_ciphers PROFILE=SYSTEM;
ssl_prefer_server_ciphers on;
# 支持 Hexo clean URL(如 /about/)
location / {
try_files $uri $uri/ =404;
}
error_page 404 /404.html;
location = /404.html {
root /home/www/website;
}
error_page 500 502 503 504 /50x.html;
location = /50x.html {
root /home/www/website;
}
}
# =============== Twikoo 评论服务 (HTTPS) ===============
server {
listen 443 ssl http2;
listen [::]:443 ssl http2;
server_name twikoo.brian-zzh.cn;
ssl_certificate "/etc/ssl/brian-zzh.cn.crt";
ssl_certificate_key "/etc/ssl/brian-zzh.cn.key";
ssl_session_cache shared:SSL:1m;
ssl_session_timeout 10m;
ssl_ciphers PROFILE=SYSTEM;
ssl_prefer_server_ciphers on;
location / {
proxy_pass http://127.0.0.1:40063;
proxy_set_header Host $host;
proxy_set_header X-Real-IP $remote_addr;
proxy_set_header X-Forwarded-For $proxy_add_x_forwarded_for;
proxy_set_header X-Forwarded-Proto $scheme;
proxy_http_version 1.1;
# 如果未来 Twikoo 支持 WebSocket(目前不需要),可保留下面两行
# proxy_set_header Upgrade $http_upgrade;
# proxy_set_header Connection "upgrade";
}
}
}sudo nginx -t看看有没有问题。没有问题就reload一下nginx的配置1
2
3[root@VM-4-16-centos nginx]# sudo nginx -t
nginx: the configuration file /etc/nginx/nginx.conf syntax is ok
nginx: configuration file /etc/nginx/nginx.conf test is successful此时,如果你的twikoo.brian-zzh.cn能ping通了,就基本成功了1
sudo systemctl reload nginx
1
2
3
4
5
6
7
8
9
10
11
12⚡Brian ❯❯ ping twikoo.brian-zzh.cn
正在 Ping twikoo.brian-zzh.cn [124.222.51.211] 具有 32 字节的数据:
来自 124.222.51.211 的回复: 字节=32 时间=38ms TTL=52
来自 124.222.51.211 的回复: 字节=32 时间=38ms TTL=52
来自 124.222.51.211 的回复: 字节=32 时间=38ms TTL=52
来自 124.222.51.211 的回复: 字节=32 时间=37ms TTL=52
124.222.51.211 的 Ping 统计信息:
数据包: 已发送 = 4,已接收 = 4,丢失 = 0 (0% 丢失),
往返行程的估计时间(以毫秒为单位):
最短 = 37ms,最长 = 38ms,平均 = 37ms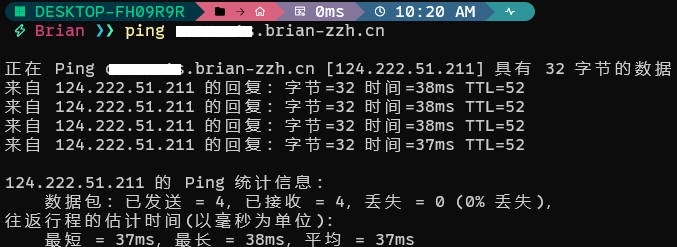
直接访问twikoo.brian-zzh.cn也是有正确返回值的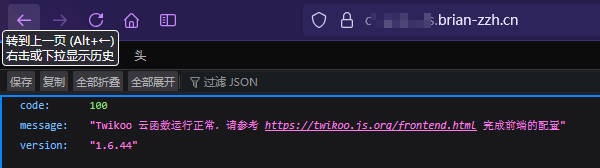
(7)在hexo上试运行
在hexo上安装hexo-next-twikoo,因为本渣用的是next主题,所以下载这个。有这些返回值就是成功了:1
2npm install hexo-next-twikoo@1.0.3
# hexo8.0以上才支持,next主题也要升级到8.4.0以上,其他hexo的主题方法不一样,请自行百度或AI1
2
3
4
5
6
7
8
9
10
11
12
13
14
15
16
17
18
19
20
21
22
23
24
25Brian@DESKTOP-FH09R9R MINGW64 /c/blog/HEXO
$ npm install hexo-next-twikoo@1.0.3
added 9 packages, and audited 804 packages in 16s
45 packages are looking for funding
run `npm fund` for details
36 vulnerabilities (3 low, 12 moderate, 17 high, 4 critical)
To address issues that do not require attention, run:
npm audit fix
To address all issues possible (including breaking changes), run:
npm audit fix --force
Some issues need review, and may require choosing
a different dependency.
Run `npm audit` for details.
npm notice
npm notice New major version of npm available! 10.8.1 -> 11.7.0
npm notice Changelog: https://github.com/npm/cli/releases/tag/v11.7.0
npm notice To update run: npm install -g npm@11.7.0
npm notice
在hexo上跑hexo clean && hexo g && hexo s先本地看看是否能用,能否正确加载和评论。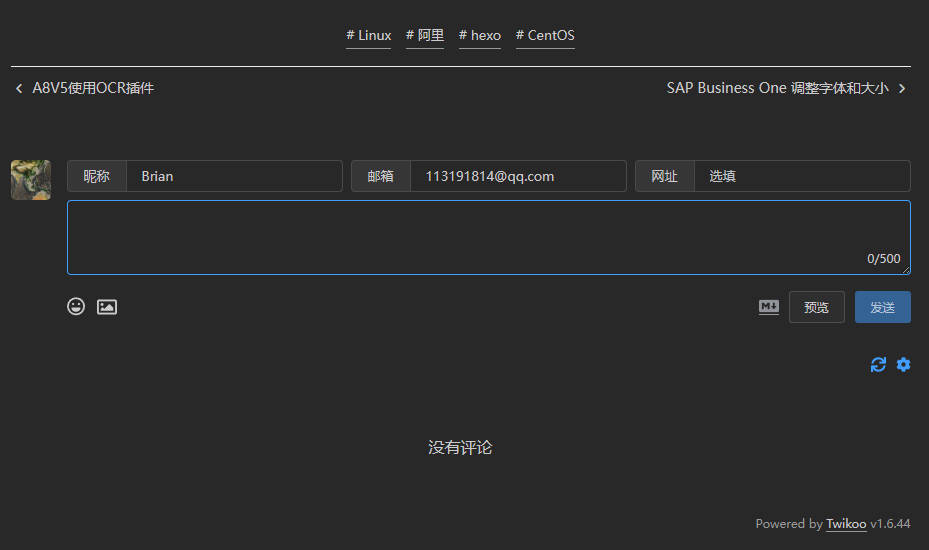
最后,在你的云服务器上部署,看看是否成功hexo clean && hexo g && hexo d